
Your cart is currently empty!
Soil Blocks: A Potless Approach to Seed Starting

Get updated by email whenever there’s a new post
For years we considered changing our seed starting system from self-watering 72-plug trays we had purchased at the big box stores to an innovative tool that extrudes stable cubes via a 4-block square form that marry pot and soil into one. The magic is in the mixture and its ideal moisture content, which then utilizes the air space around it as it’s ‘pot’.
Soil blocks work by providing a nutrient rich medium for the establishing plants. At first, the moisture is a key component to the strength of the potting mixture, yet as the plant emerges and establishes, the plant roots become a key binding agent as they permeate the block. Soil blocks are a very sturdy garden invention.
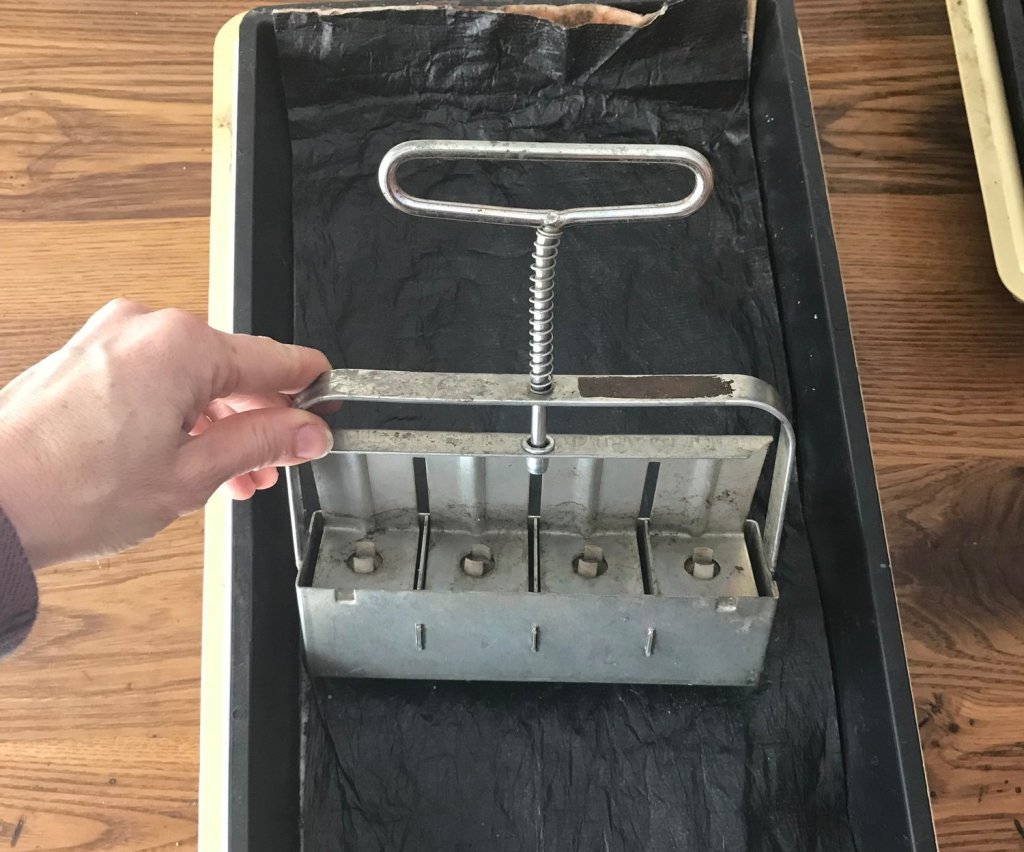
There are several sizes of blocks to choose from when investing in this new tool: from a mini-block at 3/4” to large transplant size of 4”. We hemmed and hawed last Winter when we were investing in this implement, and decided, in the end, to order just one size: a 2” soil blocker; the other finalist was an 1 1/2” blocker. We chose the larger size as we read it could be used as a single pot for many crops, going straight from this block into the field. And that is what we do for almost all of our brassicas, beets, lettuce, and many flowers. The smaller sizes will almost definitely need potting up, so we opted to give some veggies extra room for their first home.
For starts that need extra indoor time or that establish quickly and need to be potted up, we have developed a 4.25” newspaper pot method in lieu of the 4” soil blocker. We had the opportunity to try the 4” soil blocker last Winter, and despite it being the same recipe as the 2” soil block mixture, we could not get the thing to hold together. So, next best is a cubic pot made out of paper. It feels a close approximation to what we hope to achieve by using these plastic-free soil-full, pot-less pots.
Recipe
This recipe is from The New Organic Grower by Eliot Coleman. I highly recommend this book for your garden shelves. It is a well-worn book on our homestead and one we reference throughout the year for various projects and to confirm or deepen our knowledge.
The recipe is calculated in parts. I use a 2 quart yogurt container as my “part” and my lime addition is proportional to this volume:
- 3 parts coconut coir or peat moss
- 2 parts coarse perlite
- 2 parts compost
- 1 part garden soil
- 1 ounce lime
We have diverged from Eliot Coleman’s recipe in that we are transitioning to coconut coir instead of peat moss, and we don’t add the extra nutrients he recommends to our soil block mixture. Instead, we use a diluted fertilizer once true leaves appear.
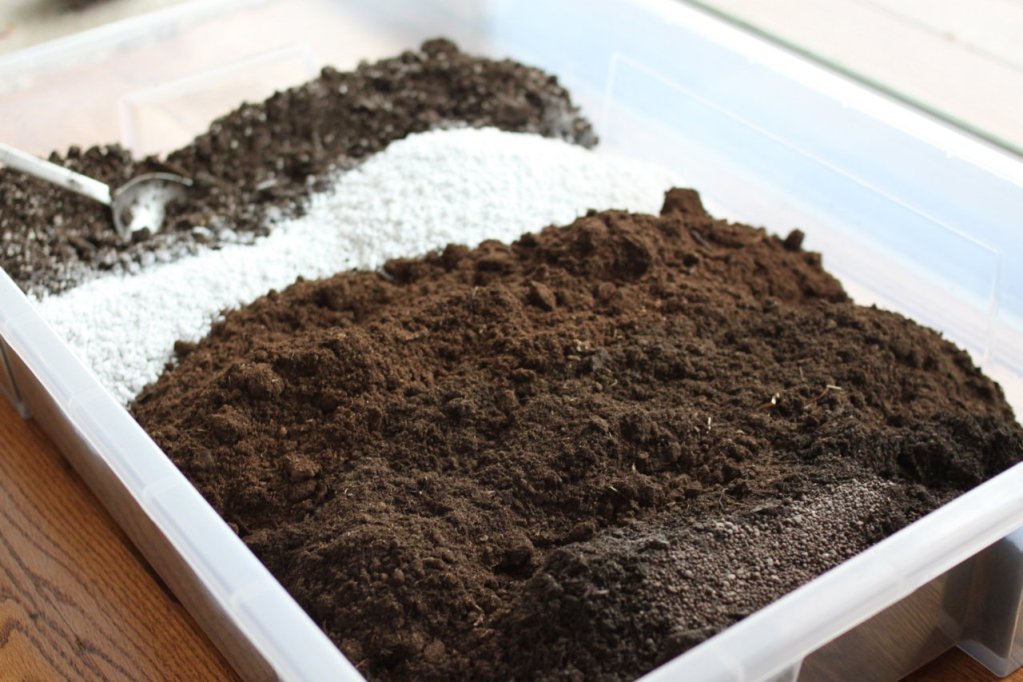
I use a large, shallow plastic bin I purchased at Ikea for the purposes of mixing. I mix all the ingredients together dry, and then add as many buckets of water as needed to super saturate the mixture. I end up using at least half as much water as volume of dry ingredients to get it to the moisture level I prefer. And then, it marinates.
Once mixed, I let it sit for a few hours up to overnight to allow the mixture to fully saturate and blend. The ideal moisture makes the perfect block. I rock the blocker front to back while pressing firmly down to ensure it is a very firmly packed block. Next I inspect the underside of the block and knock off any extra soil, keeping the bottom of the block as flush as possible. If the blocks are bulging, they won’t sit flat in the tray. You can use a knife, but I like to get my hands dirty and simply knock off and smooth off any mounds I find. I usually find mounded bottoms so this is an important step to getting the blocks just right.
FIll the bottom of the perma tray with spring, well, or de-chlorinated tap water until true leaves emerge and then transitioning to a light (half the recommended dose) of liquid organic fertilizer. Keep an eye on the trays every other day as dry indoor conditions will result in dry blocks within 48 hours.
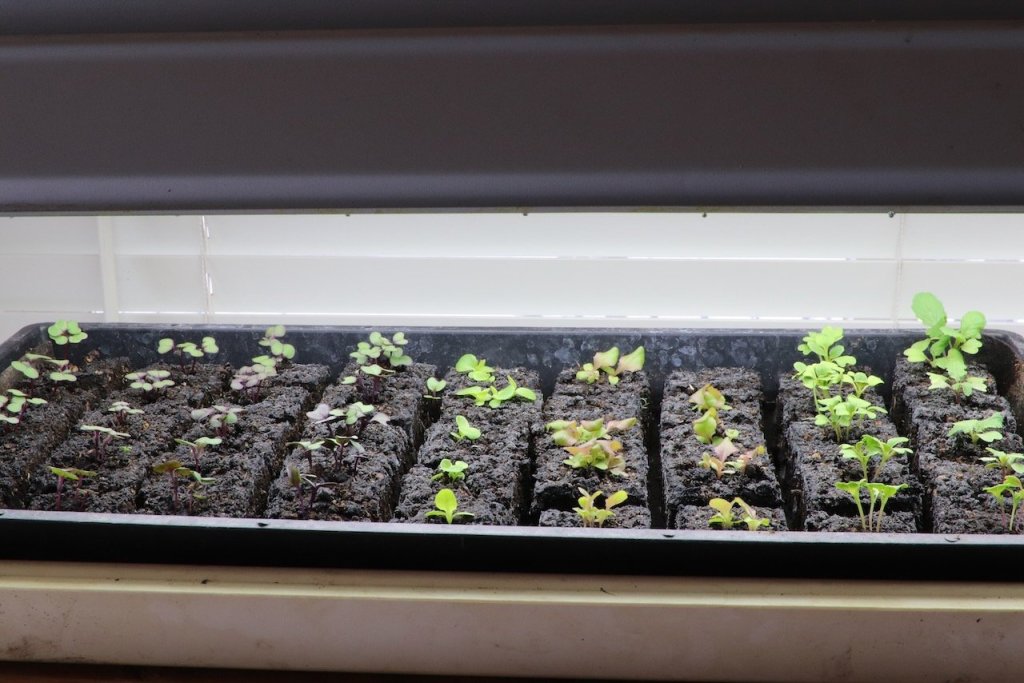
The blocks are pushed out into a soil block propagation tray. We don’t just make them and drop them into unlined trays. We weave cotton rope through the base of the tray and line the propagation tray with a wicking material to help water the soil blocks from below. This provides the base for a passive watering system and we find this system works best for us.

The pale yellow tray is the perma tray, with 1” PVC pipes laid into its grooves. We then rest the propagation tray atop the PVC pipes that act as a trough for the bottom watering system. If you are interested in seeing our shopping list for soil blocks, head on over to my Amazon storefront. I’ve put a list of seed starting supplies up there including the 2” blocker we use, the propagation trays and the perma trays.
Despite being head over heels in love with this process, there are still some vegetables we don’t start in soil blocks. Things like onions and leeks whom I sow in 4” pots from the start just go right into their 4” pot where they hang out until they make it into the garden. Other crops with large seeds like peanuts and squash I start in 3” pots because I want to give their delicate roots as much room as possible before transplant, as disturbing roots can be really detrimental to these vegetables.
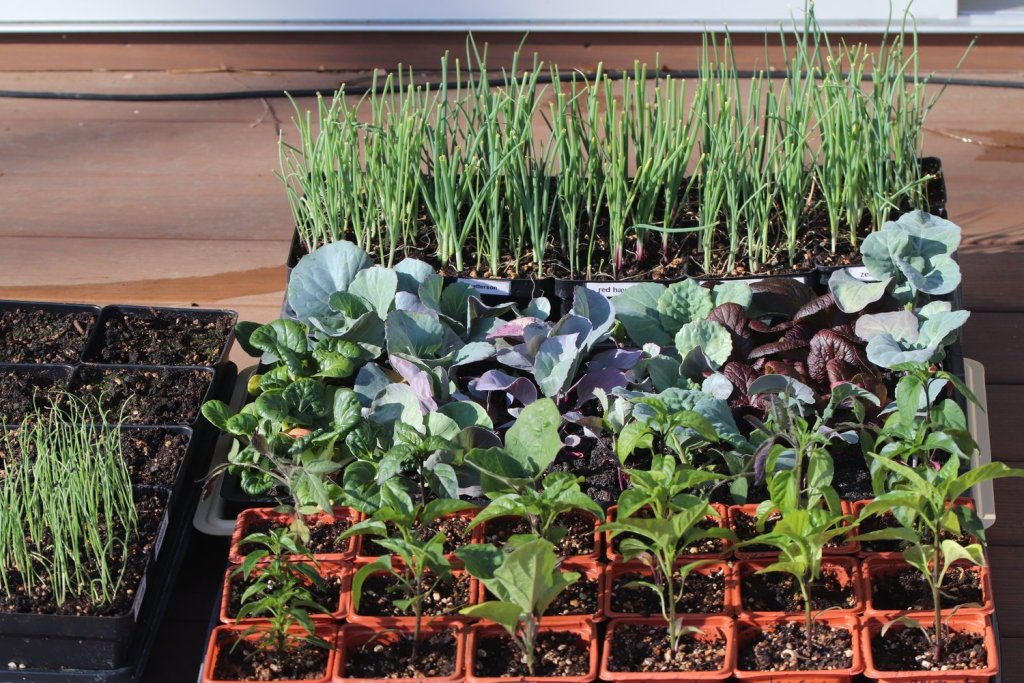
This is late March with plants taking day trips out to the deck for some hardening off. Our peppers we started in February got potted up to the 3” pots we’ve used for a few years; they are flimsy but we are very careful with them and will use them as long as possible. The onions are in their first home, a large 4” pot, while the tray of brassicas behind the peppers are in 2” soil blocks.
A Word about Coconut Coir
I would be remiss if I didn’t discuss the use of peat moss in this recipe. Since this recipe first came to popularity, much research has been done comparing coconut coir to peat moss, with mixed results. It took me several years of trials before I landed on an alternative that in general works nearly as well as this original recipe.
I first tried using just coir instead of peat and was never been happy with the results. Lots of stunted growth, and I now believe it’s because the coir wasn’t properly rinsed. But I’m happy to share that I’ve found Coco Loco potting soil is much higher quality and in general works as an alternative in this recipe.
You might also like:


Get updated by email whenever there’s a new post
Comments
4 responses to “Soil Blocks: A Potless Approach to Seed Starting”
If you’re a subscriber, you can discuss this post in the forums
[…] Meg Cowden de Semilla para bifurcarsequien habla de la naturaleza tranquila y meditativa de bloqueo. Ahora, considero que el bloqueo como un mal necesario cada año toma mucha energía y tierra. Aún […]
[…] de jardim, inspirado no Meg Cowaden SemearQuem fala da natureza silenciosa e meditativa de BloqueandoO Agora, todos os anos eu bloqueava como um mal necessário que exige muita energia e solo. No […]
[…] my gardening mentors, Meg Cowden of Seed to Fork, who speaks of the calm and meditative nature of blocking. Now, I regard blocking as a necessary evil each year that takes a lot of energy and soil. Still, […]
[…] one of my gardening men, Meg Cowden of Seed to forkWho Speaks of the Calm and Meditative Nature of blockingNow, I Regard Blocking as a Necessary Evil Each Year That Takes A Lot of Energy and Soil. Still, The […]