
Your cart is currently empty!
Welcome to Meg’s Blog
-
Endings and Beginnings
Harvest season is in full swing.
The harvests I’m pulling now are opening new doors, charting new seasons. Saving seeds from dried zinnia blooms. Pulling in our bountiful borlotti bean harvests. Chopping down our mustard seed plant, curious how hard it will be to winnow the seeds. These harvests also signify the imminent closing of the frost-free growing season. With each week and each storage-friendly harvest, we leap ever closer to the dark weeks of late fall and our long winter’s nap.

The thoughts of fall and winter crept in during August when I saw how this scene embodied all the seasons — while it’s still full of life, it’s already set seeds and continues to do so. It was a reminder of the seeds I’d want to gather in September.
At the same time, we are mentally preparing ourselves for refrigerators devoid of fresh green beans and cucumbers (and summer squash if you haven’t ripped yours out like I did last month). We imagine a future when our countertops aren’t dotted with tomatoes of all shapes and sizes. We maybe are also realigning our schedule with the shift of the seasons, if we have school-aged children whose calendars have just reset. It’s no coincidence that September is the Jewish New Year (Rosh Hashanah), harvest season of storage-friendly crops, and the start of a new {school} year. So much renewal this time of year.
For those of us who live for summer — I count myself as one of them — it can be terribly bittersweet to acknowledge and accept the end. I ride a seasonal high when school gets out in June and my days can be more carefree. I rejoice in the freedom of planting hot season crops and their promise of juicy foods that require weeks of unrelenting heat to grace our table. But the fear of the long, cold, and dark winter months and probability of slumping into seasonal depression can spike anticipatory anxiety in any season, but it’s particularly problematic this time of year.
But when we garden, we are given an opportunity to not only plant beyond the first frost (hello roots and hearty greens) but to also widen our gaze and reframe the seasons. Because within each season is a new season on the horizon. It’s so much more than just ripe produce. Some seasons are focused on external growth, growing plants and harvesting their fruits while others are focused on the harvest and the internal growth held within.

I chose these specific colors of gomphrena to blend together into a big wreath … someday.
I’m currently on a mission to harvest my everlasting flowers, mostly my gomphrena because I rarely get to my strawflowers in time. The gomphrena somehow managed to put out really long stems lately, and are screaming at me daily to clip, bundle, and hang to dry. I’ve wanted to make a gomphrena wreath for a while now, and maybe this is my season to make one. Or at least, to harvest enough to someday make a wreath.
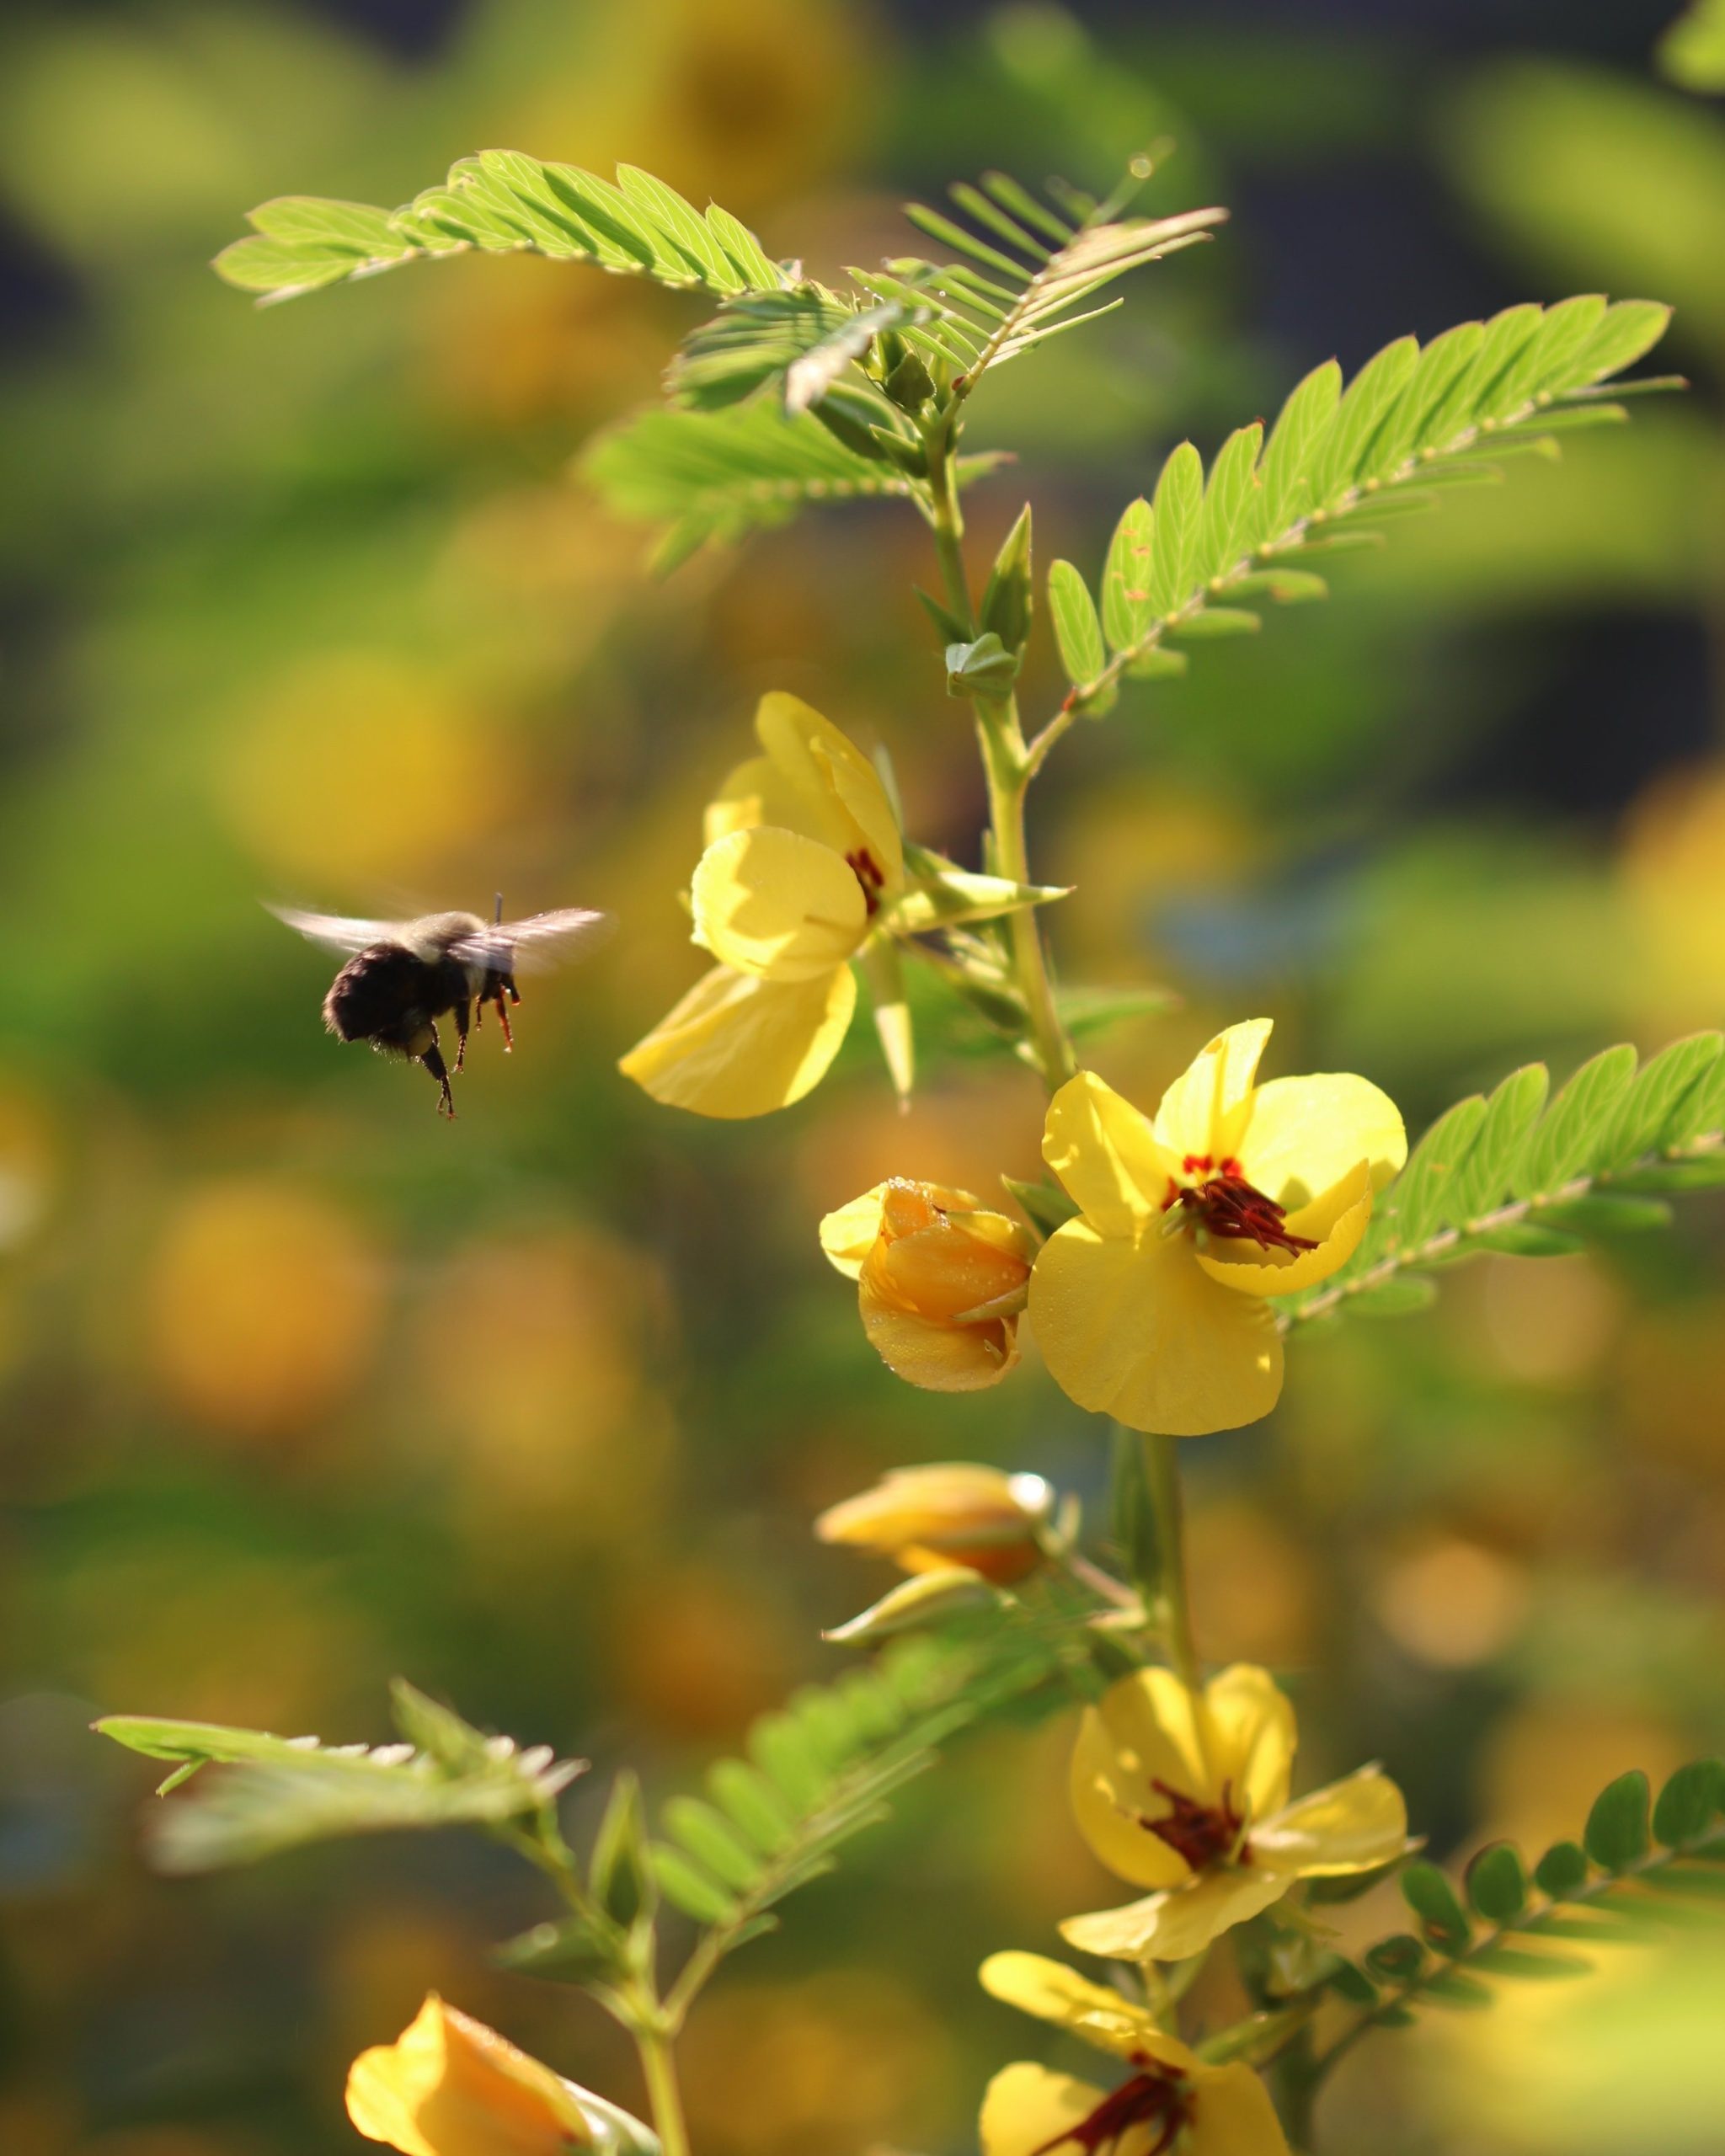
Outside of the annual garden, I see so many wonderful prairie plants that have set seed too, seeds I can harvest, store, and gift, sharing a new season, a new plant relationship with others. Partridge pea is top on that list, an annual prairie plant that popped up in a corner of our garden after we remodeled in 2021. I have to time my harvests carefully as the seeds literally pop out of their leguminous pods, leaping several feet away, slowly increasing their range if the surrounding land accepts them. Our little bed of partridge pea has blossomed from a few plants to many square feet over the past two summers. It’s a delight, a bee haven, and a completely self-sufficient little native garden.

Partridge pea flowered for over a month, buzzing audibly every sunny day of summer. Now it’s time to collect some seeds to share with others, and let most self-seed around our garden. I see so much hope and renewal in fall, mixed right in with the death and decay. This ability to accept autumn as a season of new beginnings is one that took almost 20 years to realize. But it’s clear. This is a season of seeds.
Seeds are the beginning of new chapters, new gardens, new seasons.
Seeds hold entire gardens inside, just waiting for us to dream them up, and wait through the off season before tending them.
-

Low Tunnel Guide: Selecting + Setting Up Low Tunnels to Spring Ahead
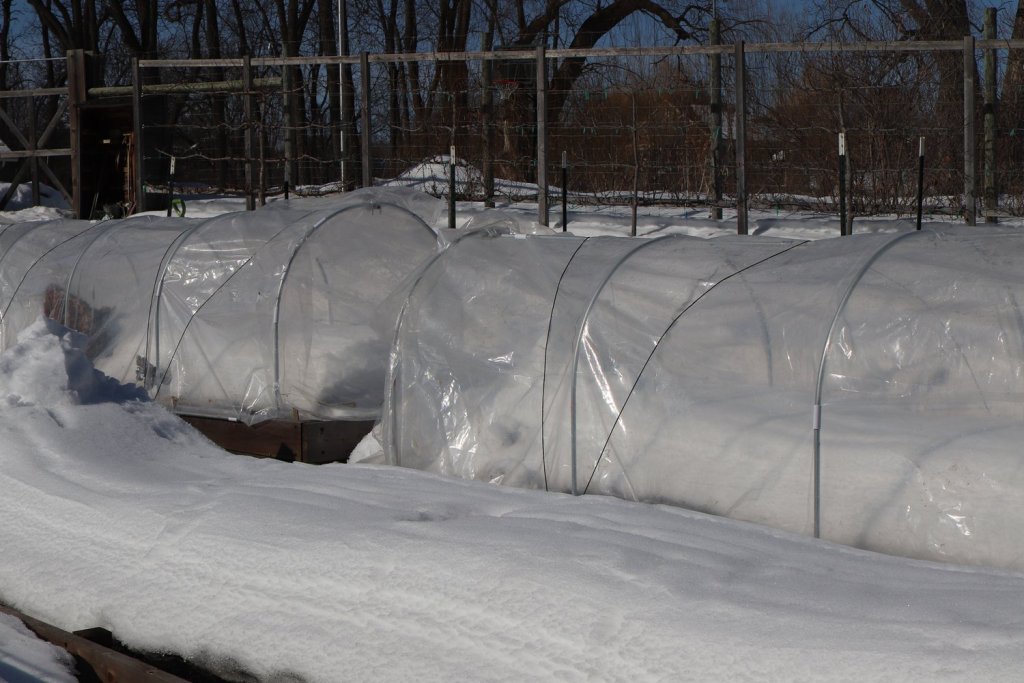
If I could propel each of your growing seasons, it would be with this modular system: setting up low tunnels in fall. This has a positive, cascading effect across your entire growing season. And it’s something that is much, much easier to do before the ground freezes.
If you’re in a warmer zone than me — chances are high many of you are! — this post is coming with plenty of time to implement. For all zones, this task can be completed in the coming month or so. If you’re in zone 4 or colder zone, the drop-dead date would be pre-Thanksgiving (last Thursday in November, to my international friends).

We use the same EMT conduit to cover our blueberries (bottom of image) to protect against birds, which has seemed to become a growing issue alongside the drought. For those tunnels, we have added an extra 12” to both sides (to make it 12’ total length with a female-female connector to make them high enough for the taller plants. The only thing you need to do this fall is set the frames up. Don’t wrap the beds in plastic just yet – that comes much later. We want the rain and snow to soak into the beds for as long as possible this winter before covering them, and honestly, you’ll just end up needing to shake snow off the tunnels in January and February if you put it up now, so you’re saving yourself a lot of extra work by waiting. And adding some of the best irrigation to your beds in the meantime.
You can see how when we had in-ground beds, we set them up right at the edge of the side of the beds. We often used snow to heel in the sides, especially the north side of the tunnels until the snow melted. Worked great! If you’re using PVC, which is easiest, fastest, and more economical in the short-term to setup (but not as long-lived), the most critical task is to pound the rebar into the ground before it freezes. I share more about that in the video below.
Though if you’re making that effort, bending the PVC pipe into place will take all but another few minutes. And while you’re out there, zip-tie together the cross brace too. You are literally framing these in, but not finishing the build until late winter.
A Tale of Four Tunnels
Your garden, your rules. This is a mantra I live by.
I show you how we do things, you take inspiration and either follow suit or riff off what we’re doing.
I am showing you how to setup low tunnels a few ways with either PVC or metal conduit (called EMT, electrical metal tubing) – or even just some lightweight metal for a more temporary system.
You can install the more sturdy PVC or EMT low tunnels one of three ways:
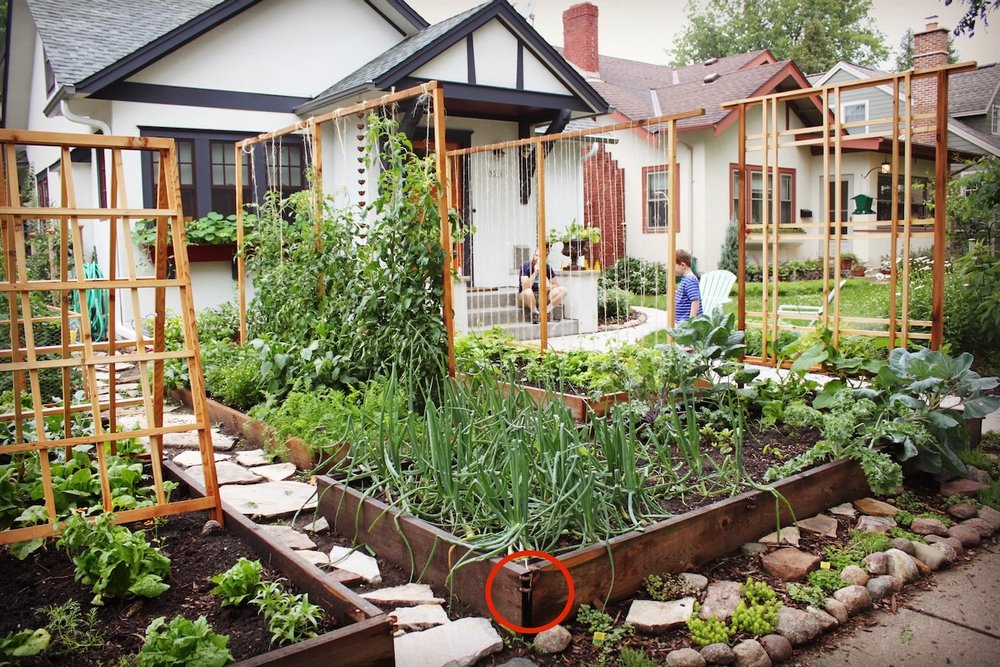
Our original, raised bed garden in south Minneapolis circa 2008. How cute was this front yard?! We used to do a single leader for tomatoes back then, and as you can see all our tall crops are positioned on the north side of the beds. - Secured to the outside of your raised bed with 2 straps (for holding the bent pipe or PVC in place). Side note: this was how we originally did it back in 2006.
Spring 2023: we trialed the added parachute cord to help hold down the plastic. We did switch to greenhouse poly in 2022. It’s clearer and thus lets more light in, but it still does tear though not quite as easily as painter’s poly. 2. Secured to the inside of the raised bed with sleeves for the pipe to go into. (This is how we are currently doing it)

Our OG low tunnels were PVC, rebar, and 6 mil poly from home depot — plus extra large binder clips and some bricks to hold it all down. 3. Secured to the ground on the outside of the raised bed OR directly into the ground for in-ground beds (this is how we used to do it here before we transitioned to raised beds.)

Lastly, you sometimes see me using these smaller, more mobile low tunnels. We call them wickets, but I think they are actually known as low tunnels too. Made of #10-gauge corrosion resistant galvanized steel wire, they work well with 84” Agribon and are a much lower profile for seedlings or just seeded areas.
They are not as strong or durable as PVC or EMT, and shouldn’t be used for any type of winter covering. I use them for spring frosts, summer heat waves, and those inevitable early fall plunges that are sudden and short-lived (to eek out another few weeks with my greens).
I don’t ever use these for tomatoes or peppers, but do use them for insect netting on young brassicas and will also use them for shade cloth in summer, as well as if I want to go crazy and DOUBLE COVER things in a low tunnel. This is pretty rare for me, but I have done it in the past, where I had some late lettuce I was trying to keep for as long as possible. If I had the right crops, I could see this happening again in the future.
As a general rule, I prefer to use the lowest tunnels in spring and summer more than fall. And that’s because the fabric will freeze and stick to not only the soil but also to the bricks we use to hold it down. It’s definitely not a perfect system, but we got them for like $.25 each from a friend who was selling her organic farm and everything in it.
As you can see, we try different ways of doing things. Often.
And honestly there’s no perfect system.
With climate change I have found our tried and true ways no longer serve us and we continue to work to refine our system. What worked for us back in our city gardening days didn’t end up translating out here in large part because of our mowed paths, our desire for a super clean aesthetic (we didn’t want the clamps to be visible on the outside of the beds), and because our climate is getting windier. The tunnels and how we secured them has had to continue to change to adjust to our changing climate.
Materials
Raised Bed Low Tunnels with metal conduit:
- 4 ½” EMT metal piping (10’ lengths)
- 12, 1” One-hole straps (can buy in small bags or larger boxes)
- Pipe cutter to cut the cross brace
- 12 1” outdoor decking screws and possibly 12 washers for straps (our screw heads were too small for the clamps and they have fallen off)
- 6, One-inch PVC cut to 6” lengths (for receiving the metal conduit)
- 3 1” Cross connectors (one for each hoop)
- Low tunnel pipe bender (Not an affiliate link — be sure to order the right size for your beds – we ordered the 4’ wide one)
In-Ground Low Tunnels:
- 12” long rebar (comes in 8’ lengths from home improvement store)
- Angle grinder to cut rebar
- Either PVC (schedule 40) or metal conduit (if metal conduit, you need the pipe bender listed above)
- Hammer
- Zip ties (for pvc cross-bracing)
- Cross-connectors (for metal conduit cross bracing)
For late winter:
- Poly (either 6 mil painter’s plastic or greenhouse plastic)
- ½” snap clamps for metal conduit
- ¾” snap clamps for PVC
For Lightweight, Temporary Low Tunnels:
- Low tunnel hoops, like these from Johnny’s (not an affiliate)
- Agribon or other fabric (84”)

Parts you’ll need for metal conduit hoops if you want to follow how we installed them. You can drop the pvc slip inside the straps if you attach them to the outside of your beds instead of the inside. I’ve added a Low Tunnels idea list to my amazon page (affiliate link) so you know what clamps, straps, and cross connectors to look for. The cross connectors are an online purchase (I bought mine via amazon) but the rest is readily available at your nearest big box home improvement store or possibly local hardware store. The snap clamps I’ve bought both on amazon and from Johnny’s Seeds.
Here’s an 8-minute video about how we set these up. I go into more detail in this video, so it’s worth a watch.
I sure hope you’ll consider adding low tunnels to your garden if you’re not already using them. They really do help me weather late winter with more grace than I knew was possible.
-
September Vibes
It’s a really good thing I committed to more flowers in our vegetable garden this summer. Because I’m exhausted, per the usual late summer fatigue of processing hundreds of pounds of tomatoes, succession planting for six months straight, and keeping up with all the other intensive summer vegetable harvests and processing needs.
And to be clear, this is all a voluntary, self-induced fatigue that over time will transform from fatigue to romance once the subzero temperatures freeze us inside huddled by the fire. How quickly our minds twist exhaustion into something that took little effort.
My fatigue is buoyed by the hundreds of annual flowers I planted in the garden this year. So let’s celebrate some of my favorite views right now.
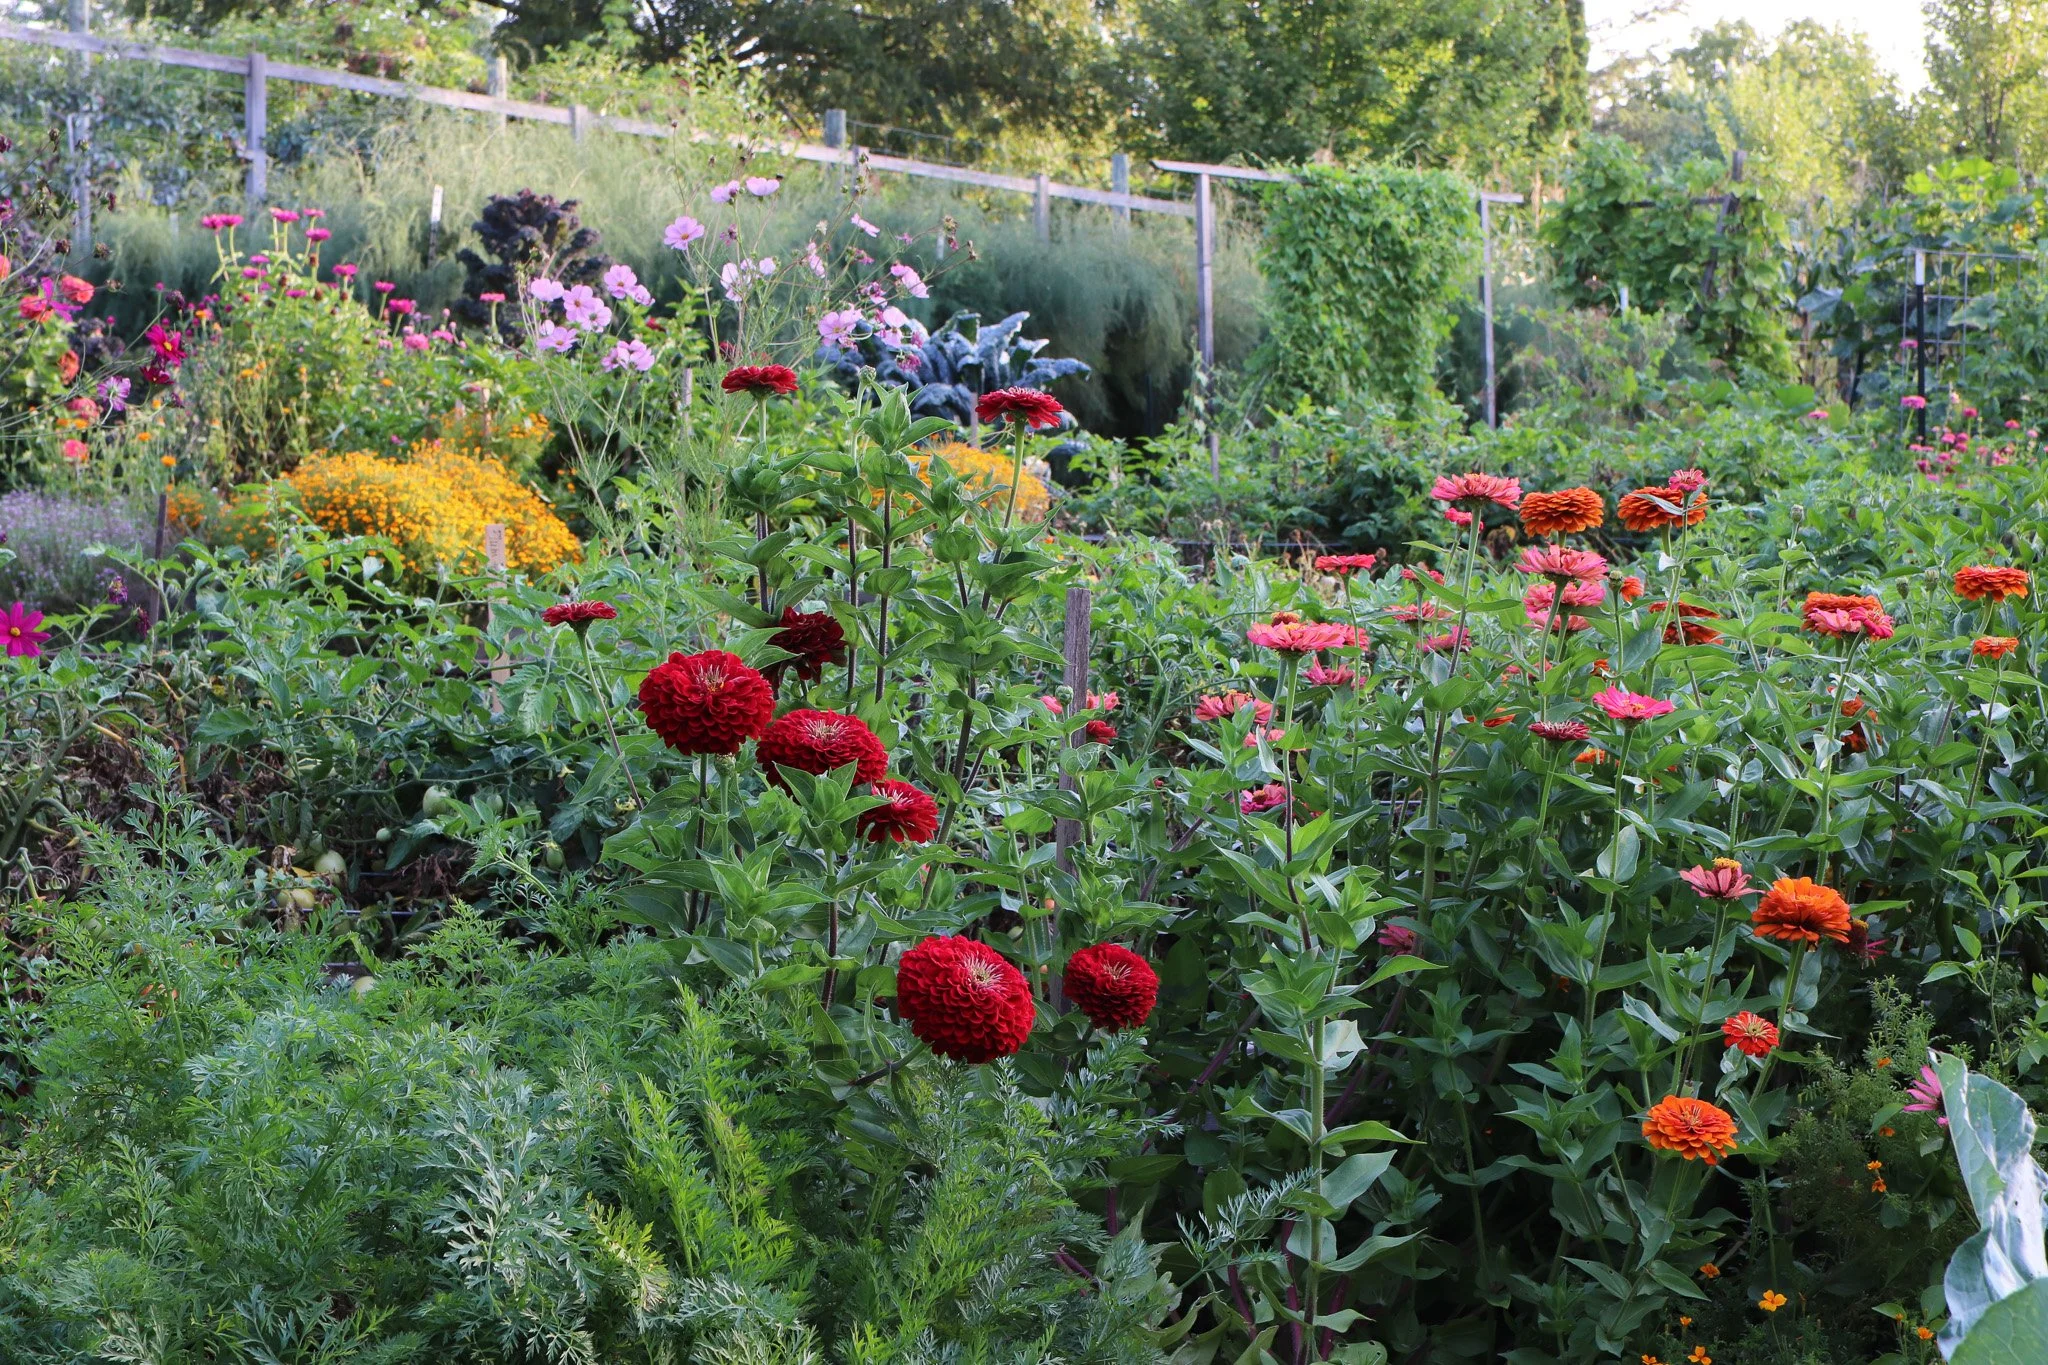
If you stand at just the right angle right now, you really could be in a flower garden. And I’m pretty pleased with how the layered flowers across four beds seen here makes a bold color statement. I’m especially happy with this brilliant red zinnia (I think it’s Benary’s Giant Wine from Johnny’s Seeds).

The Benary’s Giant series is one of three types of zinnia I grow. Orange Benary’s Giant is another reliable producer for us, and it’s a favorite with pretty much anything with wings. I think the pink ones here are Senora, though not as impressive as older seed has produced, so I’m not sure what’s up with that.
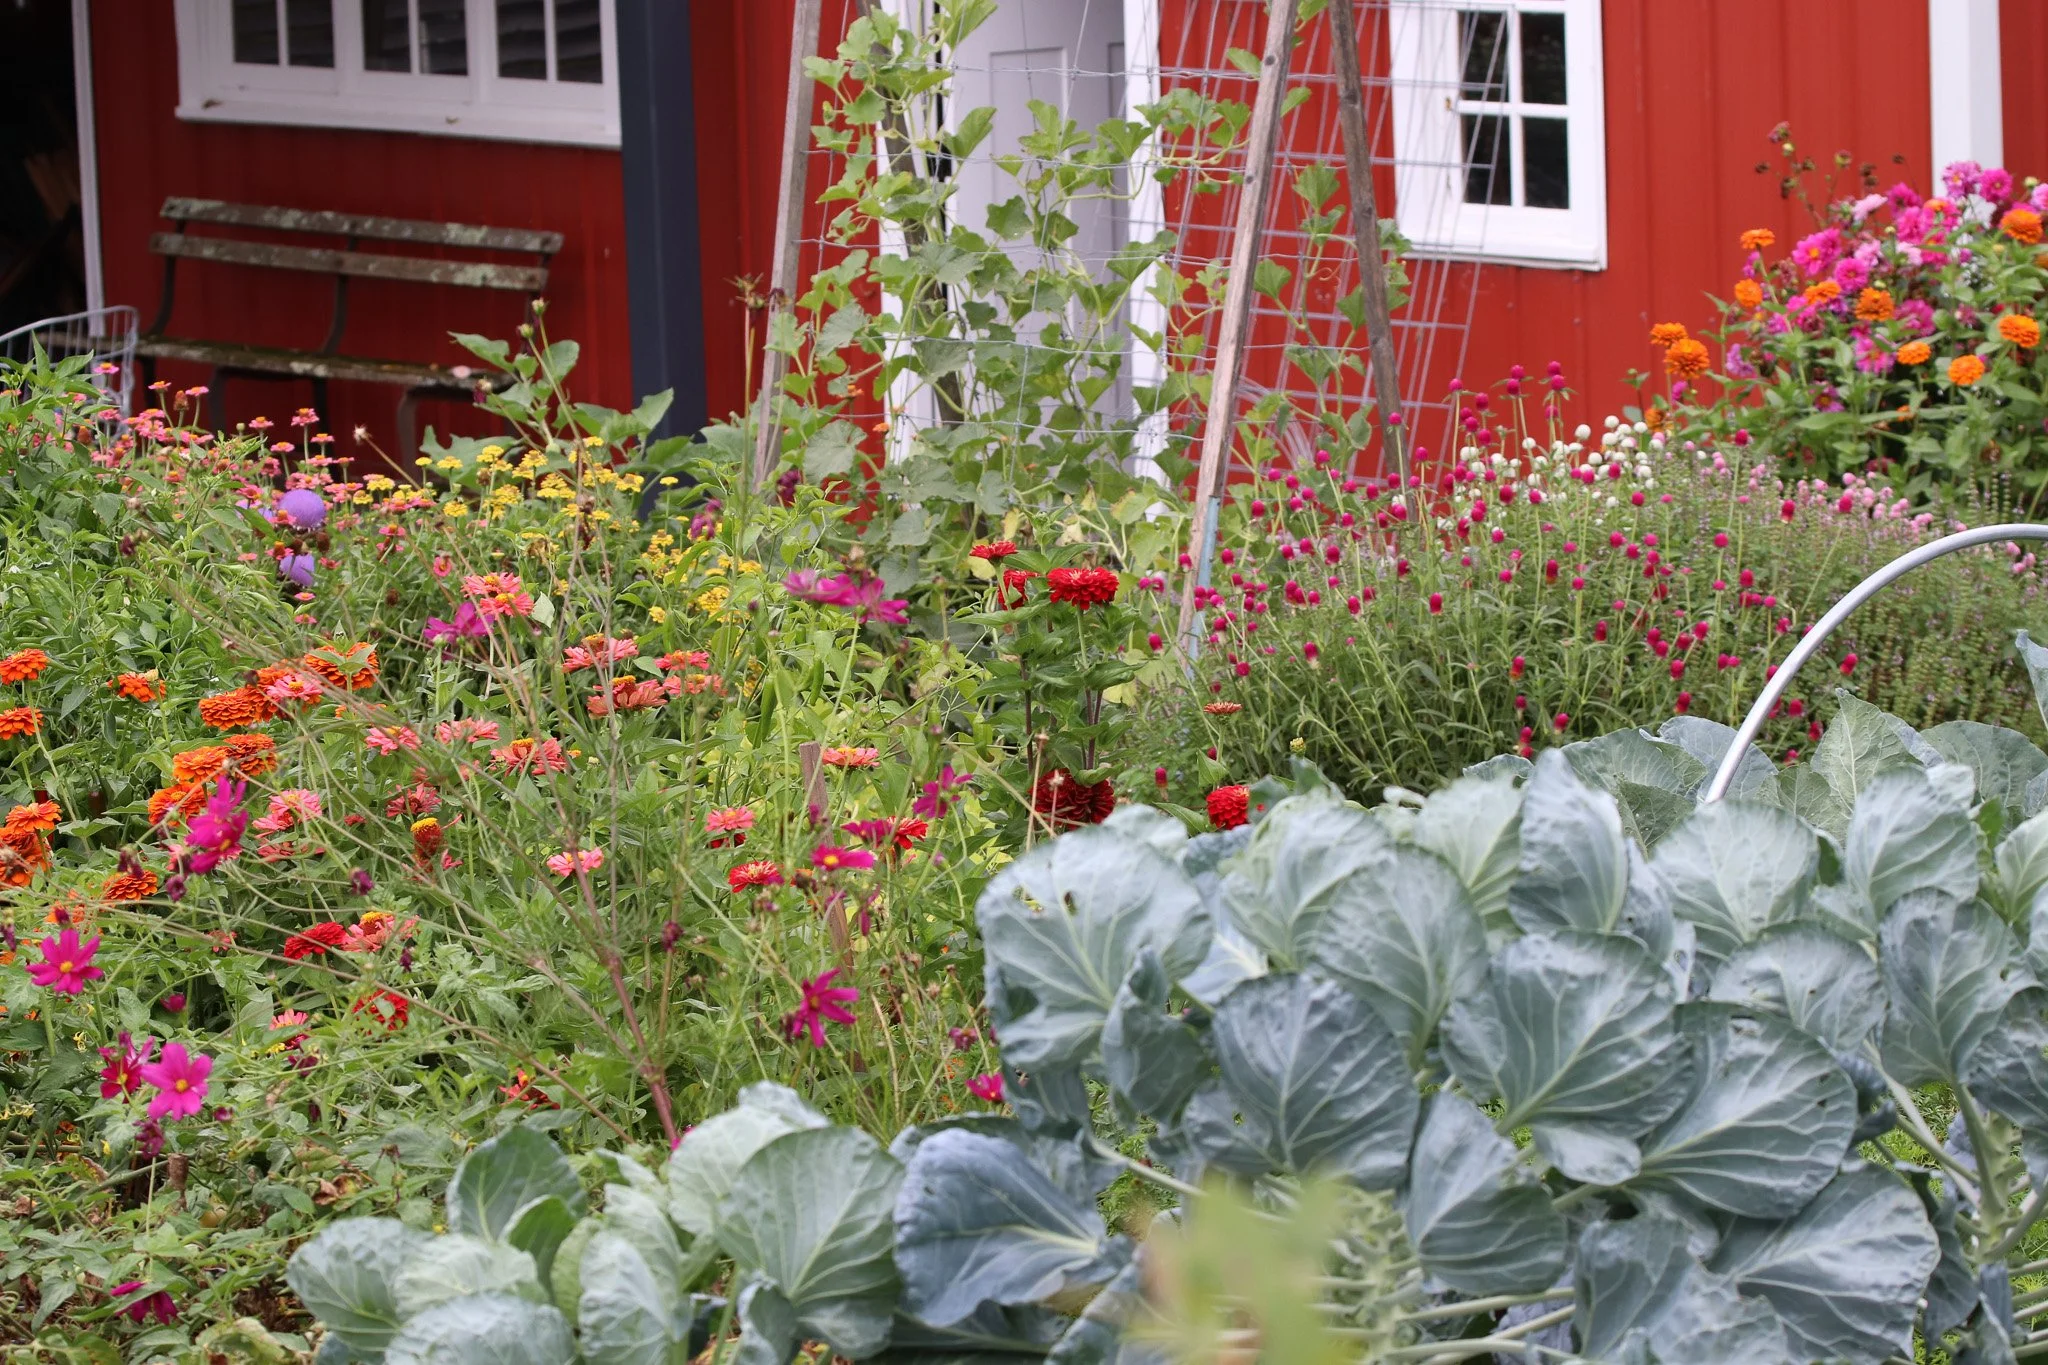
This is another great cross section, basically looking in the opposite direction as the first image above. Again, with a view of five beds, you get a big burst of color and texture with some pops of vegetables mixed in. It’s high up there on my current favorite view here.
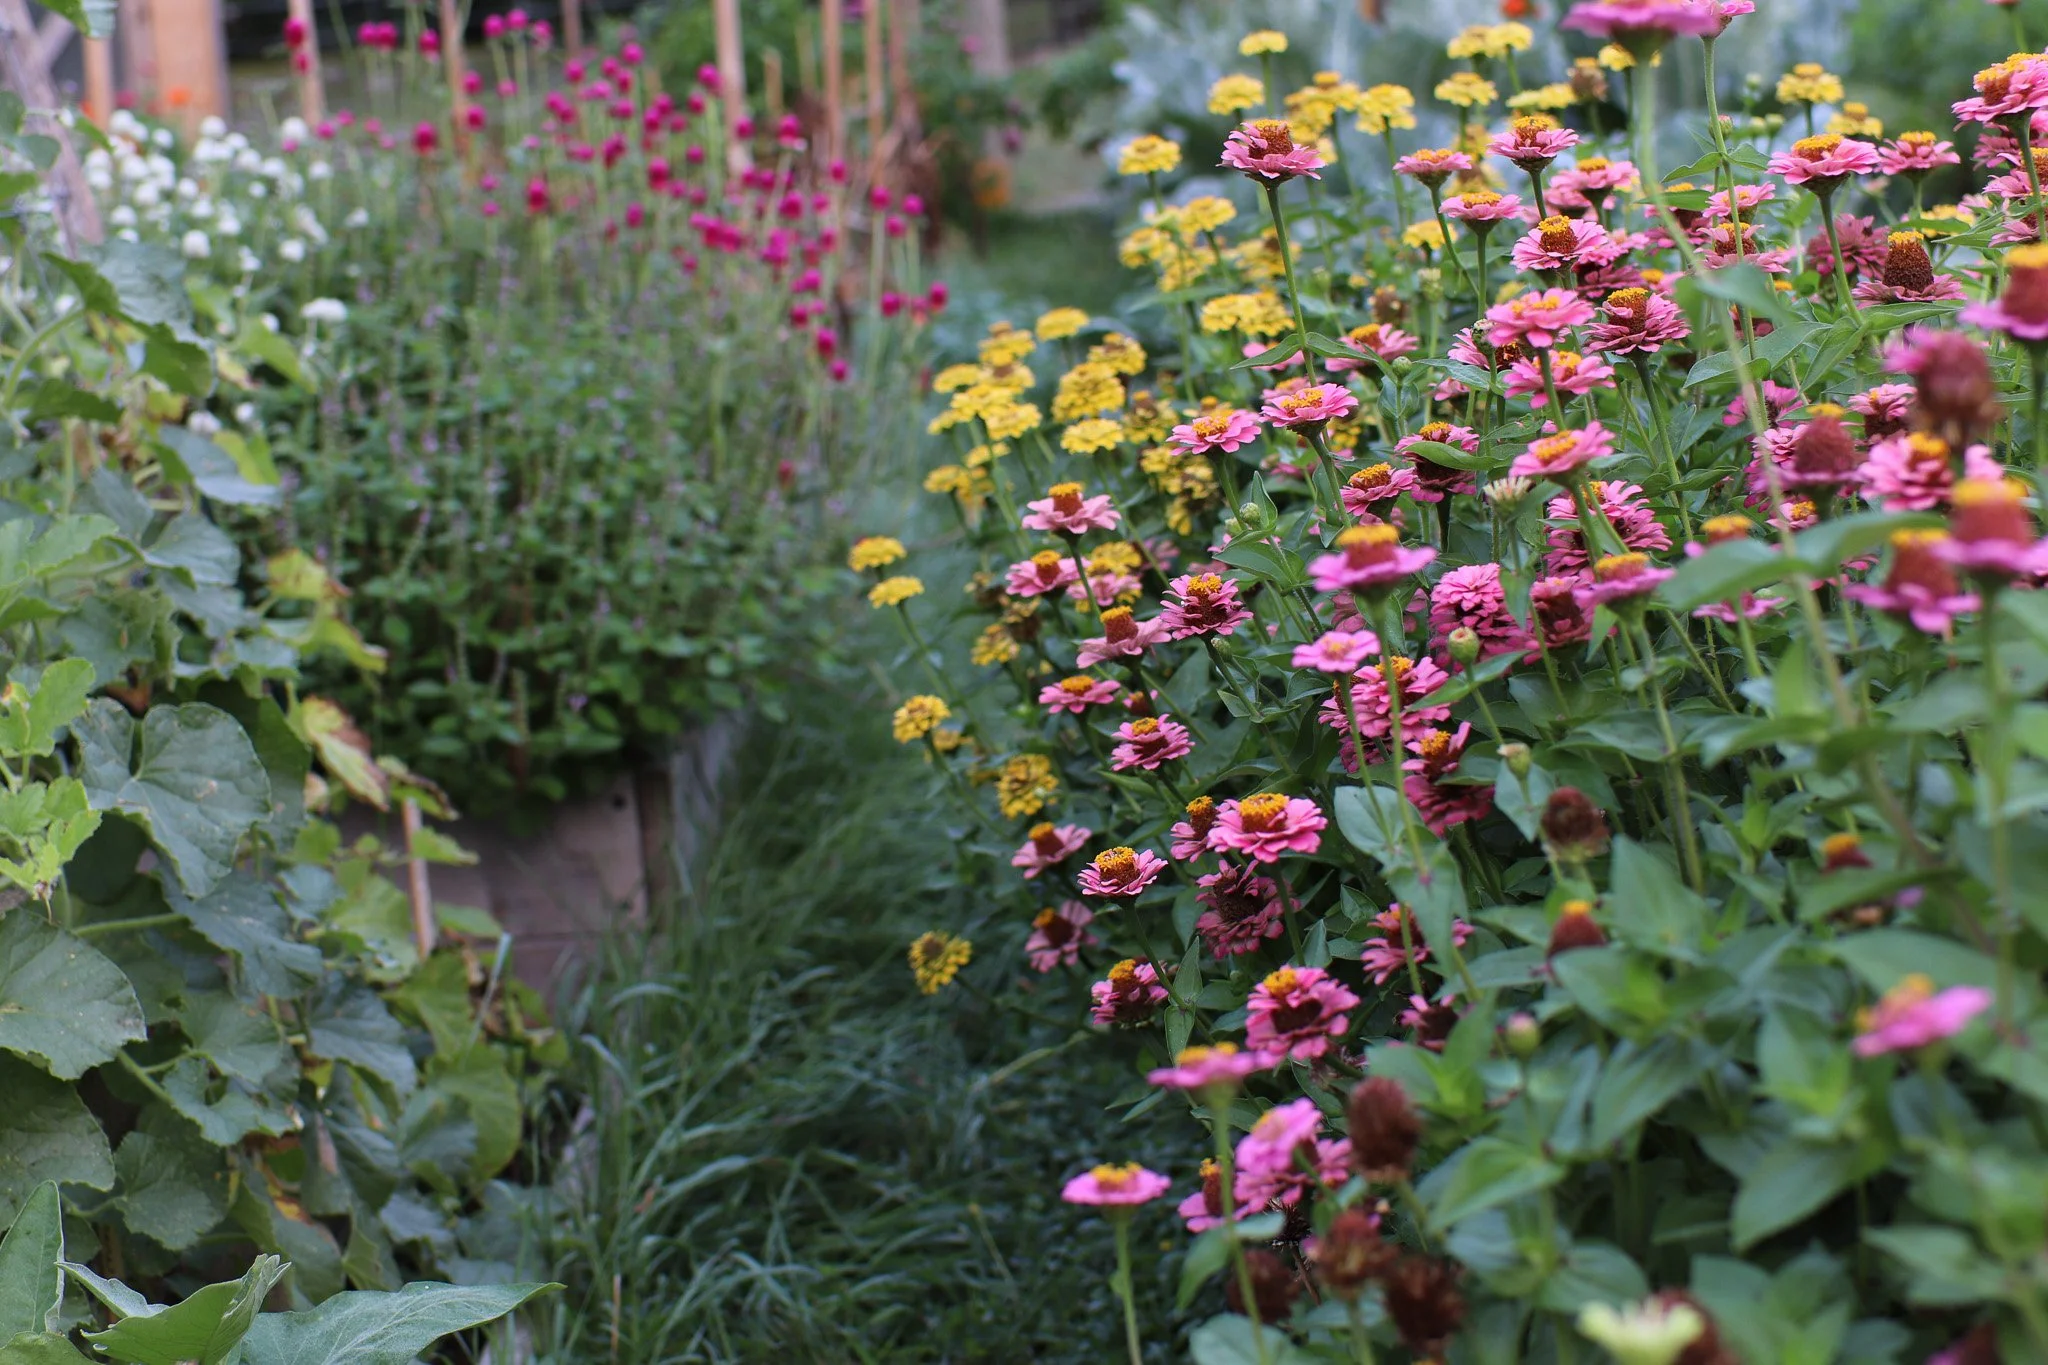
I have been blown away at the productivity of these Thumbelina Zinnia, a new zinnia variety for me this summer. I paired it with my artichokes here, and the extras are tossed in and around other beds. It has been covered and buzzing with pollinators for the past 2.5 months and my garden will never be without it ever again.
-
My Favorite 30- to 40-Day Varieties
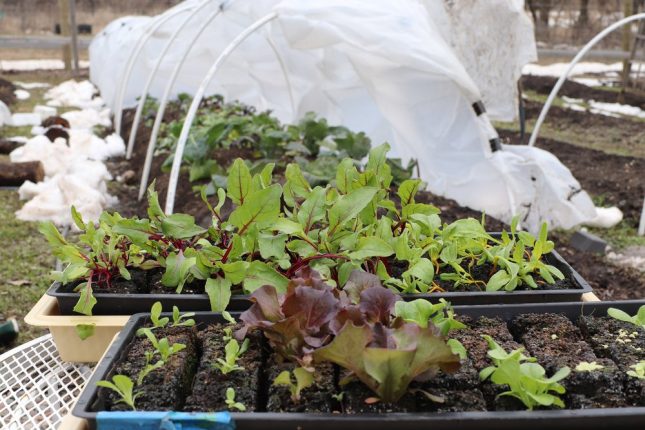
I talk a lot about these quick crops. Now is the time in zone 4 and cooler to be seeding these veggies for late fall harvests – and even for overwintering and early spring harvests, too.

I’ve linked to different seed companies, but you can honestly find the right mix from any one of these companies, or others too. These just happen to be where I usually buy my seed.
Quick Radishes
Any 28 or 30-day radish will do. These are some of the ones we like to grow, from classic red (Sora), to more colorful mixes:
Arugula
I’m not as picky with my arugula seeds. I most often just grab them from Botanical Interests when I’m at the grocery or garden center.
Spinach
You want to be sure if you’re growing spinach for overwintering (you should be!), you select cold hardy varieties. I sow it as late as the fall equinox here, which can be right around our first frost some years. Matador and Giant Winter are ones I’ve effortlessly overwintered without ANY protection here in zone 4:
- Matador
- Giant Winter
- Bloomsdale (I’m not sure I’ve used this for overwintering or not yet, but I did sow it this week)
Cilantro
Cilantro is remarkably cold-tolerant and we can harvest from it well into fall past those first hard frosts. You can harvest it at any size, too, so get those seeds sowed. Best to be sure to fully cover them as they tend to take a little longer (larger seeds) and seems to prefer darkness to germinate.
Salad Turnips
I almost forgot this root — and I’ve even forgotten to sow it (will remedy that today!). This 35-day variety is like a sweet, mild horseradish. A horseradish candy, if you will. So, so good!
Mustard Greens
These are really fast growing brassicas. Great for early spring direct seeding too! Territorial Seed has a pretty great selection in my opinion, and is usually where I source them from.
Broccoli Raab
This is the trickiest brassica for me. Even when direct seeded in late August it has bolted on me in the warmth of October. I need to keep trying because its expedience to harvest is worthy of deeper study:
Tatsoi
A fun bok choy relative, I direct seeded some of this last week for our fall garden:
Mesclun Mixes
Admittedly not something we seed because we find the lettuce too limp, but these mixes are quick producers and could yield salads yet this fall:
- Mesclun Mix
- Chef’s Medley (Botanical Interests has several mixes to choose from)
-

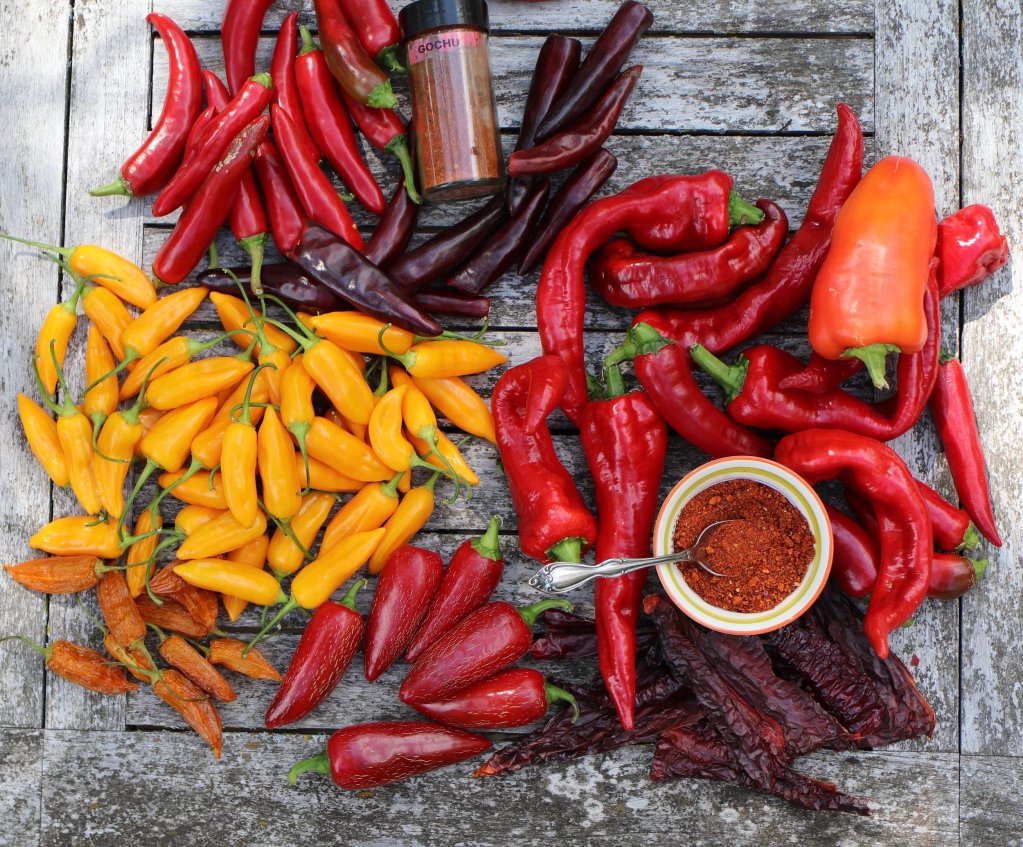
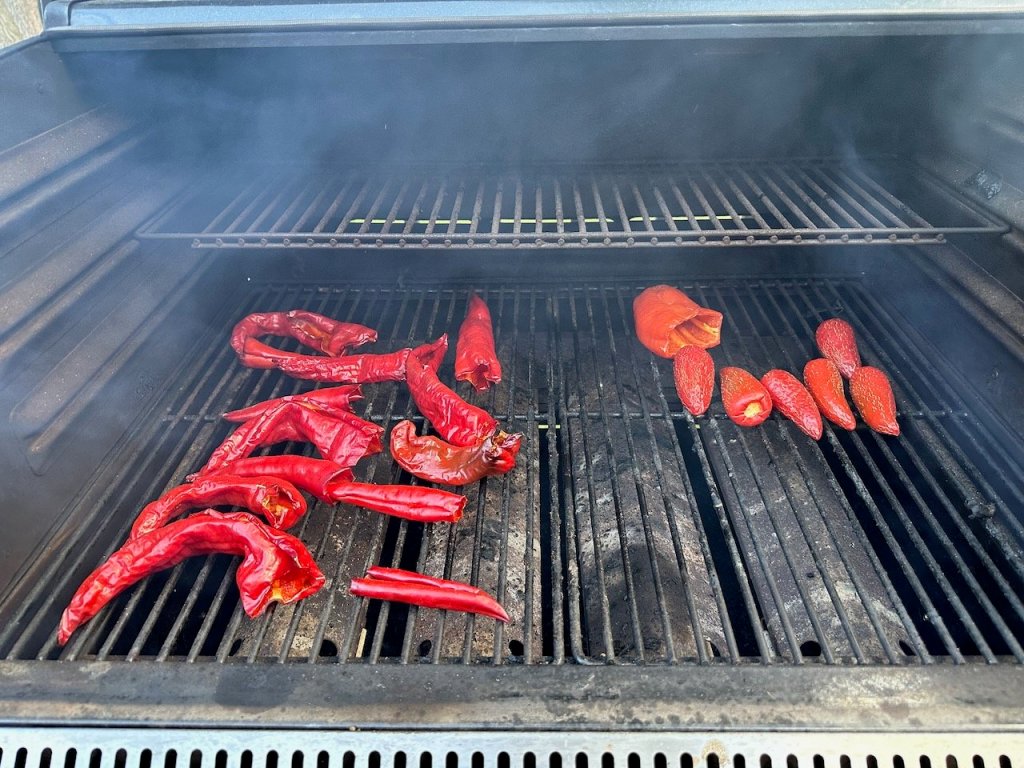
Smoking + Dehydrating Peppers
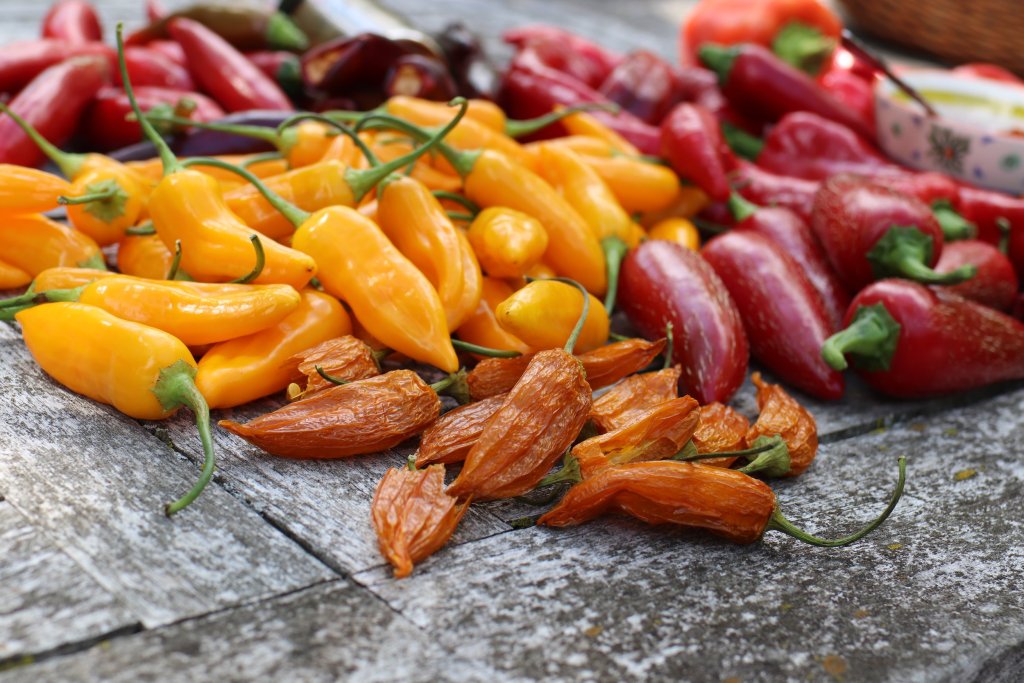
With every passing year, more and more of the peppers we grow are for spices. They are used nearly daily year-round in the kitchen. And it’s one of the most fun seed to fork projects we’ve added to our annual processing since growing on this scale.
This year we’re growing Early Jalapeño, Aji Amarillo, Baby Aji, 3 varieties of paprika (Feher ozon, Gernika, Magyar), Mareko Fana (berbere spice), Hong Gochu Large, and Poblanos, all for drying or smoking/drying.
We’re also growing hatch chilis, Ralph Thompson, and King of the North and Gourmet bell peppers.
In this post I’ll show you how we smoke and dehydrate both sweet (paprika) and hot (many types) or peppers. And I’ll also share which peppers we always smoke, and which ones we never do.
Paprika and Gochu were definitely the peppers that helped us turn this corner and see a whole new horizon ahead of us. Before about 2018, I hadn’t fallen off the pepper deep end, I guess. I grew habañeros and serranos and made fermented hot sauce, but other than that, those peppers were just too hot for us. (I know, it is a little hard to believe, but it’s true).
Equipment
For smoking — a new in 2022 possibility for us — we use our Camp Chef dual fuel (pellets & gas) grill.
For dehydrating, we use our very old and reliable American Harvest Dehydrator. There are much more expensive dehydrators out there, and every year I say to myself, I’m going to invest in a new one, and yet every year this old lightweight one does the job for us just fine.
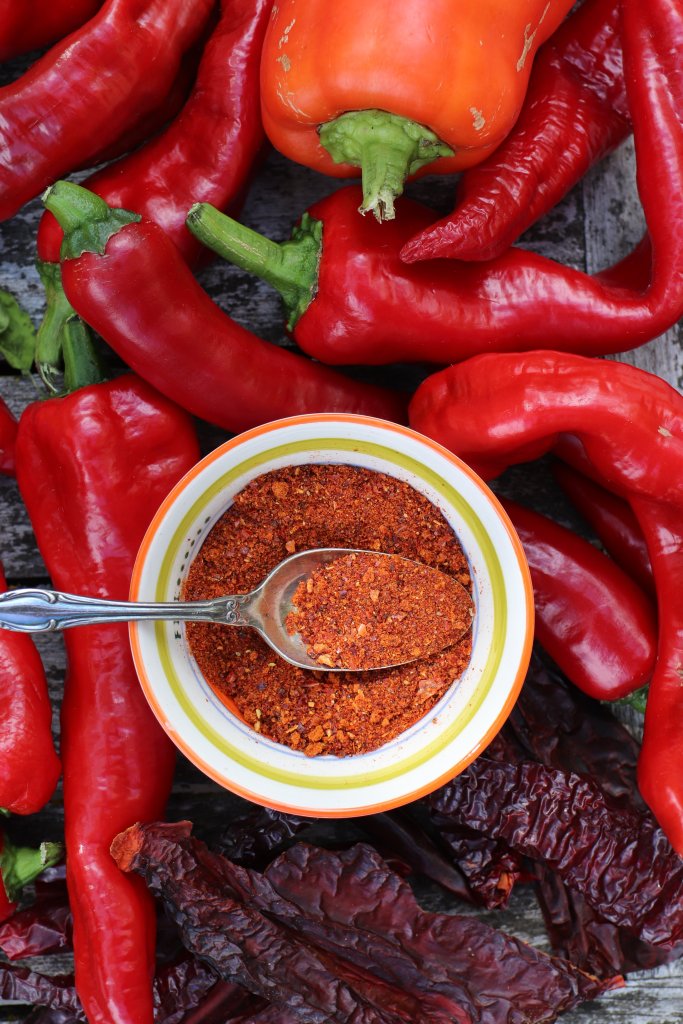
Smoked or not, homegrown paprika is so flavorful and fun to grow (and gift!).
We have been dehydrating paprikas for many years longer than smoking them was possible. But it definitely elevates the flavor. And – and! – smoking and dehydrating takes some household peppers and transforms them, such as jalapeños magically become chipotles and poblanos shrivel up into anchos. I find this all a bit confusing, but I’m learning.
When is a pepper ready to be dehydrated?
The question of ripeness should be addressed. Can you dehydrated any pepper? The answer is yes. But I prefer to wait for full ripeness to dehydrate. The full fruity flavor of a pepper doesn’t develop until it reaches its maturation. Sort of like the difference between a green bell pepper and a red bell pepper, two peppers, same plant. Very different flavor! (Could you imagine a green bell becoming paprika? The flavor just isn’t there.)
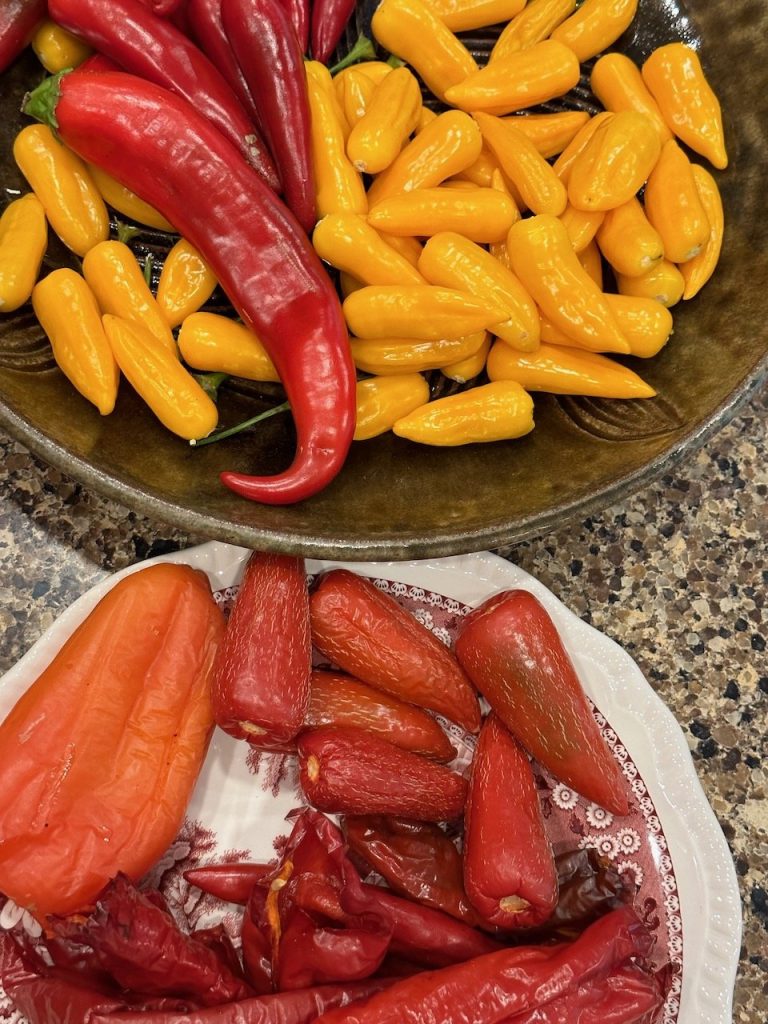
op: baby aji amarillos and a hatch pepper waiting to be dehydrated. Bottom: smoked peppers also waiting to be dehydrated.
Smoking is optional but really does add something special to the peppers. We mostly just smoke paprika and jalapeños, though John also tossed some gochus on the smoker last weekend as well just to see what they taste like.
Instructions
For Paprika and other sweet peppers you want to smoke and dehydrate, cut off stems and derib. Slice open. You only want to smoke and dehydrate the flesh. Get as many seeds out as possible too.
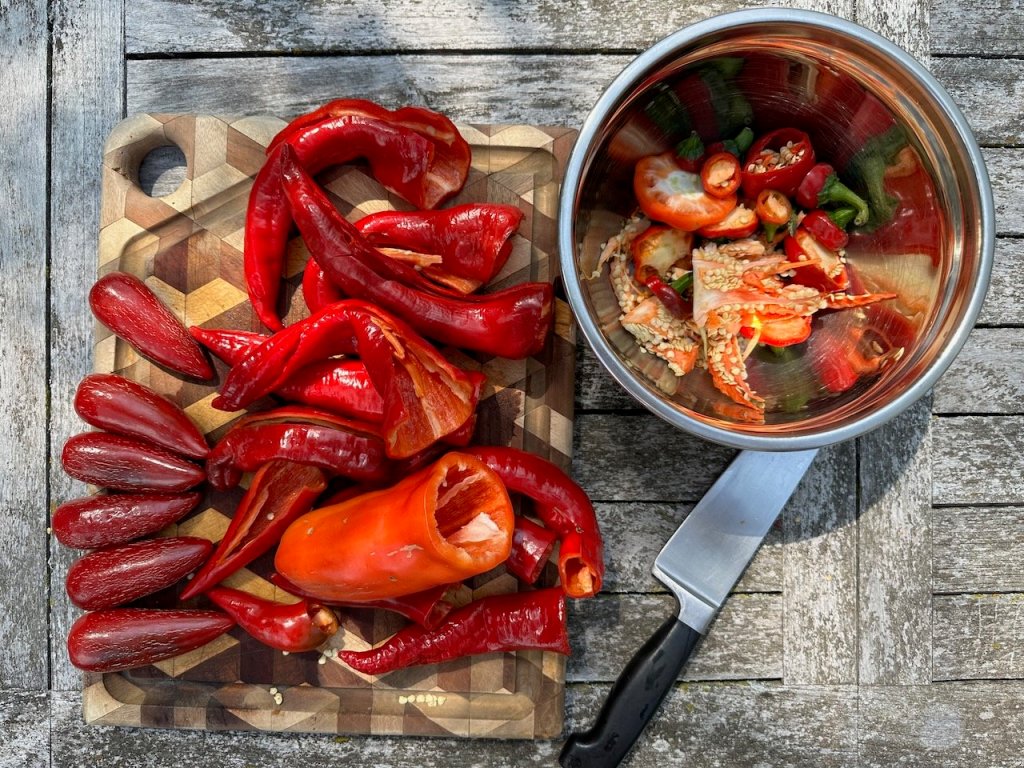
Stems, ribs, and seeds taken out of the paprika and stems cut off the jalapeños.
For hot peppers, you can take the top stem off but leave them whole, though this is optional. It just saves time when you’re ready to grind. Opposite as for the sweets, we want the ribs for all its capsaisin (heat) as well as the seeds too.
Smoke peppers at 160F for 3-5 hours in your smoker. Immediately transfer to your dehydrator (veggie/fruit setting, 135F) or oven set to the lowest temp possible (170 if possible). Some newer ovens have dehydrate settings, if you’re lucky.
We go low and slow for the smoking. If this thing was full, he’d have no problem running it for more than 3 hours.
Note: all dehydrators will be slightly different. When set at 135F, this takes us longer than any time I’ve ever read. Some folks claim they are dry in 12-24 hours but I usually let mine go more like 48-72 hours.
Check for doneness in 24 hours.
Dehydrated peppers are done when they are brittle and crunchy to the touch. They should not bend but rather break. This is honestly the “official” dryness for them via food preserver courses I’ve taken, so … go figure! Haha.
Baby Ajis: dry versus fresh.
OPTION: Dehydrate Only For either pepper, prepare as above as if to smoke, but instead just place in a single layer in your dehydrator on fruit/veggie setting (135F). Provide air space between peppers (they shouldn’t be touching).
Check for doneness in 24-36 hours.
Peppers are done and ready to be packaged when they are brittle and break apart. If they are bendy but don’t snap, leave them in for another 12 hours. When in doubt, I dry them for longer to drive more moisture out.
Storing, Grinding, and Using
We like to store our dehydrated peppers whole and wait to grind them until needed. We simply put them in labeled ziploc bags and store them on an upper shelf in our pantry. A glass mason jar with a tight-fitting lid will also work. I do have some of our dried chilis in those too.
We will grind enough for a small spice jar full, and when it runs out, we will grind more fresh to use.

For grinding, we use 2 different kitchen gadgets, either our old coffee grinder that’s now only for spices or the dry mill on our vitamix (Affiliate Link). I highly recommend this dry mill base if you own a vitamix. I use it to grind corn into cornmeal too, and it will also grind flour for us if/when we ever grow some ourselves.
It is recommended that you consume dried peppers within 18 months of dehydrating them. (Fully confess, with some of our bone dry dried chilis, I haven’t done that. And I’m here to pen this post.)
-
A Garden Helper
I’ve been feeling absolutely overwhelmed this month. And yes, we just got home from an epic trip abroad, I had knee surgery, and we’re in the throes of canning season. So it’s really no wonder I’m feeling this way.
I pine for August in February, telling myself this will be the year I won’t be paralyzed by the sheer volume of tasks and hundreds of pounds of produce engulfing our lives. Yet each summer there’s a week or more where I feel absolutely discombobulated, borderline seasonally depressed, drowning in an endless, pounding pace of harvest, process, plant, manage pests — and oh wait, there are teenage boys to feed too.
The drowning really weighed me down this week. I look at the garden and only see a ragged landscape. Disease-riddled tomatoes that I don’t even visit because they are well past their peak. Calendula preparing to take over the entire garden next year, dropping dozens of seeds into the raised beds if I so much as brush past one. Broken zinnia like downed logs, making several paths impassable, and instead of taking the 10 seconds to go and remove it, I simply stop walking down that path. True story.
I woke up yesterday and tried to get a solid game plan, having started to feel like I was moving a little faster (in the literal sense) post-operatively. But I still felt this nagging suffocation from the garden. I wrote that ridiculous list of tasks I wanted to get done, and then the watermelon happened.
Those watermelon really shifted my day. They sparked the joy of gardening that the frenetic pace of August so effortlessly sucks dry. They juiced me right up.
And they were my squirrel moment, abandoning the tray of seedlings and overdue seeds to sow.
I went about my entire day, and staying ballpark on-task if you discount watermelon-gate, gifting watermelons at appointments and managing to complete 3 different kitchen projects concurrently.
I was in the flow. I was swimming, not drowning. I may have even been carried downstream by some invisible helpers.
And then it hit me.
I have a lot of really vivid dreams (this really should come as no surprise to you all). Most mornings I wake up and have to piece together what I just dreamt. Pregnancy dreams were the worst and best, and some still haunt me.
Yesterday morning I had this REM dream where I was watching an old memory of me — a fully fictionalized one, mind you. I was about 4 years old and in a small little outboard motor boat with my family. I think my mom may have been next to me.
We didn’t boat. We had a pool, but this was really bizzare that I was in a boat with my parents, and without any other siblings. Because there are 5 of us and we never had one on one parent time. Ever.
Suddenly, I saw myself moving around. It sort of felt like I was being pushed backwards. Little Meg was pretty clueless, but dreaming Meg started to freak out. I could see danger ahead. This overwhelming sense that I was going to fall into the water came over me as I’m dreaming, wondering if this is a real memory or a dream, but still mentally trying to protect her. I didn’t want her to fall in. She/I got to the edge of the boat, still oblivious to the dangers lurking right behind her.
I got to the edge of the boat, the backs of my legs bumped the side of the boat and my upper body arched and leaned, and off I tumbled into the water. It was, unavoidable.
Momentary panic. I didn’t believe I couldn’t swim. I was going to drown. Oh no, wake up, Meg. Stop this bad dream. I can’t believe they didn’t put a life jacket on me. What were they thinking.
Then I saw it. A life jacket. The same mossy green as my shirt, it blended in with my outfit. Yet it was there the whole time, it was just my perspective.
And so was my dad.
There he was, standing right next to me. Standing. In shallow water. So shallow even if I fell in with or without a life jacket, I would have been able to stand too. Because even though I felt like I was about to drown, that wasn’t actually what was happening.
The relief washed over me seeing him. I wasn’t alone. I was never alone. It turned out I wasn’t drowning at all. Not in my dreams, and not in real life.
And the helpers were there to care for me even when I didn’t know it.
I think this dream sort of worked some kind of magic on me yesterday, my dad visiting me and showing me that even though I feel like I’m drowning, he was there to show me what I needed to see … turn a mirror on me, remind me that the water is shallow even if it feels deep. That I’m okay. I’m still choking up reliving it.
This is a dream I will keep close at heart for the rest of my days, and I hope it helps some of you in the midst of your own seasonal overwhelm.
-

How to Prune Cucurbits
Hopefully most of you know that I rely on pruning tomatoes as a means of both preventing disease and managing the chaos that inevitably ensues come August.
Well it’s possible some of you don’t know that similar pruning strategies work just as well for the Cucurbit family. Think cukes, melons, and squash of all types.
In this video I show how I prune my cucumbers, winter squash, and summer squash. I discuss pruning for melons too, though it is not needed in our garden at this time so wasn’t demonstrated.
The bottom line is this: cucurbits send out new shoots/leaders all season long. In the case of things like cucumbers, it really does turn into not only a prickly mess that’s rather unmotivating to harvest, it can propel the spread of disease too due to the dense leaf area, especially come august as the morning dew returns and mornings are cooler, that water being a key vector for the spreading of fungal spores.
So if this isn’t a practice you’ve considered, I hope this gives you some ideas to tame and maintain a healthy cucurbit patch for the remainder of the summer as well as in future years. I’ll be sure to discuss this more regularly next summer too, as it’s something I do starting in early July.
-

Why I’m Topping my Tomatoes
A topic you hear about from time to time if you frequent online gardening communities, tomato topping is particularly useful when it’s late summer and you haven’t had any ripe fruit yet but there’s loads of fruit set.
When you top a tomato plant, you’re removing the growing tip of the plant, sending a signal that no new flowers or fruit need to form. It sends the signal to focus on ripening the fruit that it has already produced. We are merely helping our plants shift their focus to ripening the fruit that’s set rather than encouraging more flowers and fruit to come.
To top your tomatoes, simply find all the leaders and cut a good 2’ off the top of all the new growth. My hand in this photo is approximately where I like to cut mine off. You might cut some fruit off, but there should be lots of fruit in various stages of maturity lower down on the plants, if summer has been good to you.

Some newly formed fruit definitely got chopped off, and that was accidental, particularly on the larger slicers. I have zero regrets to dropping some of the newest sun gold fruit clusters.
Most years, our summer tomato garden is sunsetting by early September due to disease pressure. So I’m not super concerned about topping the tomatoes this week, a few weeks earlier than years past. Also, I’m honestly not sure how many more weeks I can bare glancing at all the disease pressure in the heirloom tomato bed. These plants may come out by early September this year.
Topping your indeterminate tomato plants about 6 weeks before your first frost will help the fruit that has set start to ripen. It signals to the plant to not continue to push out new flowers but instead focus on what’s right in front of it. Sort of a nice reminder for us too, this time of year when things feel like they are going here, there, and everywhere (because sometimes they are).
Because we’ve typically been satiated by 2+ months of daily, bottomless bowls of fresh tomatoes, I’m as spent and satisfied as my hard-working, tired plants — and would rather just yank the badly diseased plants and feel the sigh of relief as the landscape opens back up a little, a sign that we are entering a quieter garden season with foods that are shelf stable in and out of the garden.

Last year’s tomato bed was much less disease prone, and I can’t quite explain why. I miss this beautiful garden honestly. This year’s brutal disease pressure is trying my patience.
-
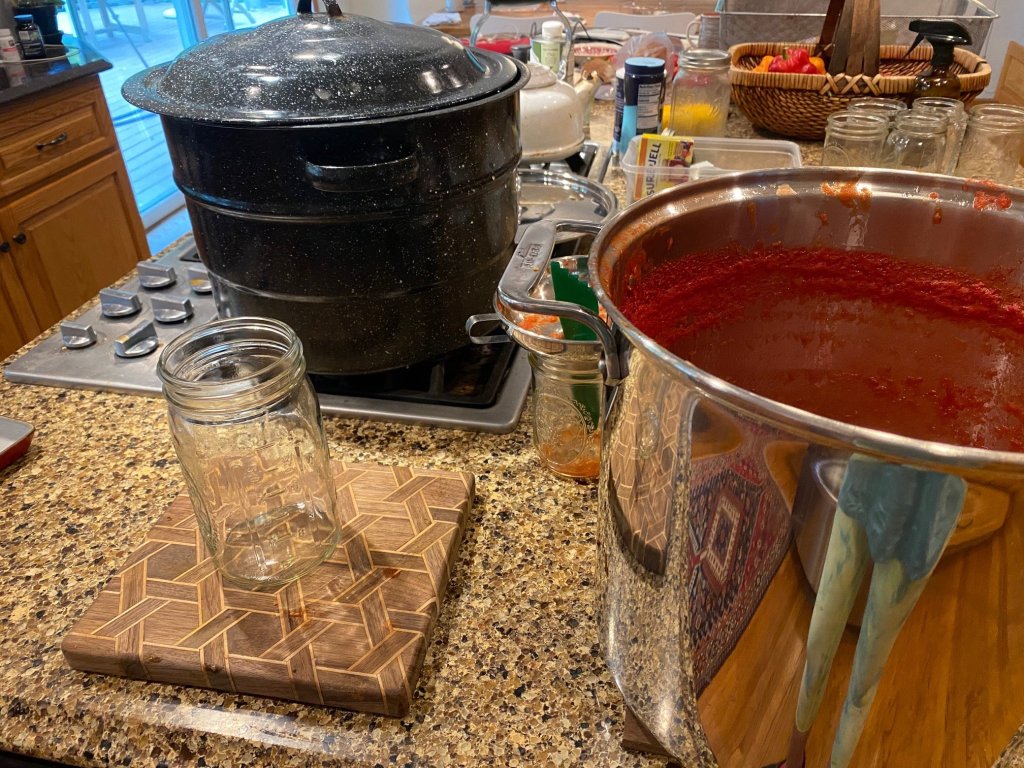
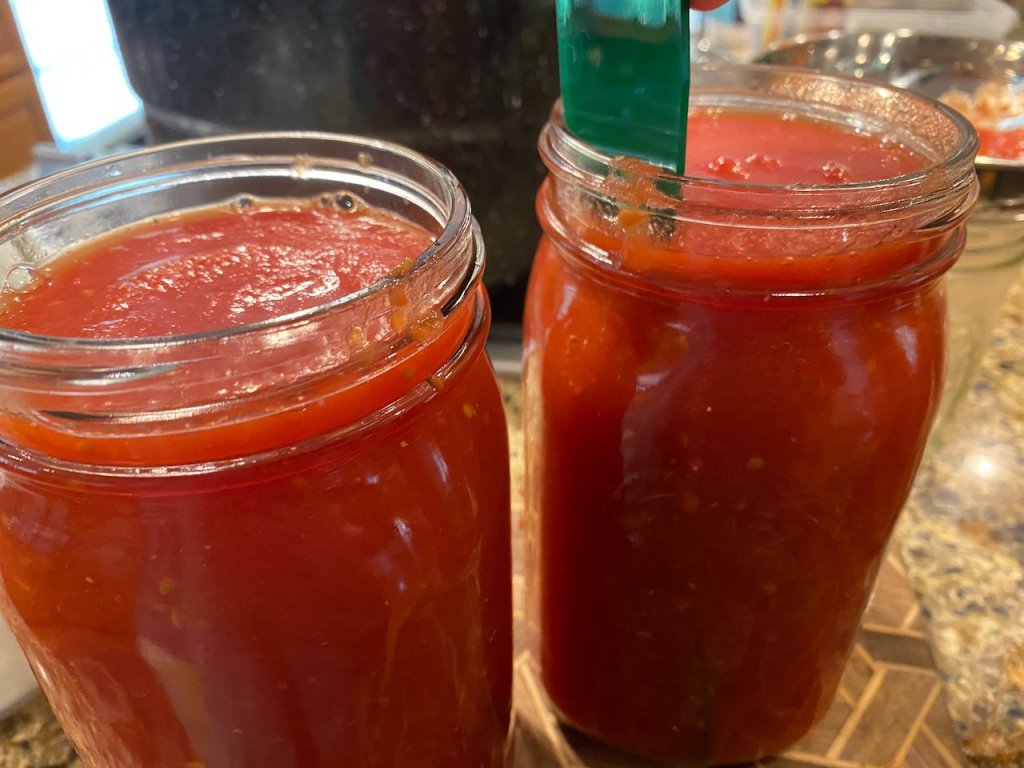
Step by Step Instructions for Canning Oven-Roasted Tomato Sauce
Note: Each quart jar is about 2 lbs of oven roasted and boiled tomatoes (about 4-4.5 pounds raw). I try to process about 50 pounds raw at a time, which usually yields me about 25 or so roasted, drained and skinned tomatoes. (Processing 25 pounds at a time would be a great amount to start with for pint jars; it should yield close to a dozen pints.)
Preheat oven to 375 convection roast or 325 bake to oven roast tomatoes. Full directions can be found here.

Cut ends off tomatoes and slice in half lengthwise.
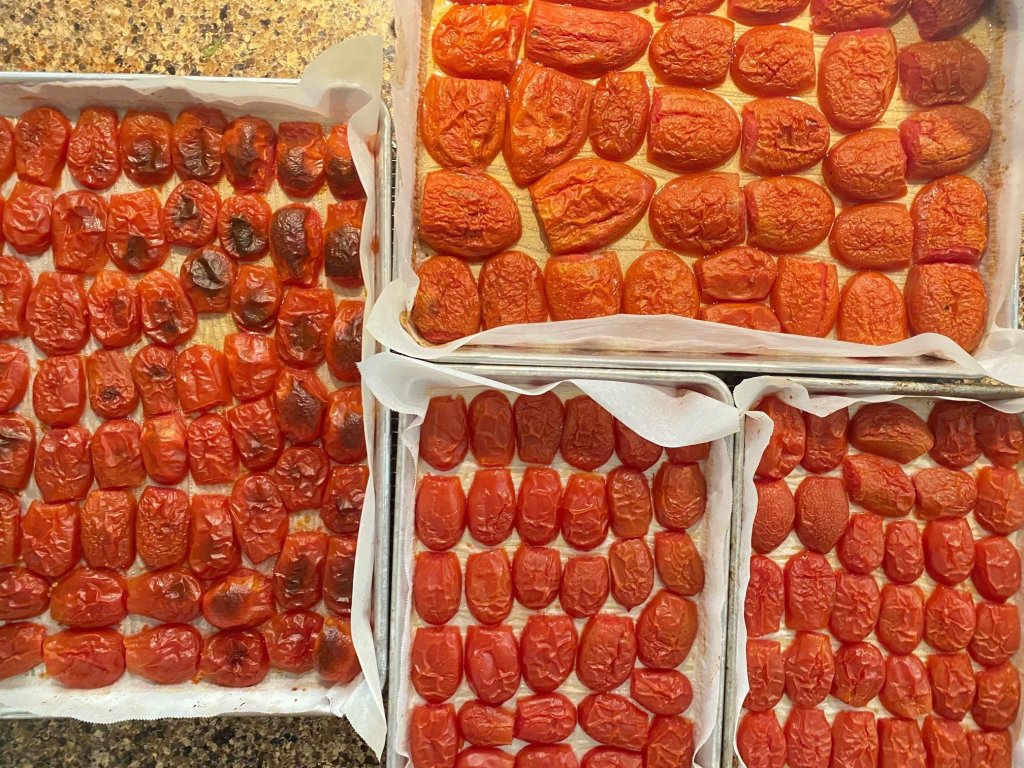
Let cool and slip skins off. Leave seeds.

Lift off parchment, removing skins, and place into a blender (we prefer a vitamix). Blend until smooth – or until your desired texture.
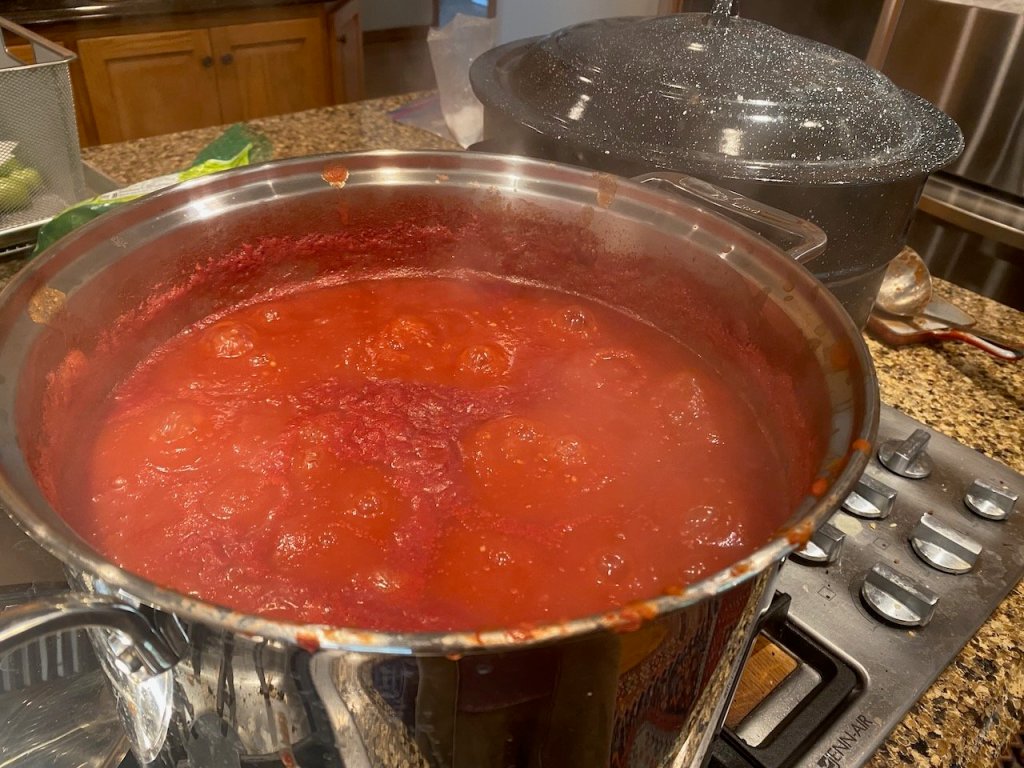
Transfer to large stainless steel stockpot and bring to a boil. I usually boil for about 30-40 minutes. This process will thicken your sauce slightly. If you want your sauce thin, you can simply bring to a boil for 10 minutes and then skip down to hot packing the jars.

Meanwhile, wash your jars and lids and rings. It’s important to even wash your new lids, too. We prefer the brand name lids (Ball and Kerr).
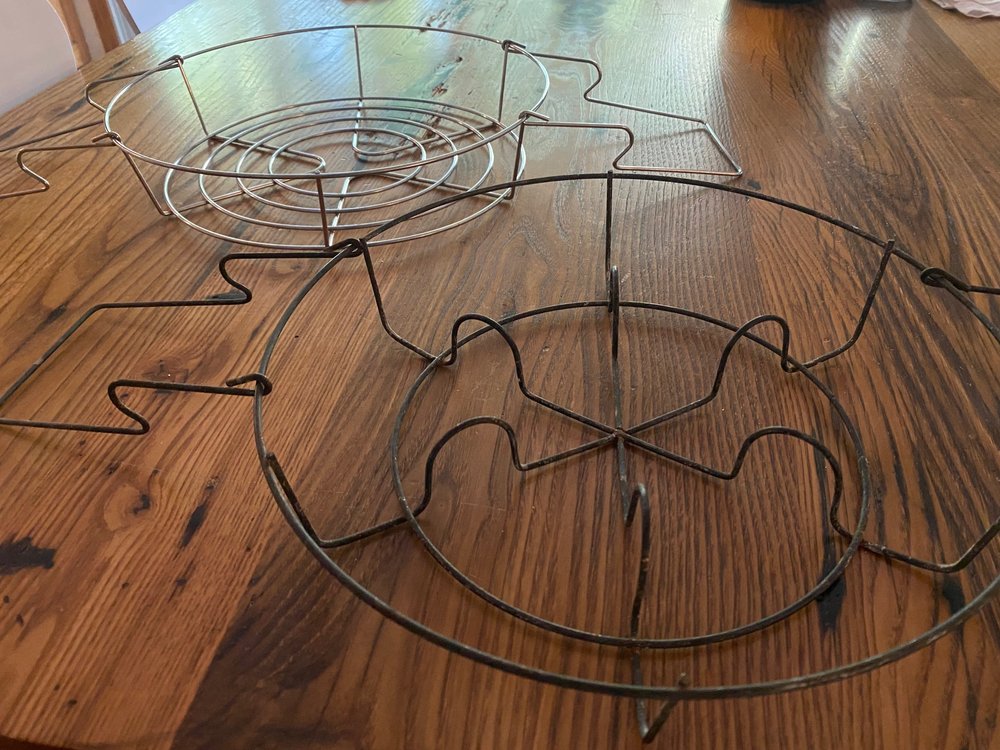
Racks are essential and you can either use one that is divided for quarts (fits 7 total) (below) or one that has no dividers, which is what I use when processing pints jars or smaller as it can fit more jars and has more flexibility. If you were to only invest in one, I’d recommend the flat-bottomed rack.

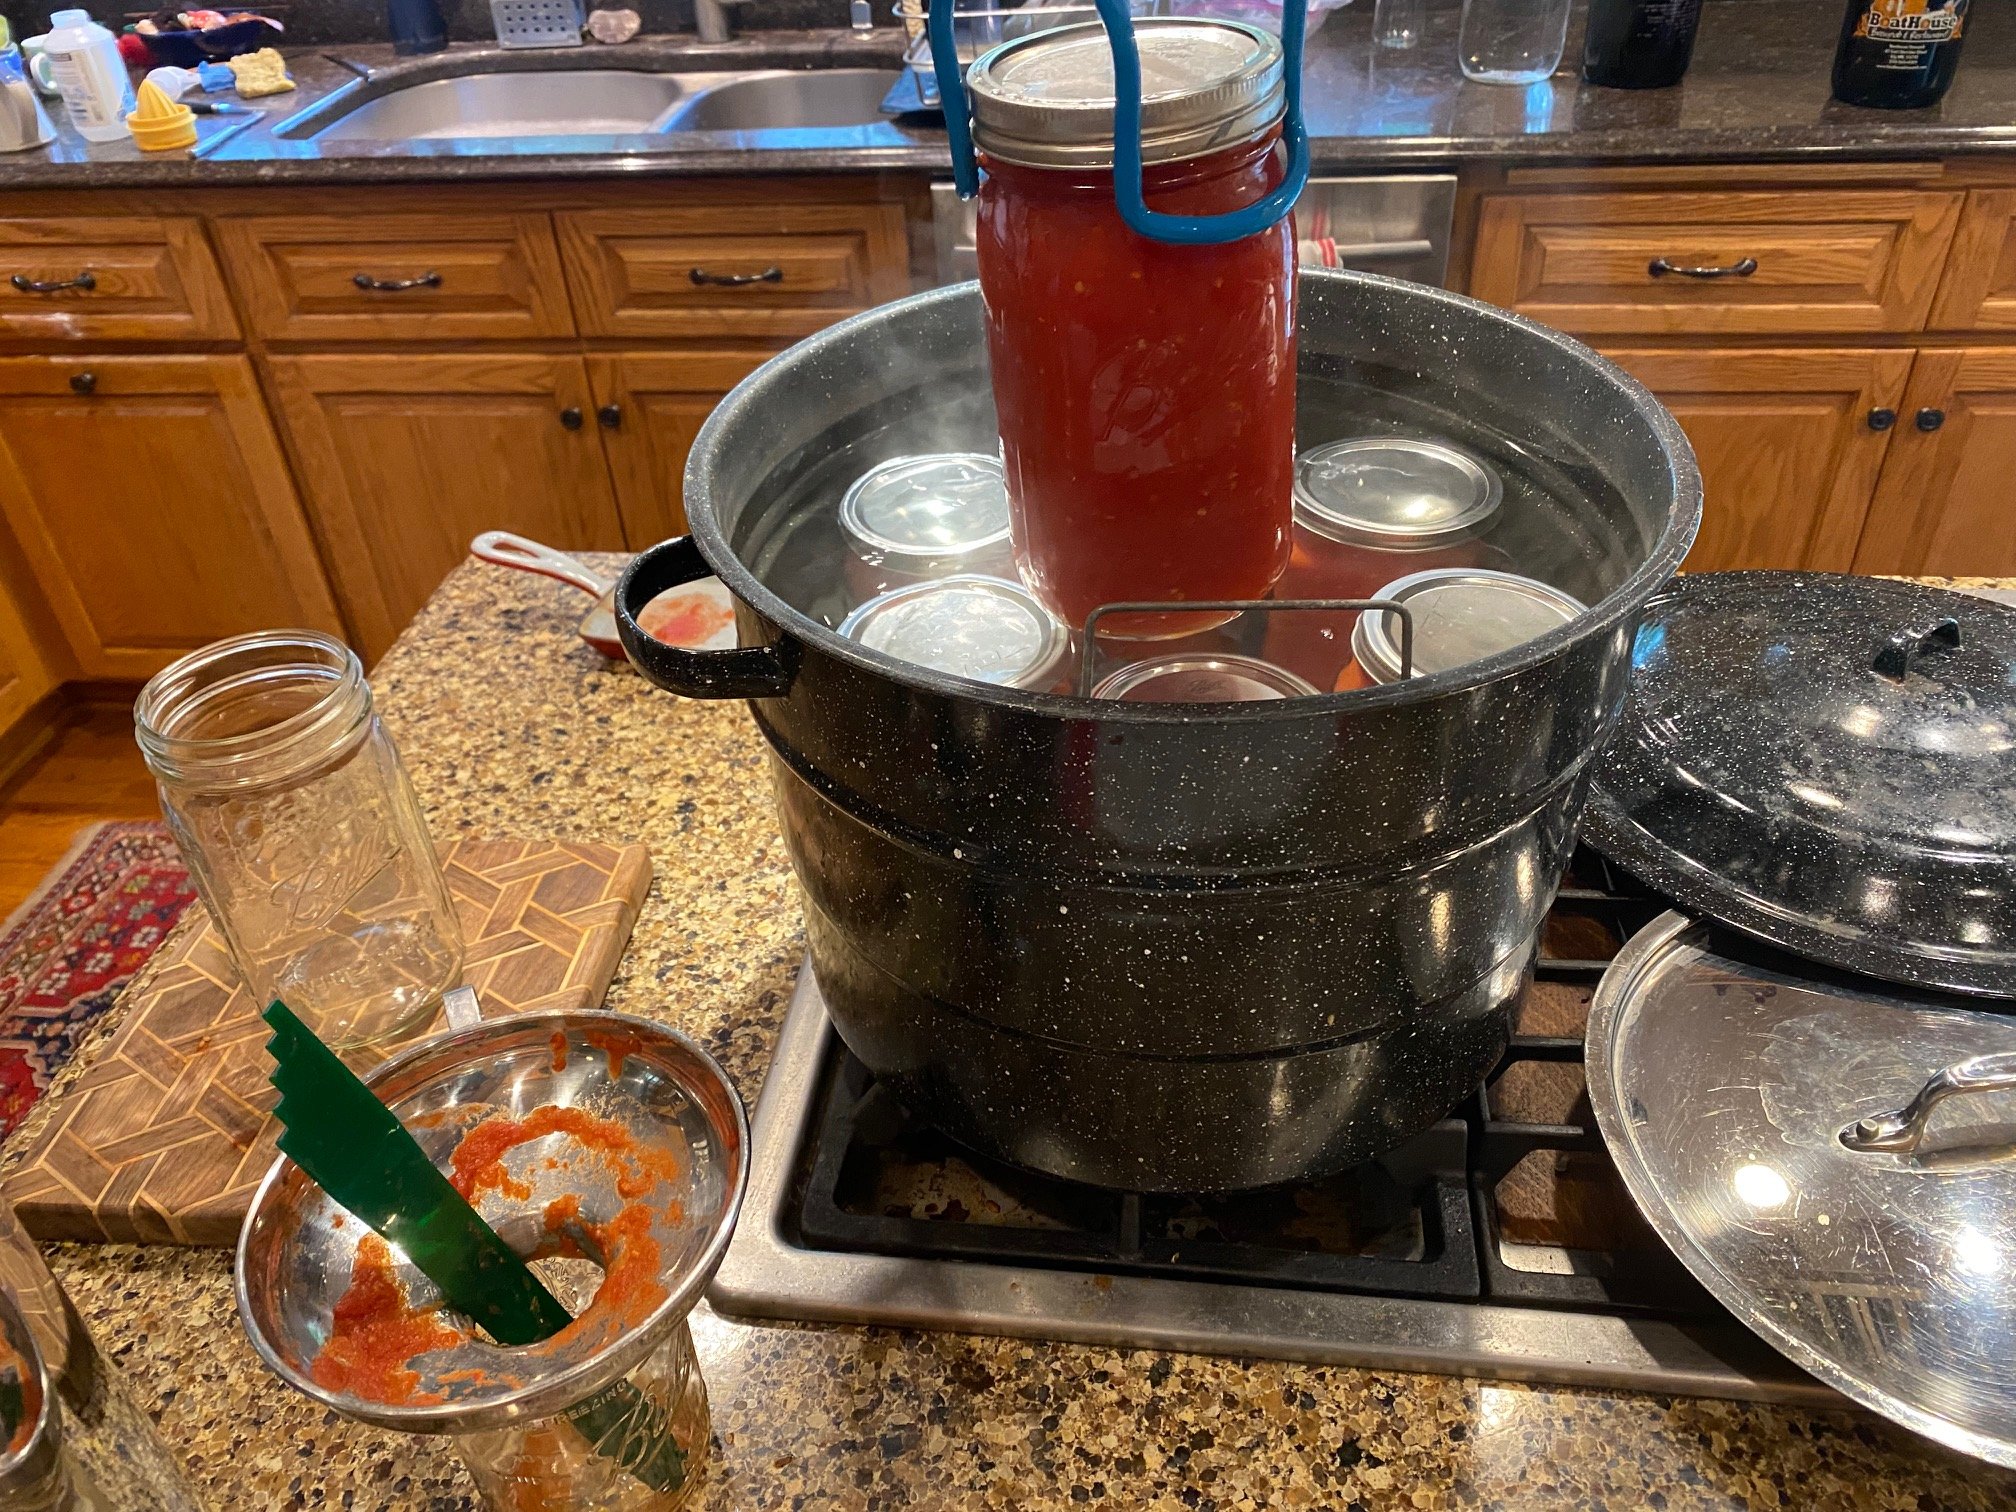
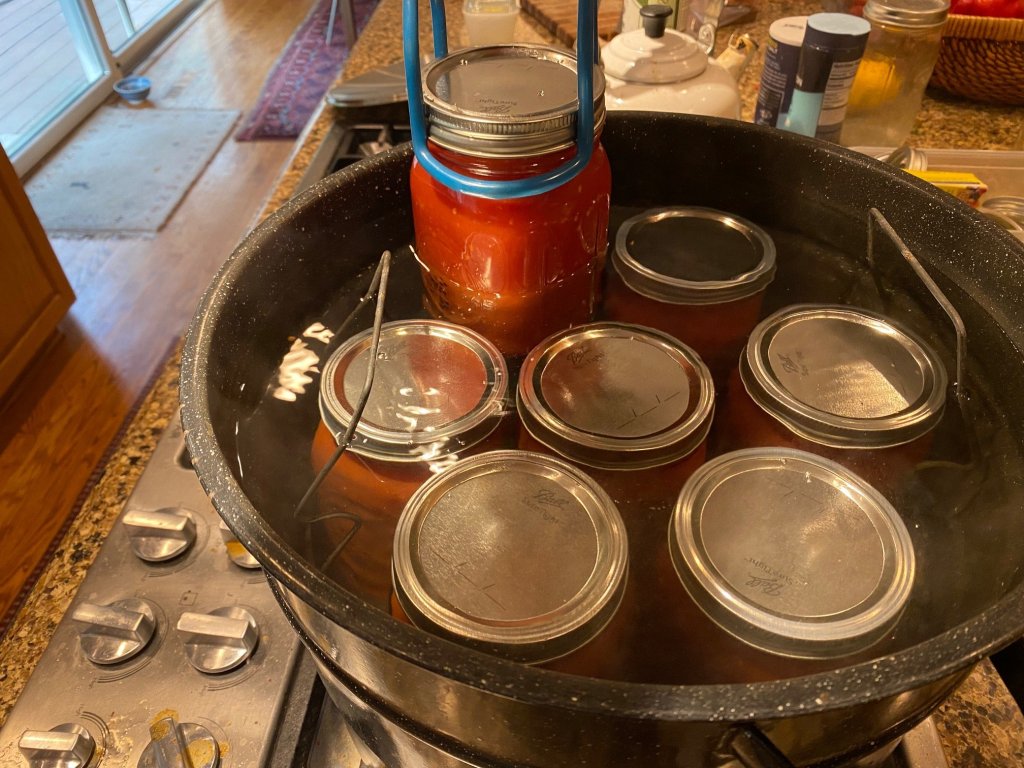
For all canning, I fill the the pot to this line. With quarts, I will have to remove some water as I fill the canner with my full quart jars. (See below)
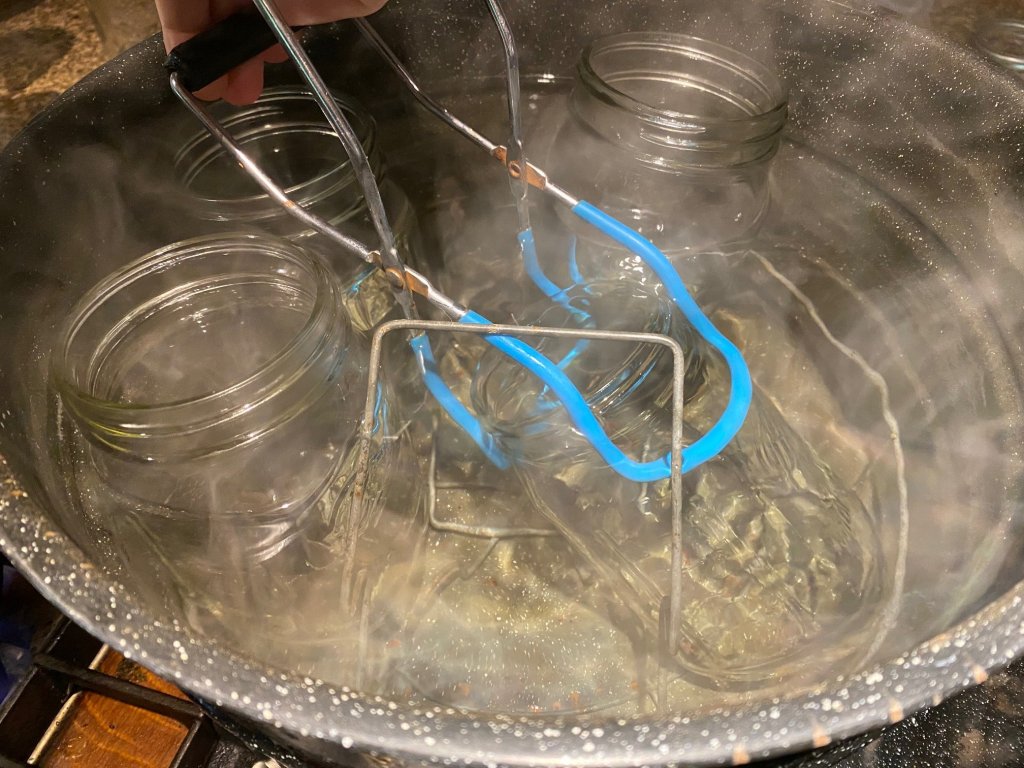
Place your clean jars into the canning pot and warm the water to a simmer (no need to boil as the processing of the tomatoes will sterilize the jars). You’ll need to dunk a few in to allow them to sink. Place all the clean lids and rings into a clean bowl adjacent to the canner. (I find conflicting information about whether or not to keep these in a warm water, but I no longer do, again because of the processing time/sterilization.)
When the sauce is reduced a bit and the jars are warm and prepped, set up an area adjacent to your canner where you can lift a jar out, fill it, and return it to the canner one by one.
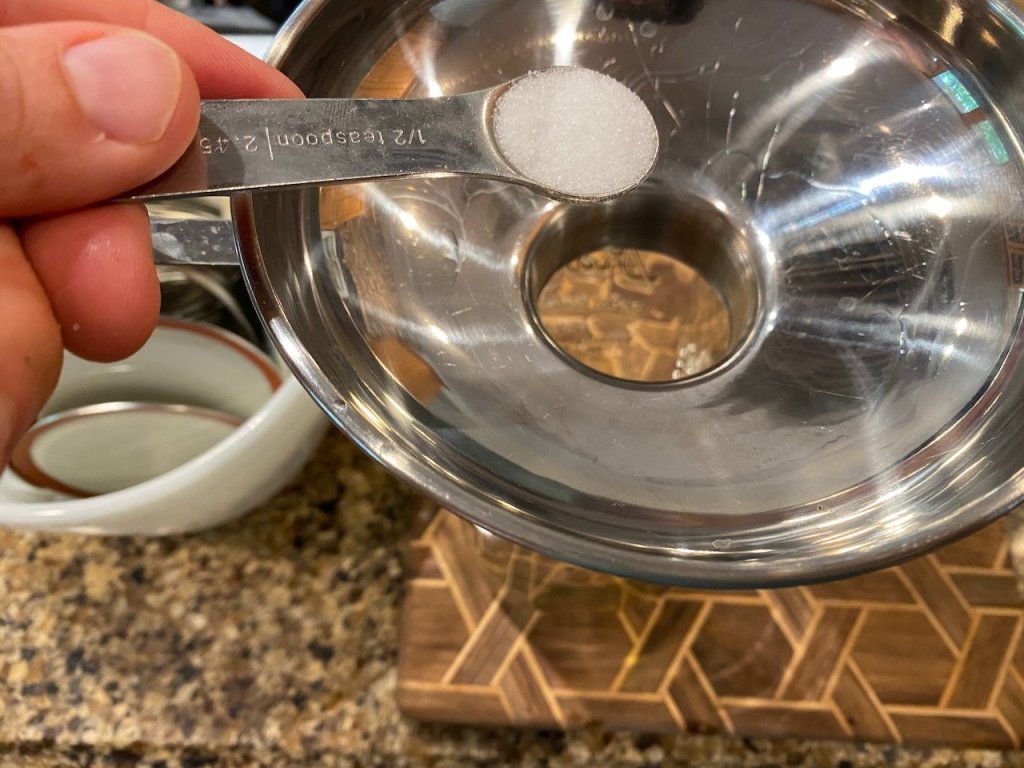
For each quart: add 1/2 tsp citric acid or (2 Tablespoons bottled lemon juice) to each warm quart jar before you fill with tomato sauce. (1/4 tsp citric acid or 1 T lemon juice for pints)
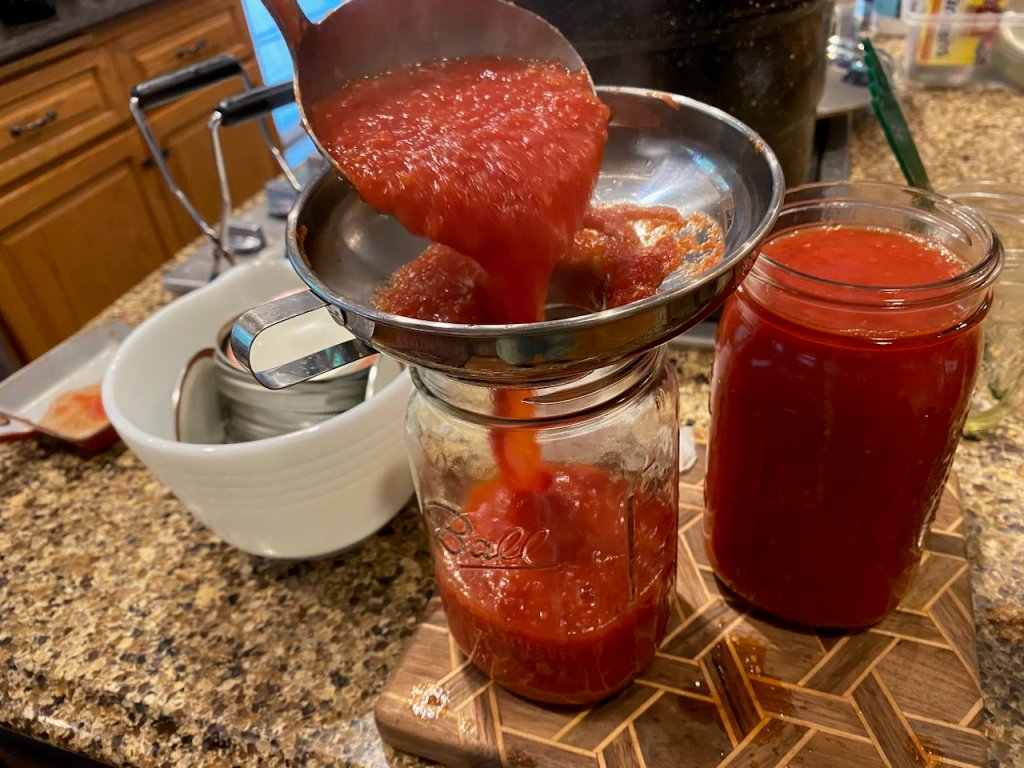
Using a funnel, carefully ladle your hot sauce into the hot jar. (This is called hot packing.) I fill to just above the lip of the threads where the jar narrows, a generous 1/2” of headspace, which is the recommended height. Overfilling will impede proper sealing.
Run a plastic knife or canning bubbler around the filled jar to remove any air pockets and adjust headspace as needed. I usually find a few bubbles but it rarely causes a dramatic drop in my overall volume.
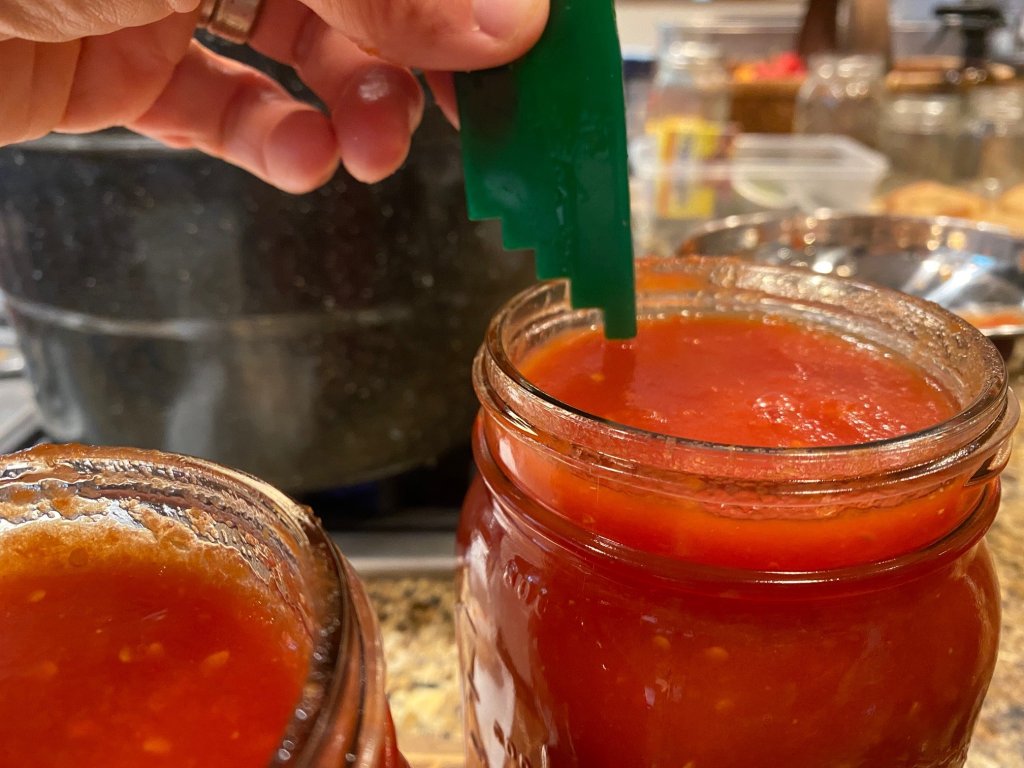
Our bubbler has a graduated measuring tool on one side that you can check your fill after removing air pockets. Once you can a few times, you’ll get pretty confident in your fill height but it’s a good idea to double check yourself seasonally.

Using a damp cloth or paper towel, clean the rim of the jar off so it’s free of all debris that would prevent proper sealing.

Center the clean lid on the jar and finally hand tighten the ring.
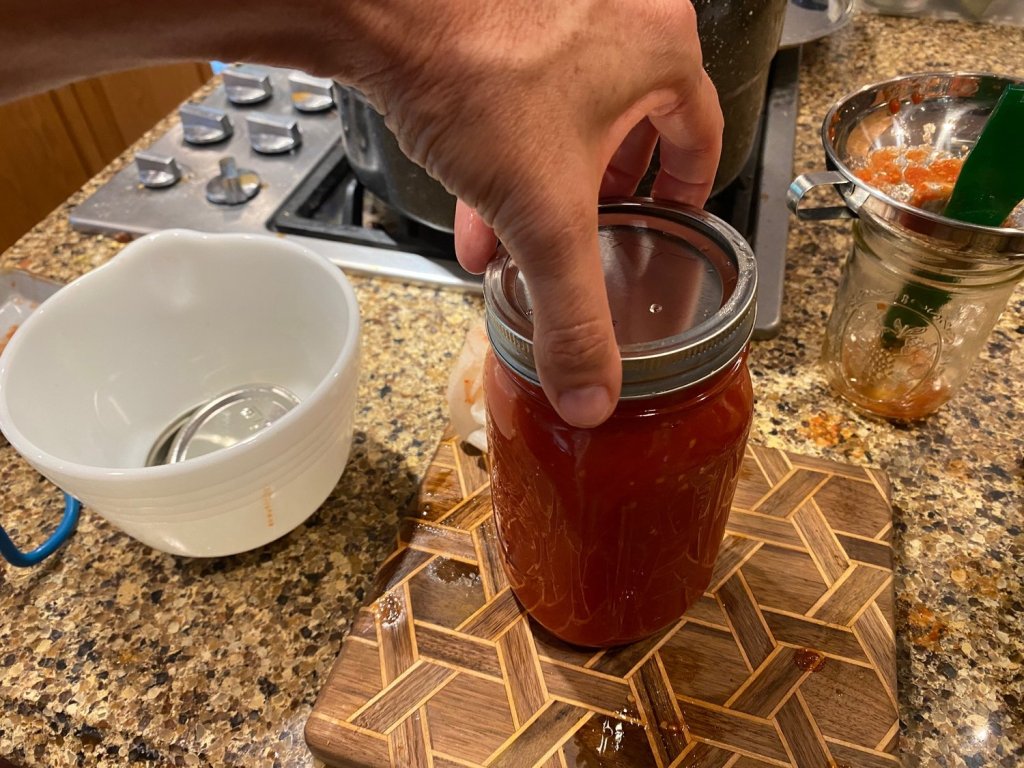
I’m gonna be honest, the lid tends to move a bit as I work to get the ring threaded, but it always works out in the end.
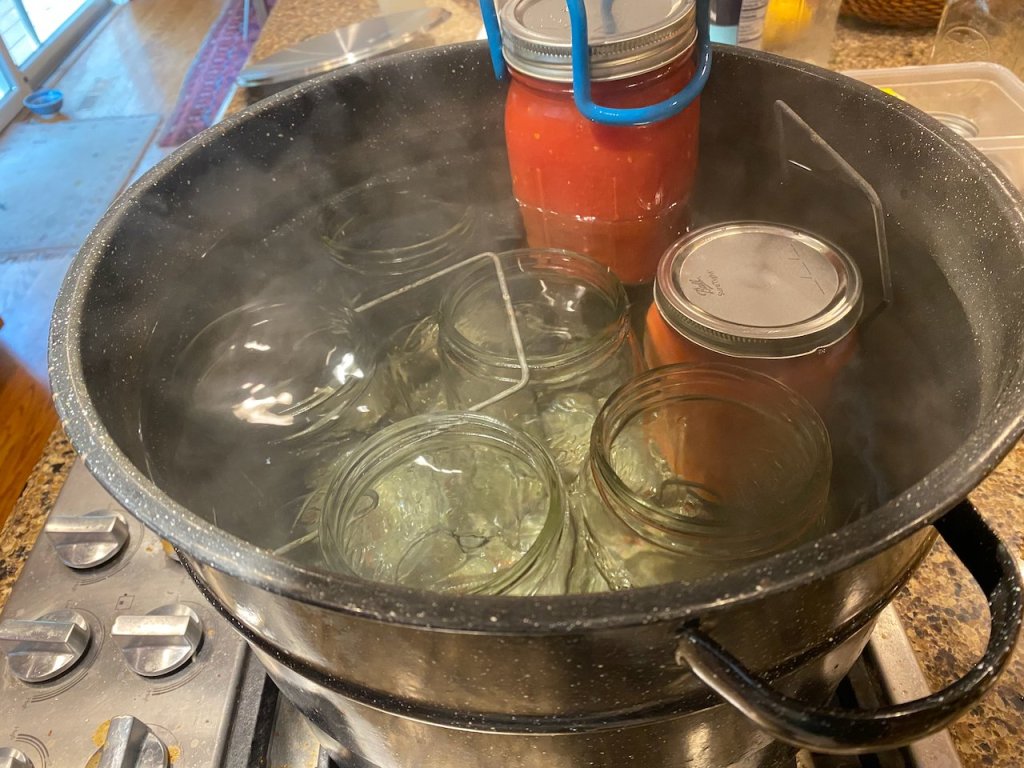
Using the canning tongs, gently lower the jar into the hot water bath.

Once you start filling the canning pot with filled jars, you’ll need to dump 2 or more quarts of boiling water out into the sink to prevent the canner from overflowing. I start this process about halfway through hot packing the jars.
Repeat process as needed.

When the final jar is filled and in the hot water bath, be sure the hot water bath covers at least 1” above the top of the jars.

Bring the pot to a full boil and start your timer for 40 minutes (adjusting for latitude as needed). Lower to a gentle boil, medium or medium low depending on the burner. You need to maintain a boil for the duration of the 40 minutes. I leave the lid slightly cracked too otherwise it sputters the entire time!
When the boil is complete, shut off burner and let sit for 5 minutes before removing jars.
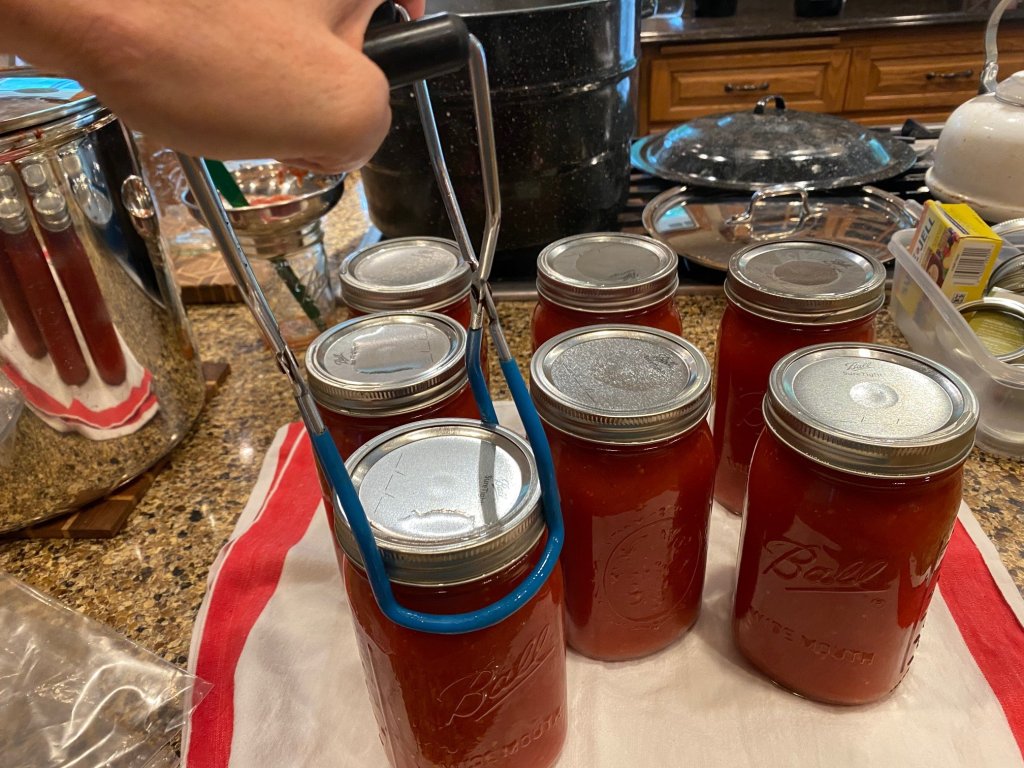
Place jars on a smooth towel and let sit for 12-24 hours before removing lids, checking seals, and moving to their storage location.
-
Early August Garden Tour
-

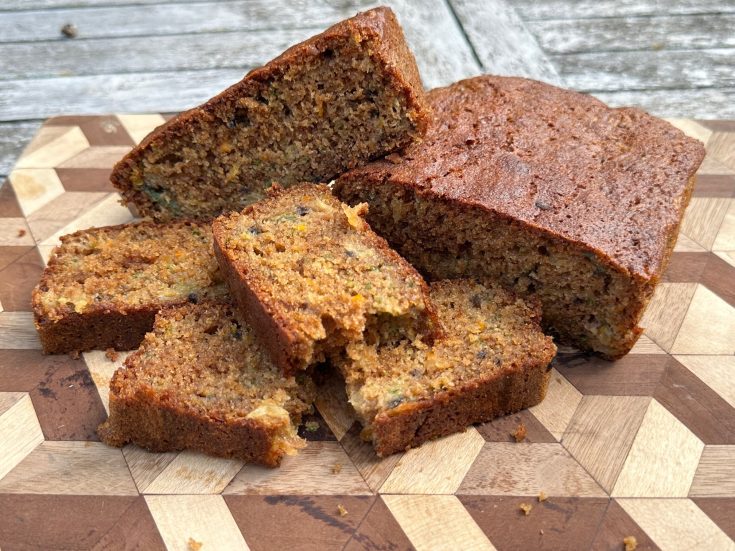
Zucchini Carrot Bread
This is a twist on a recipe that was a summer childhood staple. I can hardly remember a time when this bread wasn’t double wrapped in wax paper and aluminum foil in our fridge, pre-sliced for ease of eating.
I reflexively do this with my loaves too, conjuring up the days when my mom busied herself in the kitchen shooing the curious kiddos out the door and into the pool or further into the woods until dinner.
Yield: 2 loavesZucchini Carrot Bread
Ingredients
- 3 eggs
- 1 cup dark brown sugar
- 1/2 cup honey
- 1 cup avocado oil
- 1 tablespoon vanilla
- 1 cup white flour
- 1 cup whole wheat flour
- 1/2 cup wheat germ
- 1 tablespoon cinnamon
- 2 teaspoons baking soda
- 1/2 teaspoon baking powder
- 2 teaspoons salt
- 1 1/2 cups shredded zucchini (and summer squash will do!)
- 1/2 cup shredded carrots
- 8 ounces crushed pineapple, lightly drained
- 2 T freshly grated ginger (optional but recommended)
Instructions
- Set rack to middle and preheat oven to 350. Grease and flour (or add parchment to) 2, 8×4 bread pans. Set aside.
- Measure out dry ingredients into small bowl and mix well. Set aside.
- Shred and measure out summer squash and carrot. Add in drained pineapple. Set aside.
- In a medium bowl with a hand mixer, beat eggs until frothy (a few minutes). Beat in oil and vanilla. Add sugar and honey and beat until thick.
- With a wooden spoon or spatula, mix in the dry ingredients until fully incorporated. Finally, fold in the zucchini, carrots, and pineapple.
- Pour evenly between the 2 pans and bake for 50-60 minutes or until an inserted toothpick comes out clean. 55 minutes worked perfectly for our oven at 350 convection bake. Follow the clean toothpick more than the timer though as ovens can vary in temp widely.
- Immediately remove from the pans (this is easiest with parchment lined pans) and set on a cooling rack.
- Serve plain, with butter, or most deliciously, with some cream cheese.
Ingredients
-

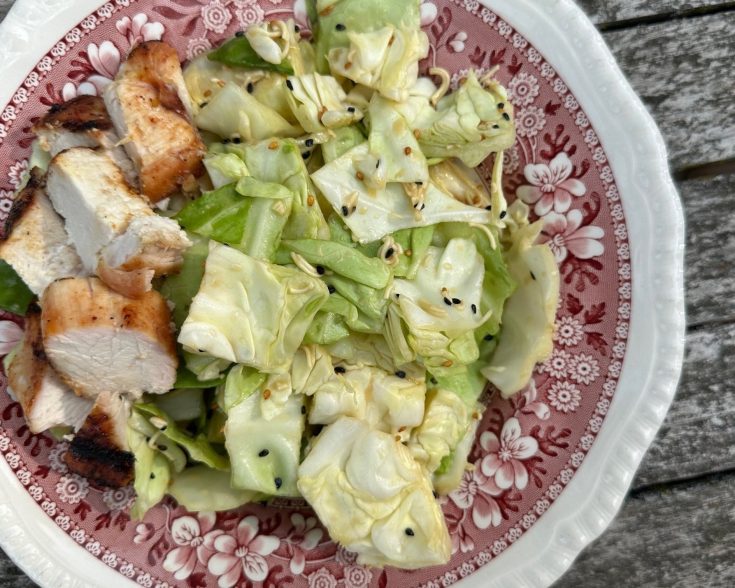
Cabbage + Ramen Salad
This is a throwback to our early days as a young couple. We’ve been making this on hot summer days for as long as we’ve been together. I mean, ramen sorta says it all I think to the stage of life at which we first started eating this.
Cabbage + Ramen Salad
Ingredients
- 1 head of cabbage (green, savoy, or even napa)
- 1 packet ramen noodles
- Protein of your choice (we usually grill chicken breasts for this meal)
- Sesame Ginger dressing (link below)
- Sesame seeds
Instructions
- Prepare your protein.
- Make Sesame Ginger salad dressing.
- Chop cabbage.
- Crush ramen inside package with the handle of a knife or other blunt instrument.
- If you aren’t going to eat it all in one sitting, I recommend adding the ramen on top, like croutons. This will allow you to make another quick salad as a leftover using the extra dressing and already prepped cabbage — an easy and healthy meal for a busy day or night.
- In a large bowl, toss cabbage, ramen, and dressing. Top with protein and sesame seeds. Serve immediately.
This is the kind of food we crave on the hottest days of summer, and are grateful cabbage is in season nearly the entire year for us so we can enjoy it stir fried and raw, depending on our mood.
-

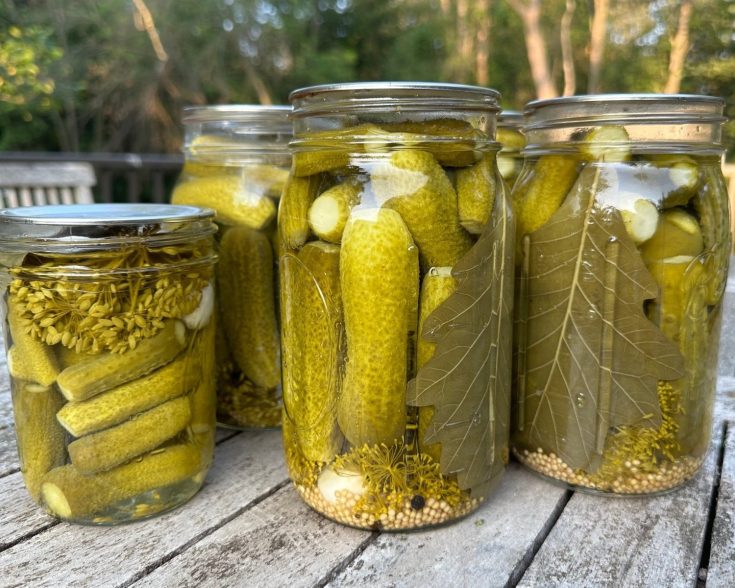
Crunchy Dill Pickles
I don’t know about you, but if you’re a canner and have ever opened a jar of your summer’s cucumbers pickled only to be met with a floppy mess, you may be leery of recipes claiming crunch.
The first key to our pickle recipe is the addition of tannins in the form of oak leaves. Lucky for us, we have planted about 6 swamp white oak trees on our property since moving here, so never have a lack of leaves. Alternatives to oak leaves include grape leaves (I’m guessing many of you might have grapes growing wild or otherwise), raspberry or cherry leaves.
The second most important key for crunchy cucumbers is to pick them small! We have been learning this the hard way. It’s not always easy to get out there every 12-24 hours to pick them, and even more so challenging to have enough ready at the right time to preserve their crunch. But we have transitioned to pickling our cucumbers WHOLE and this has really improved their crunch.
If you have pickling cucumbers that are wider than an an inch, consider making it into bread and butter pickles or sweet relish instead. This is what we do with our “too big” cukes, of which there are always some (and sometimes too many). And these other pickling recipes are less urgent in my opinion, and can be done up to a week after harvest, so that’s a definite bonus too. They also make great holiday gifts.
The final and equally important step for good pickles is to soak them in an ice water bath for an hour before processing. This gives you time to get the oak leaves, peel the garlic, clean the jars, and get them set up in the hot water canning bath.
In the past I’ve used recipes that are 50/50 distilled vinegar and water and they are, frankly, intensely vinegary. So this year I’ve switched to the Ball canning jar brine recipe but with my tried and true seasonings. I think the slightly lower acidity and small amount of sugar will help balance the sourness just the right way.
Crunchy Dill Pickles
Ingredients
- 4.5 pounds pickling cucumbers, all smaller than 5” long and blemish free
- 4.5 cups vinegar
- 6 cups water
- 5 tablespoons canning salt
- 3 tablespoons sugar
- ADD TO EACH QUART JAR:
- 1 oak leaf
- 1-2 heads of dill, flowering
- 1 tsp mustard seeds per quart
- 6 peppercorns per quart
- 1 clove garlic
- 1 chunk jalapeño, or other hot pepper (optional but fun)
Instructions
- Rinse cucumbers and place in a large bowl. Cover with ice and add enough cold water to submerge. Set aside for 1 hour.
- Meanwhile, prepare 4 quart jars and 1 pint jar. Wash jars and lids with soapy water. Fill water bath canner to about 3/4 full and add the glass jars. Bring to a boil and then turn to simmer.
- Take lids and rings for jars and place in a one quart pot. Bring this to a simmer and then turn off. I add my ladle and funnel to this water a few minutes before I will be assembling the jars.
- In a stockpot, combine vinegar, water, canning salt, and sugar. Bring to a boil.
- Prepare cucumbers by cutting a small piece (1/16”) off each end. This also helps preserve the crunch so do not skip this step.
- Now it’s time to assemble the jars. Take the jars out of the hot water bath Set the oak leaf into the jar, then add the dill, garlic, peppercorns and mustard seeds. Finally, start to stack the cukes in there. Get them as packed in as possible; you’ll be able to fit more than you think.
- Once all the cucumbers are packed into the jars leaving a solid 1/2” head space, grab the funnel and start ladling the hot brine into the jars filling to 1/4” from the top.
- Using a damp paper towel, wipe the rims of each jar before placing the canning lid on. Finally, screw them tight and place each back into the hot water bath.
- After all jars are filled, rims cleaned, lids secured, and all back in the hot water bath, bring the canner back to a boil and boil for 10 minutes (up to 1000 feet, add 5 minutes for each additional 1000 feet of elevation).
Notes
TIP: You want to use your pickling cucumbers within a few days of harvesting. Ideally it would be the next day, but honestly that only happens for about half of any batch for me. I try to use them within 3-5 days of harvest.
-

Mid-July Garden Tour
-

Fennel Grow Guide
I don’t remember when we first started growing bulbing fennel (also called Florence Fennel or finocchio, but I’m guessing it was 2018. Like with everything else, I sparsely read up on it and then just dove in head-first mostly unschooled and completely curious.
I usually like to uncover cold tolerance, ideal soil temperatures for germination, and days to maturity to help me get my head around where in my seed-starting marathon I’d likely add a new crop.
Fennel has been growing for millennia as a prized culinary and medicinal herb. There are two types of fennel, leaf and bulbing, and I’m going to focus this post on bulbing – also known as florence fennel – as it’s the only type I’ve grown so far.

I definitely pushed the end of the season on these fennel, but it was for the garden tour. We will slice them thin and make a salad with them. I’m using these for a post-tour potluck celebration later this week. What I love is the delicately beautiful foliage, its strong garden interest, the overall uniqueness, the anise-y flavor, and the challenges (opportunities) it provides in the kitchen during early summer and sometimes fall.
And possibly the best part? It’s one of our most disease-free vegetables in the garden. So the hardest part is getting those seedlings going, hardened off, and timing that planting right.
Varieties
I’ve only grown hybrid Florence fennel: Orazio is our tried and true and I recently picked up Solaris from High Mowing. They are both planted in the garden and while I see a slight difference in shape, they are all performing well — and I didn’t distinguish which ones were which so I really can’t tell you whether one is better than the other.
Culture
Fennel is one of those vegetables I wouldn’t really think of as a direct-seeded crop. I’m not sure why exactly, but I’ve always given it an indoor head start of 6 weeks or so. It’s quite similar to a carrot seedling in it’s early stages, with one main exception. It tends to sit a bit above the soil line when germinating, and the root collar is usually suspended in the air.
In researching this guide, I’ve learned that it is sensitive to root disturbance. Now if I had known this years ago, I may have started with direct seeding instead, but here we are with a tried and true indoor sowing and transplanting method.
Seeding
Plant seeds 1/4” deep and covered; light is not required to aid germination. When seed starting use soil blocks or larger newspaper pots that you can easily and gently tear the paper back off them when transplanting.

A potted up Solaris seedling that was started on May 14, you can clearly see the root collar here, the line where the stem and root delineate. The root is that pale pink color and the stem is the white/pale green. I never plant them quite up to that line, but usually close when it comes time to transplanting. I don’t want to bury that line.
I always germinate fennel with the heat mat on, like almost all our veggies. If sowing directly in the ground, you’ll want soil temperatures to be above 55 for quick germination of seeds. Warmer soils will hasten germination, so with damp soils (overhead water daily until you see germination) you should see germination within the week.
Direct seed 1/4” deep, a cluster of 2-3 seeds for every 4-6” and thin to one plant per cluster after germination.
Plant Spacing
I usually give my fennel about 12” between plants because I like ot plant them in between sweet alyssym and snapdragons on my “end caps” of my main garden path.
If you will be growing them in their own bed in a more traditional way – like in rows – space them 4-6” apart with 18” row spacing, slightly more room than celery or carrots need.
How I interplant fennel it keeps it a bit cooler and thus less prone to bolting in early summer, though I fully admit the fennel I harvested last night for dinner was starting to bolt (we ate it anyway).

And speaking of interplanting, someone asked if it was okay to interplant it and again, this is where my ignorance serves me: I’ve never not interplanted fennel. I see it as a bonus vegetable, almost in the floral category with what it adds to the garden, so it’s always been interplanted and more of an ornamental vegetable than my standard work horse type crops like tomatoes and potatoes.
Irrigation
Florence fennel, like celery, forms crunchy stalks that are made of water. So yes, consistent and generous irrigation is key for this crop. Our garden beds receive an inch of water per week through our irrigation (calculated by the drip lines and how much time needed to release 1” of water).
But too much water can also be a bad thing. I’ve had springs where a beautiful fennel was harvested and had been rotting from the inside out from root rot or collar rot. I wondered at the time if perhaps I transplanted it too deep and the root collar was below ground and thus prone to rot.
Timing
Fennel is purported to grow better as the days grow shorter, meaning it’s a great fall crop. I’m trying to grow two fall successions this summer to test that theory. One is just about ready for transplanting and the next round I will seed with my fall iceberg lettuce soon (this week, mid-July).
Generally speaking, fennel should be ready about 2.5 – 3 months from when you seed it for bulbing fennel. This current harvest we’ve been having (for the past few weeks) was from our March 18 seeding that was transplanted in late April. We could have harvested these sooner, and I likely would have were it not for the garden tours. While our harvest is more like 3 months, they were sized up (the ideal size is about 4-6” wide) by mid-June. I was just holding onto their ornamental beauty and I even often let one go to seed too, just for fun.
So if you’re in my climate or warmer, sowing some fennel now for fall harvest is probably a great time. In addition to the indoor sowing, I am going to give direct seeding a try too, just to compare notes on whether I do need to indoor sow them for fall. I have a feeling direct seeding will work out just fine, though I will be strategic in selecting an area where I will simply thin to the right spacing rather than transplanting so I don’t disturb the roots.
Fertility
Like so many wonderful foods, they are heavy feeders so they require soil with high organic matter and ample irrigation. I’d put it in the category with brassicas or celery, as they are both demanding in these areas too.
I transplant our normal 1/4 cup fertilizer in with each fennel seedling. And they grow in our compost-topped raised beds.
Harvesting
To harvest, cut the plant at the root collar. It’s a pretty tough root so perhaps pruning shears are the best tool for this job (this harvesting knife is better for squash, cabbage, broccoli, and lettuce).

You can harvest your fennel at any bulb size really. Sometimes I harvest them young if we have a hankering for a certain dish. You want to catch them before they bolt as like with other crops, this does change their flavor a bit. (Although we still eat and enjoy them even after they’ve started to sprout their flower stalk.)
Pest Pressure
Delightfully, fennel has very few pests and so it’s one of the easiest crops to grow in the garden, naturally pest-free.
-

Why I Love the Freyr Trellis
This spring I was delighted to receive a Freyr trellis from Seattle Urban Farm Co.
First of all, if you don’t know who they are, they are, as their name suggests, urban gardeners in Seattle. Both home gardeners and running projects like rooftop restaurant gardens, they are innovative folks who are making the most of their growing season and climate. Like me, they excel and delight at succession planting and do so in small spaces. We have a lot in common, except our winter lows.
When Hilary offered to send me a trellis to try out and provide feedback, I jumped at the opportunity. I’d been ogling this design since they first started sharing it on their feed last summer.
You set it up once and leave it in place, kind of like our DIY Arbor, the only other permanent vertical trellising in our garden. The rest of the vertical elements in our raised beds are installed annually in spring as we crop rotate and mix things up.
The base of this kit are really sturdy anchors that go about 16” into the ground/raised bed. It’s definitely an install it once kind of project. I stalled it about 2/3 back on the north side of this bed which allows me to interplant in front of the trellis. The thing I love about this is how easy it was to install, how customizable it is, and of course the sleek and modern design. I selected a slate gray to compliment our main garden pergola color and I couldn’t be happier.
I installed it by myself one Sunday in May (when it was still unseasonably cool) while my husband was cooking Sunday supper for the family.
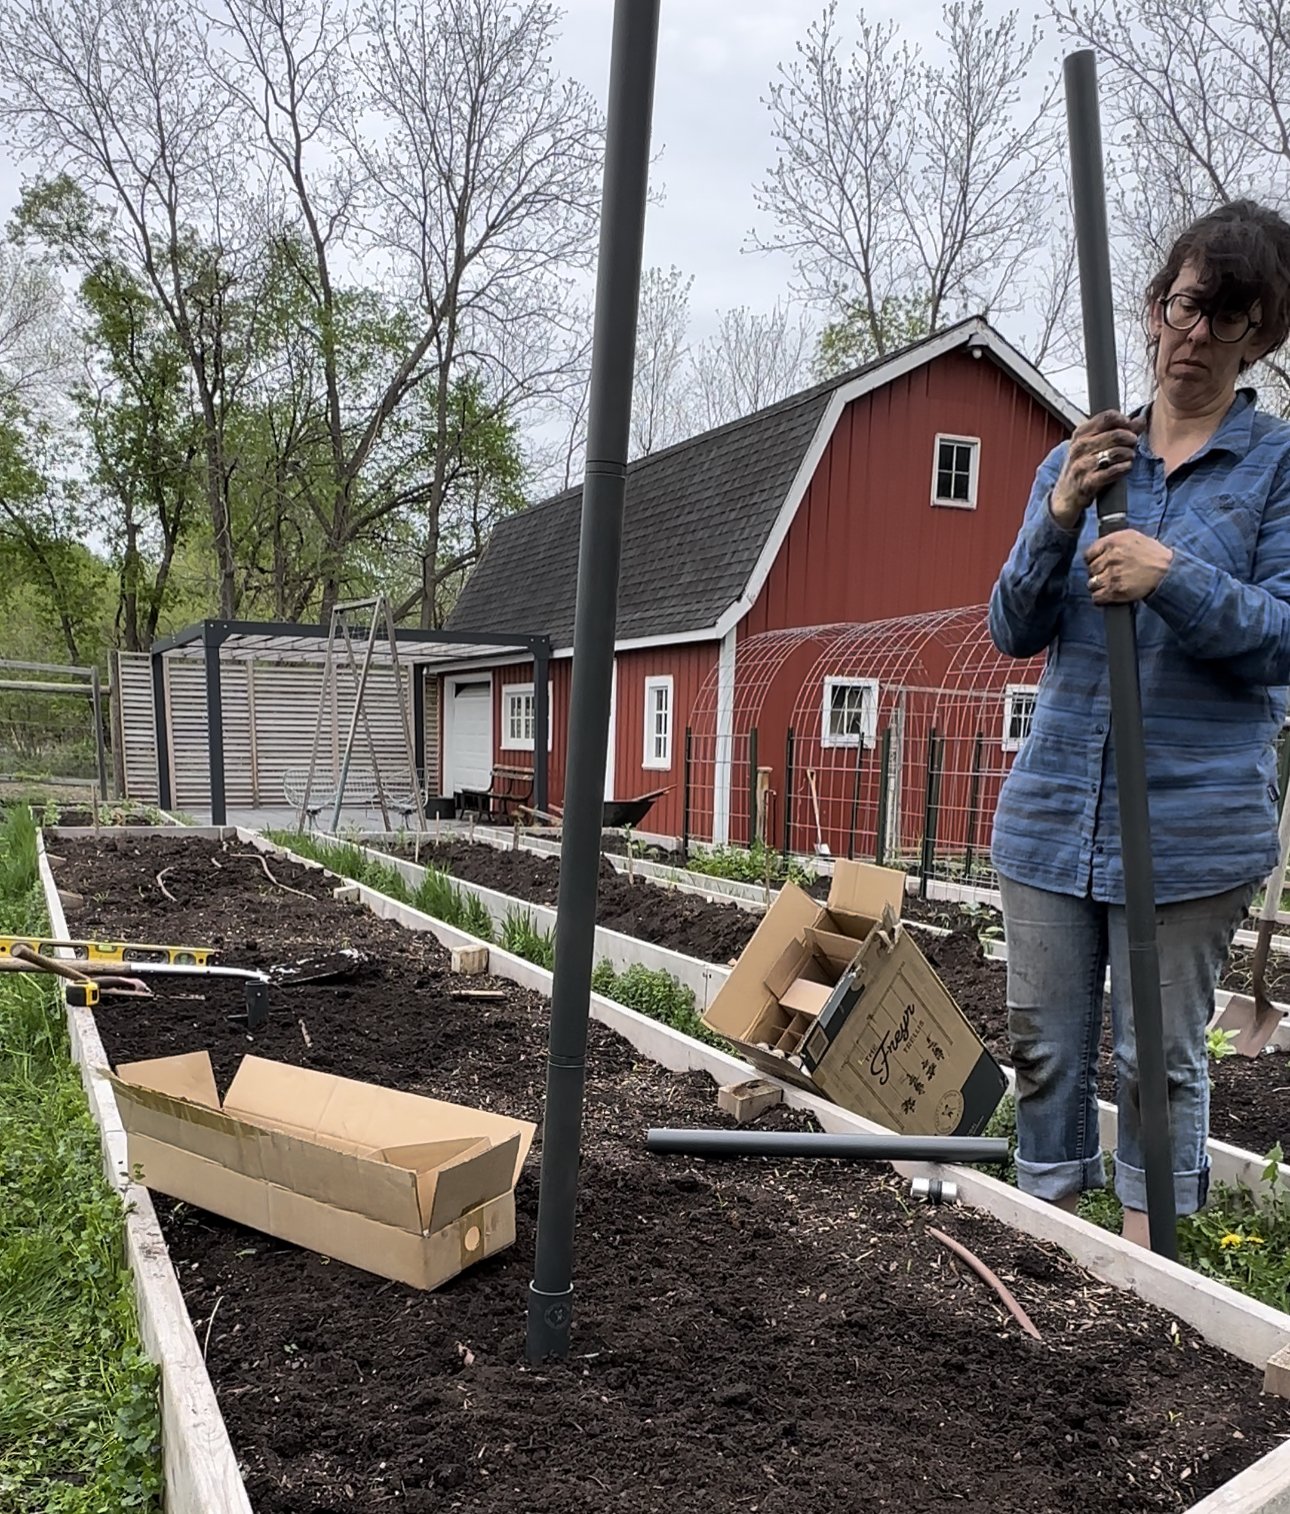
After the bases are installed at a distance to your liking (I did 7’ so the cross brace on top had some overhang on either side), you start screwing together the posts. Each segment comes in 2’ lengths and it can be installed as large as an 8’ x 7’ trellis. Watch How I Installed it on Instagram
There was zero pressure to share this or to become an affiliate, but after watching my beans flourish and just being so happy every time I got a shared view with this trellis and our main pergola, I decided to become an affiliate and join their program.
So this means if you follow this link and purchase something from their storefront, I receive a small kickback as a thank you for the organic marketing (sending new customers their way).

I installed this about 2’ shorter than possible because I am growing a half runner dry bean on them that top out around 5’. Instead of having a partly covered trellis, I am going for lush so kept it shorter for that fuller look. Next year I’ll go taller for winter squash. If you’ve ever jumped on my Amazon storefront, this is basically the same thing. You order what you want, and a small percentage is paid to me for introducing you to this product — at no additional cost to you. It’s a really nice way to support small businesses, especially this trellis as you’re supporting two small businesses with one purchase. That’s pretty awesome, I’d say, and your garden will be beautified and you’ll get to explore growing all kinds of things vertically (I will use this for melons or winter squash next year).
Affiliate Link
-
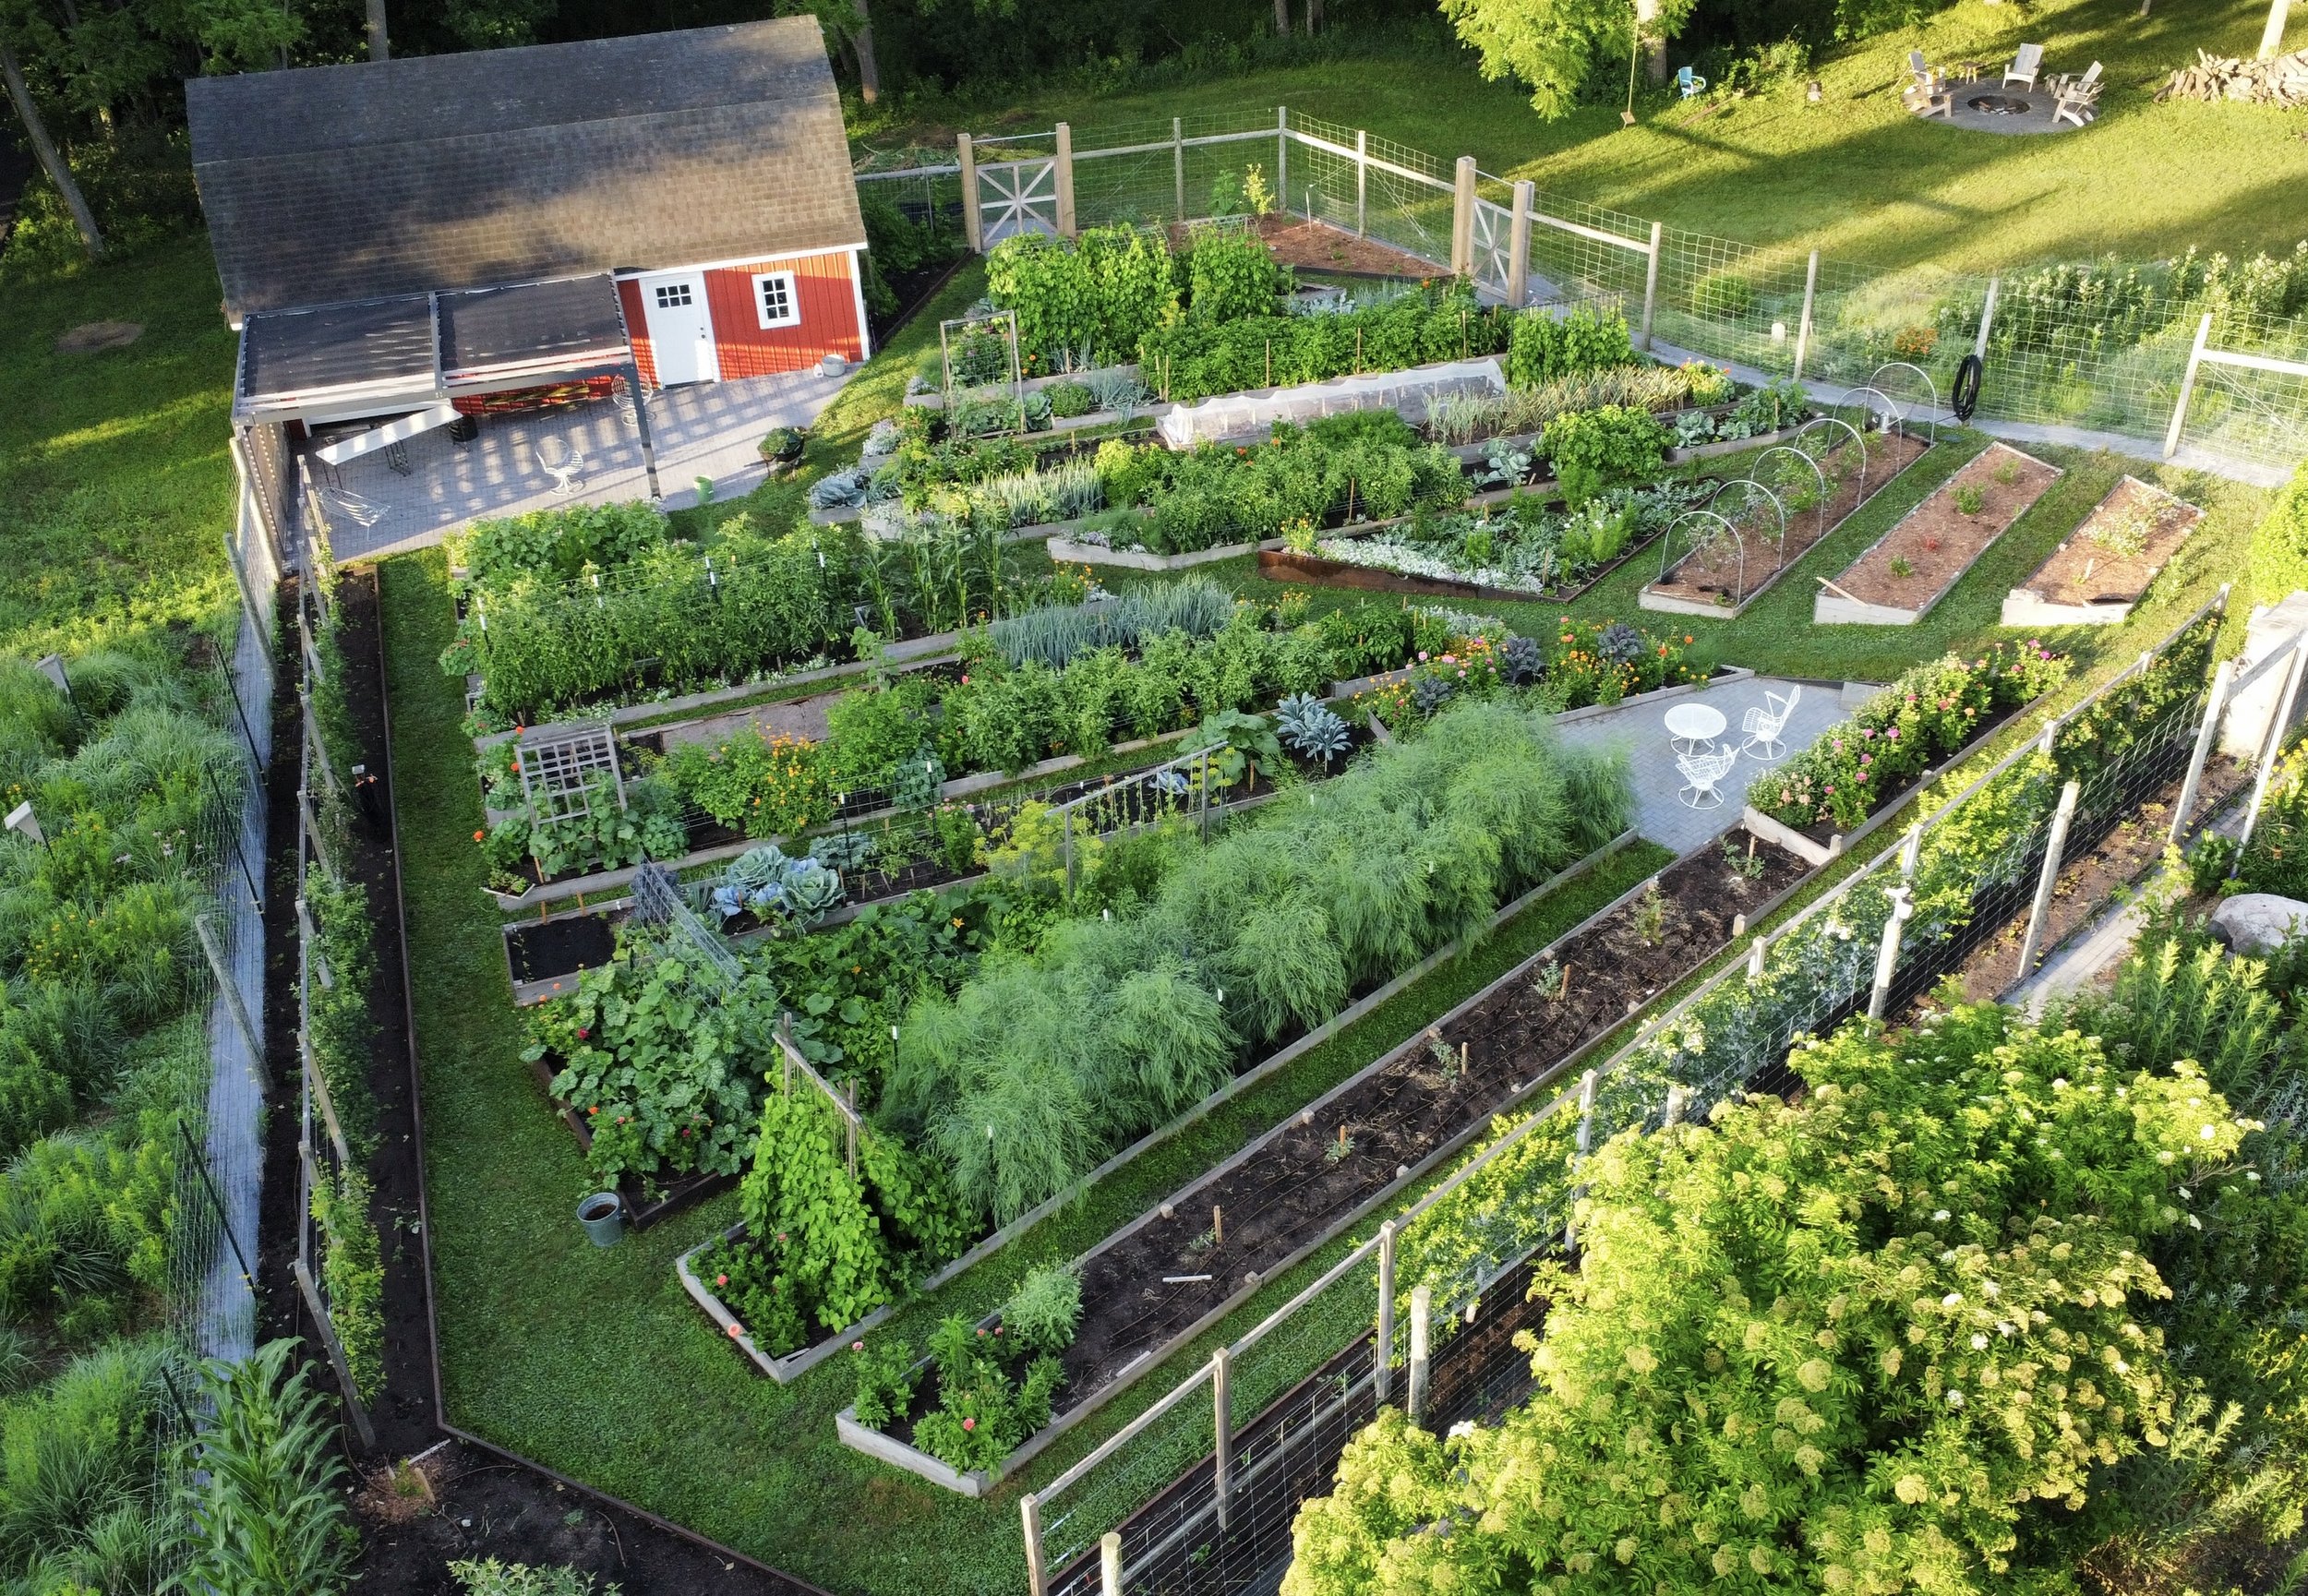
Complete 2023 Grow List + Perennials
A benefit of this garden tour is that I’ve spent time doing things I don’t normally do, like comb through my spreadsheets and write down every single thing we are growing in the garden this year.
Since so many of you won’t be able to. be here in person and becuase this is a really big chunk of intelluctual property, I wanted to be sure you all have access to this information.
While some of these varieties are new, the majority of what’s on this list are tried and true favorite varieties we have been growing for years. I didn’t exhaustively write out every radish we grow, but other than that, it’s pretty exhaustive.
The big picture:
- 156 varieties of vegetables (I rarely count this up, but WOW)
- 37 flower varieties
- 12 apple varieties
- 10 blueberry varieties
- 7 honeyberry varieties (mostly new to us)
- 4 strawberry varieties
- 4 pear varieites
- 1 apricot (that still hasn’t fruited for us)
New to us varieties are indicated with an ^.
There’s also a downloadable pdf version at the bottom of this post.
Vegetables
Tomatoes
Speckled Roman
Pantano Romanesco
Marzano Fire^
Costuloto Genovese
Pink Berkeley Tie Dye
Solar Flare
Afternoon Delight
Sun Gold
Yellow Pear
Paul Robeson
Oregon Spring (determinate)
Whittemore
Pianollo del Vesuvio
Plum Perfect (determinate)
Italian Roma (determinate)
Dwarf:
Micro Bonsai^
Fuzzy Wuzzy^
Canary Yellow^
Peppers
Bastian poblano^
Aji Amarillo
Baby Aji
Mareko Fana^
Hatch Red
Magyar
Joe E Parker
Feher Ozon
Gourmet
King of the North
Ralph Thompson
Hong Gochu Large
Early Jalapeño
Jimmy Nardello
Gernika
Alpine Poblano^
Eggplant
Rossa di Rotunda
Properosa
Diamond^
Listada de Gandia^
Tomatillo
Super Verde
Brussels Sprouts
Dagan
Gladius
Broccoli
Blue Wind
Green Magic
Belstar
Vita Verde
Bok Choy
Joi Choi
Cabbage
Chieftain Savoy
Green:
Primax
Tiara
Farao^
Promise^ (for fall root cellar)
Capture
Storage^ (for fall root cellar)
Red:
Primero
Ruby Perfection^ (for fall root cellar)
Napa:
Bilko
Merlot red
Minuet^
Kale
Scarlet
Nero Toscano
Dwarf Curled (for fall)
Cauliflower
Bishop
Skywalker
Flame Star
Cheddar
Fennel
Orazio
Solaris
Kohlrabi
Beas
Terek
Kolibri
Onions/Alliums
Patterson
Rossa di Milano
Gold Coin^
Red Long of Tropea
Musselburgh Leeks
Red Long of Florence^
Conservor shallot
Celery
Tango
Kelvin^
Artichoke
Imperial Star
Peas
Oregon Snow
Sugar Ann
PLS 595 (shelling)
Potatoes
Ama RosaButte^
Huckleberry Gold
Baltic Rose
Burbank Russet
Caribou Russet
Magic Molly
Keuka Gold^
Dry Beans
Dapple Gray bush
Tiger’s Eye half runner
Borlotti (speckled cranberry) pole
Snap Bush Beans
Gold Rush
Velour
Maxibel Haricot Verts
Sweet Corn
Solstice
American Dream
Popping Corn
Robust
Cucumber
Adam Gherkin
Max Pack
Marketmore 76
Lemon
Unagi
Summer Squash
Ronde de Nice
Croockneck
Winter Squash
Musquee de Provence
Waltham Butternut
Candystick Delicata
Kakai (pepita)
Musk Melons/Cantaloupe
Snow Leopard
Musketeer
Halona
Watermelon
Mini Love
Sunshine
Beets
Red Ace
Touchstone Gold
Badger Flame
Cylindra
Avalanche
Shiraz^
Detroit Dark Red
Carrots
Atlas
Mokum
Purple Haze
Bolero
Yaya
Head Lettuce
Rouge D’Hiver^
Speckled Back trout
Marvel of Four^
Red Romaine
Little Gem
Concept*
Coastal Star*
Jericho*
*Heat tolerant varieties
Radish
Easter Egg
French Breakfast
Peanuts
Tennessee Red Valencia
Fall Roots (not yet planted)
Watermelon Radish
Red King
KN Bravo
Purple Globe Top Turnips
Herbs
Dill
Bouquet
Basil
Genovese
Everleaf
Tulsi
Thai
Cilantro
Calypso
Leisure
Parsley
Giant of Italy flat leaf
Thyme
Sweet Marjoram
Cumin
East Indian Lemongrass
Bloody Dock
Flowers
Zinnia
Thumbelina^
Queen Lime Green
Queen Lime Red
Senora
Benary’s Wine
Benary’s Orange
Benary’s Salmon Rose
Benary’s Purple
Benary’s Bright pink
Giant Purple
Cosmos
Apricotta^
Afternoon White
Sensation Mix (self-seeded)
Snapdragon
Tetra
Marigold
Tangerine Gem
Strawflower
Silvery Rose
Purple Red
Raspberry Rose^
Candy Pink
Gomphrena/Globe Amaranth
Raspberry Cream^
QIS Pink^
QIS Carmine^
Audray White
Calendula
Alpha
Zeolights
Dahlia
from seed – color surprises!
Sweet Alyssum
Tiny Tim^
White
Allure Pastel^
Royal Carpet
Rosie O’Day
Sunflower
Soraya (indoor sowed and self-seeded
Mammoth (self-seeded)
Tithonia
Nasturtium
Cherries Jubilee
Sesame
Black and Tan
Kurogoma
PerennialsApples
William’s Pride
Snowsweet
Honeycrisp
Haralson
Zestar
Mountain Rose
Calypso
Gold Rush
St Edmund’s Russet*
Black Oxford*
Triumph*
*Grafted onto existing trees
Apricot
Brookcot
Pears
Luscious
Celine
Gourmet*
*Grafted onto Luscious
Blueberries
Duke
Chandler
Blue Jay
Blue Ray
Patriot
Pink Lemonade
Jersey
Blue Crop
Razz
Darrow
Honeyberries
Strawberry Sensation
Boreal Blizzard
Indigo Gem
Aurora
Honey Bee
Boreal Beauty
Boreal Beast
Strawberries
Jewel
Honeoye
Tristar everbearing (new this year)
Earliglow (added this spring)
Asparagus
Jersey Knight (started from seed in 2017)
-

Sesame Ginger Salad Dressing
This dressing, like my cole slaw dressing, can be used for regular salads too. This is a riff of a recipe John created many moons ago trying to replicate Annie’s Sesame Ginger vinaigrette.
Yield: 1 pintSesame Ginger Salad Dressing
Ingredients
- 2.25 ounces tamari or soy sauce
- 6.5 ounces oil (avocado or sunflower for a milder flavor)
- 5 ounces vinegar
- 1 T sesame oil
- 1 T mustard powder
- 1 T honey
- 2 T freshly grated ginger
- toasted sesame seeds, optional but elevates flavors
Instructions
- Place all ingredients in blender and blend on high until emusified.
- Store in a dark cabinet.
- 2.25 ounces tamari or soy sauce
- 6.5 ounces oil (avocado or sunflower for a milder flavor)
- 5 ounces vinegar
- 1 T sesame oil
- 1 T mustard powder
- 1 T honey
- 2 T freshly grated ginger
- toasted sesame seeds, optional but elevates flavors
-

Strawberry Rhubarb Pie
This is probably our favorite pie of the year. I make it for Father’s Day and John’s birthday. We love apple pie too, but there’s just something quintessential summer about this flavor that makes this our number one in our home.
Yield: 1 pieStrawberry Rhubarb Pie
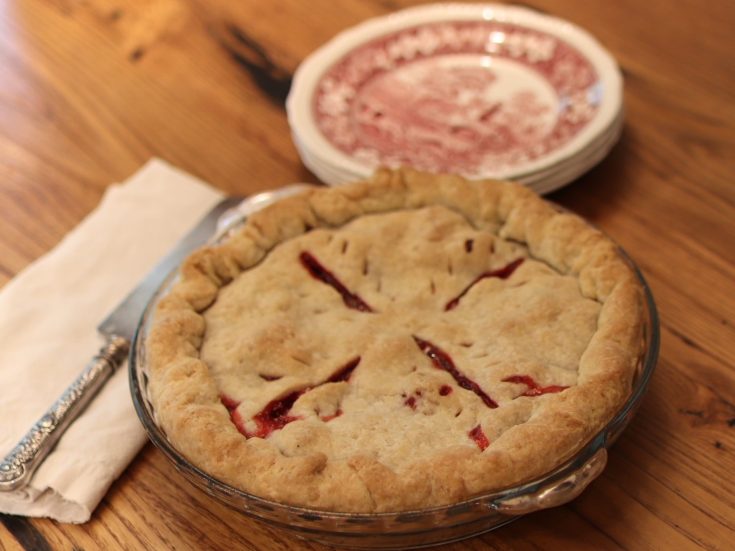
If you’re not a rhubarb fan, don’t be fear this pie — like my jam, I use
a 2:1 ratio of berries to rhubarb so it’s more of a background flavor. I
promise it’s strawberry forward, and even rhubarb-avoiders will enjoy
this combo.Ingredients
- All-butter pie crust (or your fav double pie crust recipe)
- 4 cups hulled and diced strawberries
- 2 cups rhubarb, chopped into 1/4” pieces, several stalks of rhubarb (it’s always more than I think I’ll need when harvesting)
- 3/4 cup sugar
- 3 T tapioca
- 1/2 tsp vanilla
- 2 tsp fresh lemon juice
Instructions
- Prepare all-butter pie crust and place in fridge to set while you prepare the filling.
- Turn the oven on to 400 to start preheating.
- Cut ends off strawberries and hull. Larger berries can be quartered, smaller ones can be halved, and really tiny ones can be left whole. You want 4 cups after they are cut up, so you’ll need more than 4 cups of berries total to yield this.

- Optional: peel the rhubarb before chopping (I don’t usually do this but it will make it even more tender). Using a paring knife, knick the end of the stalk and then use your fingers to continue to peel off the outer skin. I sometimes also use a peeler to start this process.
- Combine strawberries, rhubarb, sugar, tapioca, lemon juice, and vanilla in a medium sized bowl. Let macerate for 15 minutes.

- Roll out base pie crust, gently lay in your pie tin and repeat for the top pie crust. Fill pie shell with filling, top with upper crust. Seal with water and crimp edges. Add slits to top to provide openings for steam.
- Bake at 400 for 20 minutes and then lower oven to 350 and bake another 25-35 minutes, depending on how golden brown you want the crust. Be sure to see bubbling juices before you call your pie done.
- Let cool for several hours until just above room temperature — this takes 3-4 hours for me.
- Serve with a side vanilla ice cream, perhaps?!
-
Guide to Fertilizing Vegetables
Soil fertility and nutrient availability combined with air and water are essential for growing a garden. They give us life.
For plants to feed us, they not only need a lot of the non-mineral elements Carbon (C) , Hydrogen (H), and Oxygen (O), they also need many other mineral nutrients. Seventeen total minerals are needed, and the 14 mineral nutrients are broken down into macronutrients or micronutrients. This nomenclature simply denotes how much of the element is required for plant growth.
Primary macronutrients are nitrogen (N), phosphorus (P), and potassium (K). These are the NPK denoted on fertilizers such as a 10-10-10, equal parts of each.
Then there are secondary macronutrients: Calcium (Ca), Magnesium (Mg), and Sulfur (S).
Finally, trace elements are also needed, though in smaller amount still. This group is comprised of Boron (B), Copper (Cu), Chlorine (Cl), Iron (Fe), Manganese (Mn), Molybdenum (Mo), Nicket, and Zinc.
Plants primary form of nutrient uptake is through the soil. In organic gardening, these nutrients are most often supplied in an unavailable form that microbial fungi and bacteria convert into usable form over time. Top dressing with compost — adding organic matter to the soil — and using a slow release organic fertilizer are my top tried and true ways to deliver nutrients for the microbes to metabolize (it’s a process called mineralization).
The Importance of Soil pH
But just because we supply the soil microbes with the nutrients doesn’t mean it will work. The other major factor in nutrient uptake is soil pH. The pH of your soil can be obtained through a soil test. It’s the first thing we did with our site when we built our raised beds (though we haven’t re-tested since fall of 2016).
If your pH is too high or too low essential nutrients will be locked up and unavailable, no matter how much fertilizer you add to the soil. A pH around 7 (6.0 – 7.5) is generally a good level for growing food, except for blueberries, lingonberries, and cranberries which prefer moderately acidic soils. For those unusual plants, we amend with peat moss at planting and add elemental sulfur annually to maintain a lower pH.
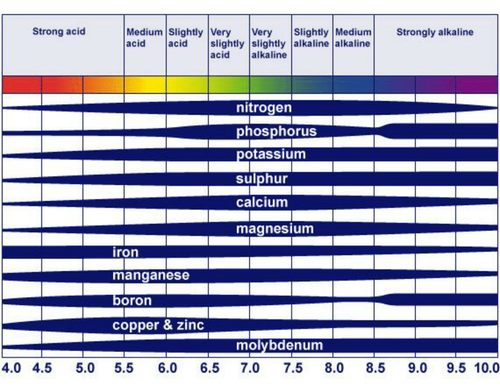
From Review of the non-NPKS nutrient requirements of UK cereals and oilseed rape by Susie Roques et al. If you don’t know your soil pH definitely look up your state’s extension agency and get your soil tested.

This is our soil test results from fall of 2016. This is straight up dig up some turf and see what the soil reads, before we added compost or anything else to our soil to improve drainage.
As you can see, our Phosphorus is really high. That is in part due to the previous owner’s love of turf grass. Phosphorus is rather immobile and so it ends up accumulating in the soil.
I’ve been learning about the fact that Phosphorus is needed much less than say Nitrogen (extension papers cite a 4:1 Nitrogen to Phosphorus need). So it is with some curiosity I might try mixing up our next batch of fertilizer without any rock phosphate.
Another possibility would be to just add soybean meal or another seed meal to our garden beds every year. It might be all we need due to our rich in organic matter soil, but I am not sure I’d be able to jump off that cliff with any modicum of confidence and without some serious sleep deprivation ensuing. But maybe one day I’ll be brave enough to try. We may be feeding our soil too much, but then again our plants seem to love the approach we are taking so it’s hard to convince me to change.
Slow Release vs Foliar Feeding
We have options for applying fertilizers, and it might be a bit confusing. I know I can get confused and overwhelmed, even in researching this post.
In simplest terms, you want to feed your soil microbiome in order to feed your plants. Here in our gardens and for as long as we’ve been growing food intensively (since summer 2001) almost exclusively used a granular slow release mix. It wasn’t until last summer that we started playing with foliar feeding, and it was because we started applying other beneficial items to the orchard that we decided to mix it in for a burst of nutrients.
If you can handle the odor, a fish and seaweed emulsion is a great short-term addition (and fix) for plants that need a little pick me up (nutrient-deficient) especially in the early season when temperatures are cool.
Cold soils make for stagnant nutrients because the soil borne bacteria and fungi are only active in warmer soils (above 60F). So when we push our season and our plants look a little peaked (perhaps purple leaves like I often see on my earliest brassicas in early April under row cover) it’s more a reflection of those cooler soils being unable to supply the needed nutrients than a problem with the plant. Warmer weather always remediates this without any intervention. Although if this worries you, it would be a great time to implement some foliar feeding.
That being said, from all the research I’ve been doing foliar feeding is not really recommended by extension agencies, and being a master gardener, they are the experts I rely on for science-based gardening resources.
Stomata, the pores on leaves (like pores on our faces), are not meant to uptake nutrients; they are more designed for gas exchange. It does work to possibly right a nutrient deficiency but long-term you should always always be feeding your soil microbes. They are the true life-givers and literal foundation of our lives.
Containers vs In-Ground
If you grow in the ground, it’s a fair bit easier to fertilize. With containers, however, every time we water we are leeching a some nutrition out the pot and onto the deck or ground.
For container plants, I tend to plant in an even higher concentration of compost (30% compost to potting soil) and top dress the containers about once a month during the growing season with some slow release fertilizer.
Foliar feeding would also be an excellent choice for container grown tomatoes or peppers, for example, as they need a fair bit of nutrients to make the magic happen. For container gardens, I’d use foliar feeding (fish/seaweed emulsion) 1 tsp/gallon of water weekly once the plants start setting fruit.
Application Schedule
So what to use and when? I’ve put this together chart to help take the guessing work out of it for you this summer, and for years to come.
-
Complete Organic Fertilizer
You may have noticed I removed my organic fertilizer recipe from the website. This was not an error. It was intentional, as through the course of writing my book I ended up consulting with Steve Solomon, the curator of the original recipe I shared from his gardening tome, Growing Vegetables West of the Cascades.
For your convenience, here is the updated recipe.
A Word on Sourcing Materials
Here in the Midwest, the most affordable and accessible seed meal is soybean meal. Any seed meal will do, so if you’re in a different region, cottonseed meal may be.your best and easiest option. Choose local seed meal.
Soybean meal I can always find at a local farm supply store, the rest I confess I most often source online and have shipped to us. I’ve updated my Amazon storefront (affiliate link — I make a minor commission off purchases made through this link) to include all the ingredients we source when we mix this up.
We (thank you, John!) recently mixed up a new batch, which usually lasts us a full growing season in our expansive gardens.
Ingredients
Nitrogen:
- 50 lbs (23 kg) soybean meal (or other seed meal)
Calcium:
- 22 pounds (10 kg) agricultural lime
- 10 pounds (4.5 kg) agricultural gypsum
Phosphorus:
- 15 pounds (7 kg) rock phosphate
Potassium:
- 2 pounds (1 kg) potassium sulfate
Trace Elements:
- 6 pounds (3 kg) kelp meal
Optional ingredients as determined by soil test:
- 2 3/4 ounces (78 g) copper (copper sulfate)
- 2 3/4 ounces (78 g) zinc (zinc sulfate)
- 1 1/2 ounces (42.5 g) boron (Solubor)
- 7 ounces (198 g) manganese (manganese sulfate)
- 1 1/2 ounces (42.5 g) molybdenum (sodium molybdate)
Despite Steve’s insistence that all gardens need extra copper and boron, we are not currently adding any of the optional ingredients listed above, and I made a conscious decision in my book to list them as optional. This is the beauty of gardening — taking our own paths across the seasons.
We use a wheelbarrow and alternate the soybean meal and calcium together first, and then lump and mix the smaller proportions together, including the kelp meal, and add them in alternating proportions as well, mixing well with a spade with each addition. The fertilizer keeps indefinitely and we store it in a plastic rubbermaid container in our barn for easy access.
-

Direct Seeding Carrots and Brassicas
In 2022, I trialed direct seeding some of my fall brassicas. Not my most prized ones, but some. A brave step to discouple myself from my seed starting routine, an overdue time to question if I really need to seed starting everything indoors (duh, no, Meg, you don’t).
And what I found out was bok choy is the champion of every season, just like carrots and beets.
This surprised me. I direct seeded it a few times in summer and transplanted them around and we had bok choy for almost the entire season.
This video also highlights my carrot preparation and seeding, as well as how I thin my carrots, which I just did last week. And in another couple weeks I’ll be doing this exact same seeding and using burlap to keep the soil cool and moist to aid in germination.
Hope you find this timely and helpful.
-

Early June Garden Tour
Hey everyone —
Enjoy your early access to my monthly garden tour on my You Tube channel. Later this weekend I will send it out to in my sometimes-monthly email newsletter.
-

Tomato Trellising & Pruning
Here are two YT videos that show how we’ve been training and growing our indeterminate tomatoes for the past 5 years. It was a big shift from a single leader approach to this method, but it’s produced more plants, and honestly in a more beautiful way.