
Your cart is currently empty!
Welcome to Meg’s Blog
-

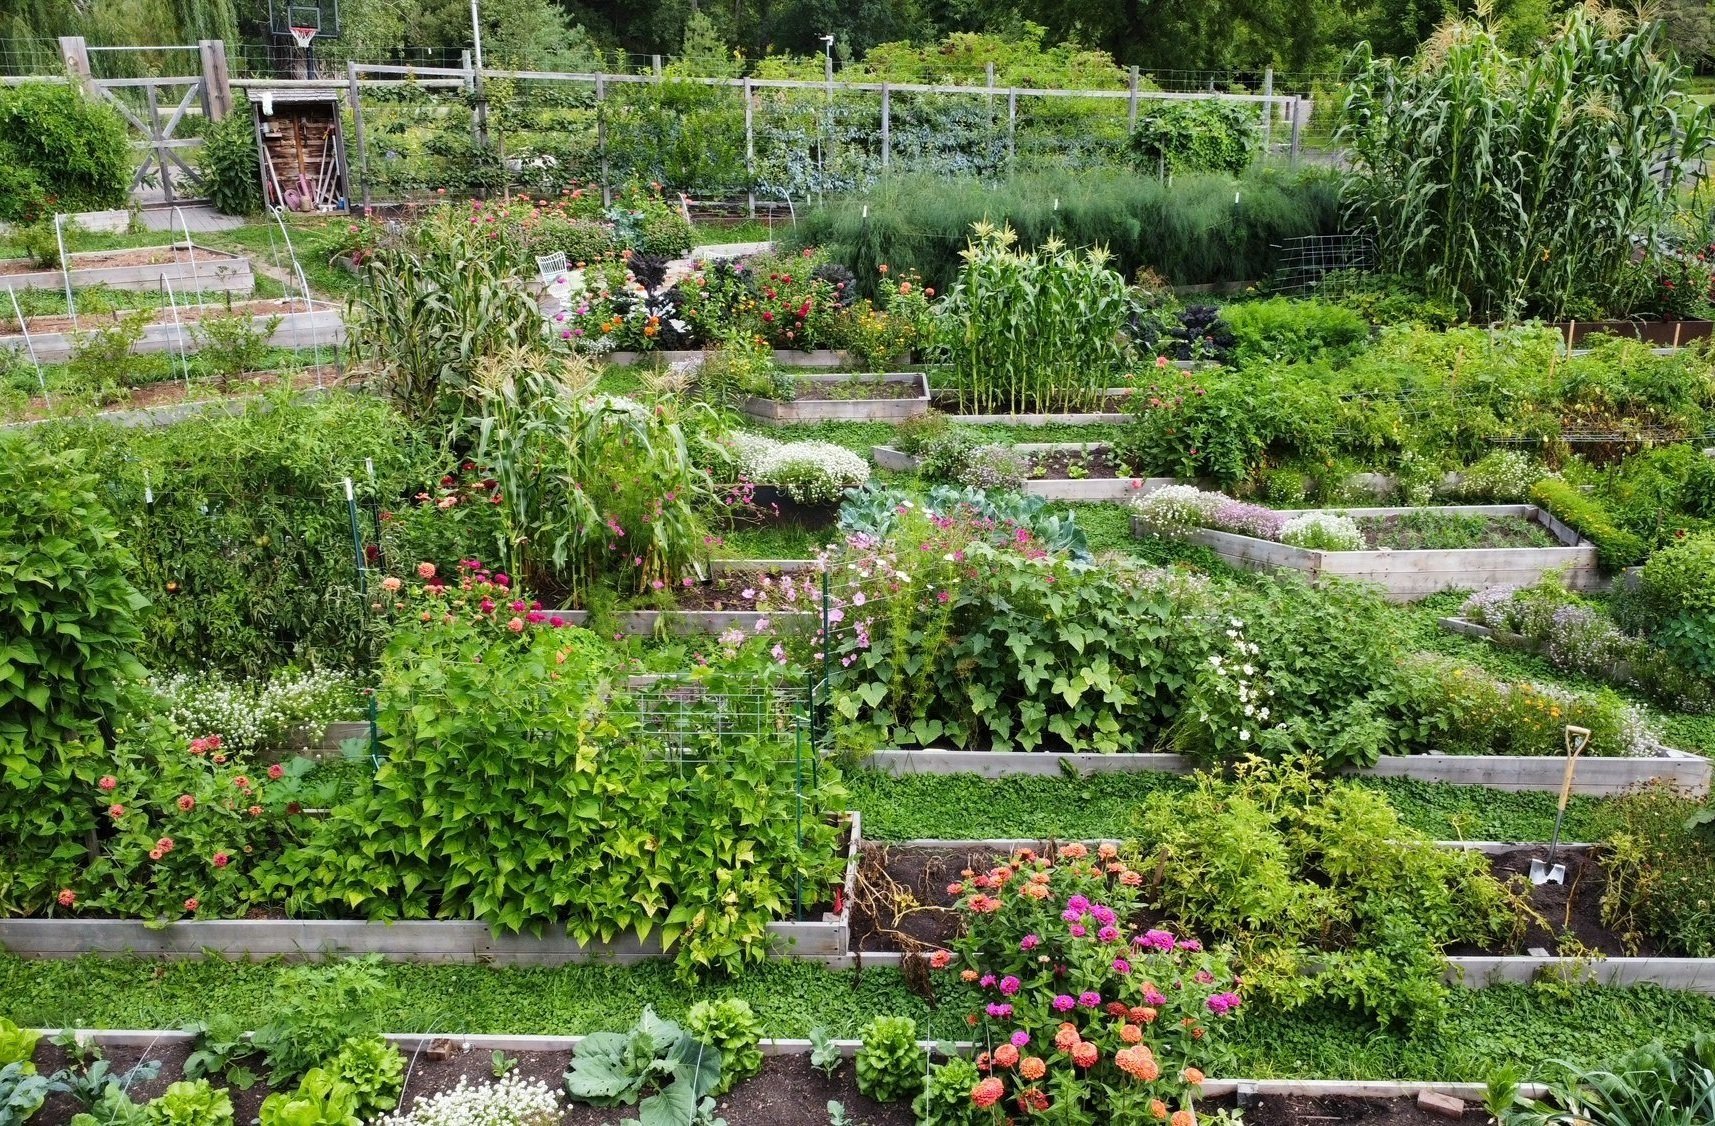
Defining the 2023 Garden Goals
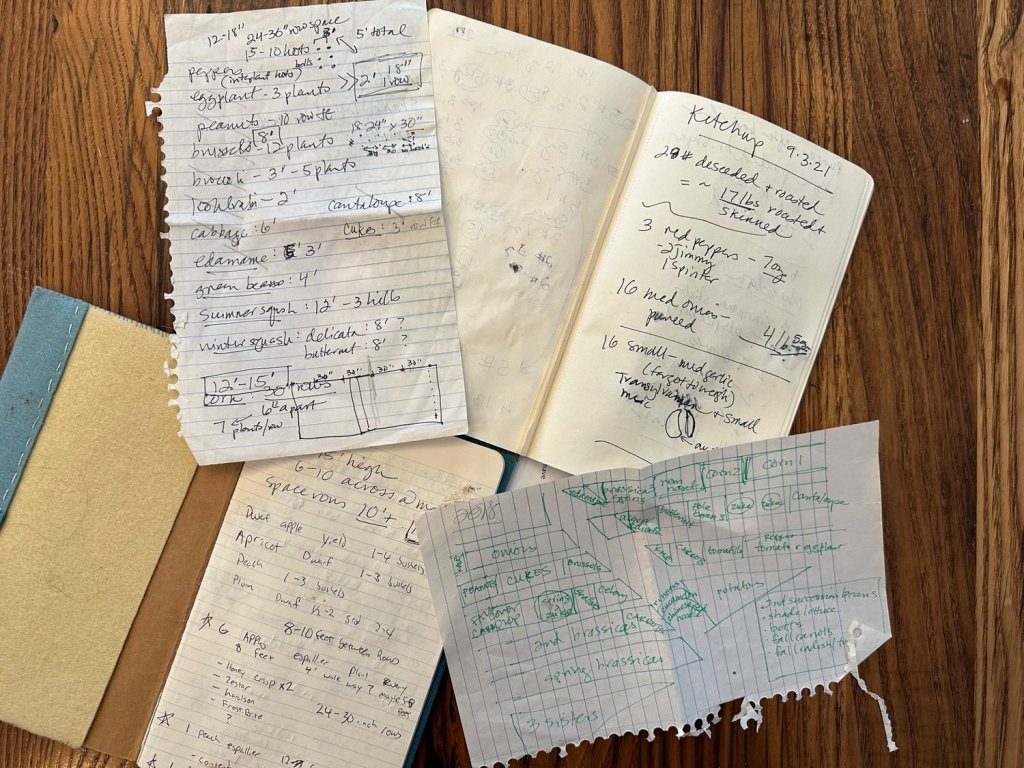
Let’s talk about how we define our garden goals. This is a topic I come back to time and again because it is inextricably linked to my seed buying, seed starting, timing of my plantings, the actual garden layout, and my sense of fulfillment year over year.
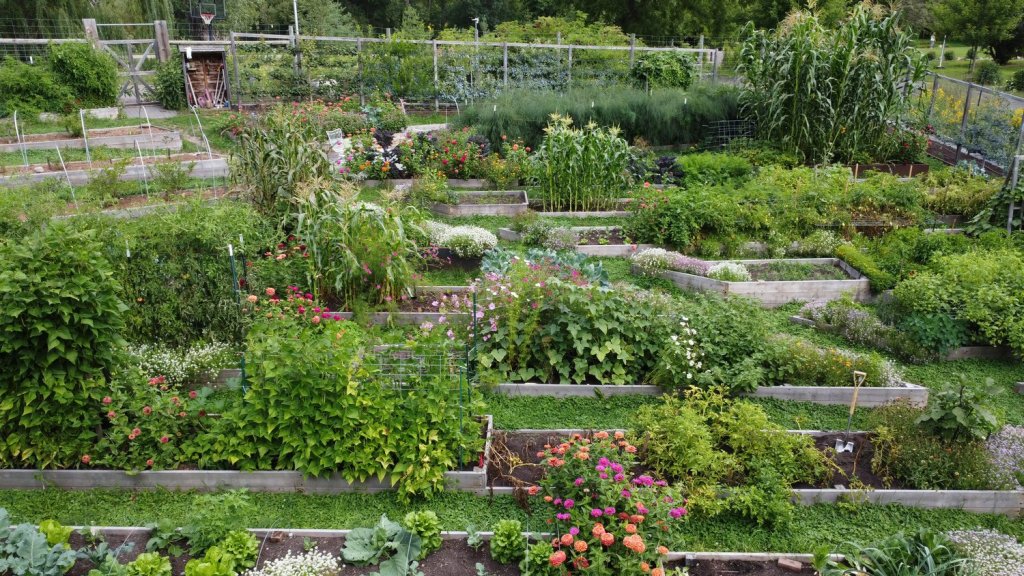
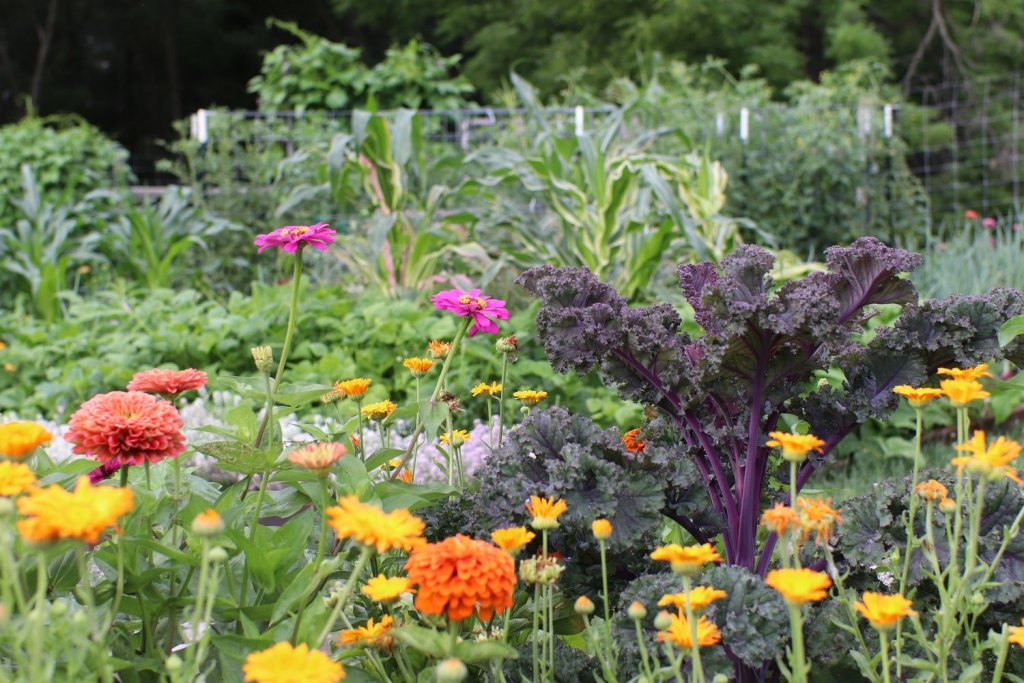
This year we have two really big, competing events that will directly impact how I plan and plant the garden. The first is a pretty big, local garden tour that is happening on July 8. It’s with my Hennepin County Master Gardener program, and it’s a Learning Garden Tour. Succession planting will be the topic covered at this garden (there are 10 gardens to visit), and we will have 10 plants of interest ot highlight, an education station, and the garden needs to be as perfect as possible, a goal I think is toxically positive. The paths will need to be tidy yet lush, the flowers as full bloom as possibly by Fourth of July, and as much early season summer fruit as I can push is my goal. So that means possibly starting some things extra early, like a few cucumbers, and definitely lots of flowers. I really want the garden to be screaming summer at us with pops of color everywhere. Zinnias are usually in bloom along with calendula, snapdragons, alyssum, chamomile, and more by early July.
I also want to demonstrate how robust a diversely planted early summer harvest can be — so I’d like to have cauliflower, fennel, broccoli, cabbages, beets, and possibly some carrots and kohlrabi in season too. Of course, herbs, and lettuce, green onions and peas will also be a goal. I’m sure I’m forgetting something too.
In stark contrast to this early season push, a few weeks after this tour we plan to depart for Europe for 2 weeks!
Gulp.
There are so many factors to consider. Why are we leaving our garden in the height of the growing season? Who’s going to take care of it when we’re gone? How will I start and seed all my fall crops when we are out of town from late July through the first week in August? What can I alter the timing ahead of leaving while not diminishing the lushness of the July 8 garden tour? What kind caretaker will be willing to pick of colorado potato beetles twice daily in our stead? Who’s going to know when to harvest our garlic?! Who will do all the harvesting, weeding, and application of Bt and Cease in our absence? And so on ….
The weeds are the least of my worries, honestly.
How do I plan a lush and early season garden while also, hopefully, equal parts delaying the season on my pickling cucumbers and tomatoes?! This is the big puzzle piece that has been twisting and turning around in my mind’s eye for months now. I think succession planting is probably the answer. Like, duh, Meg!! If I can push the cucumbers early, somehow, I can pull them out in mid-July and replant the space before we leave. That’s a big if though.
Or we delay them and let early flowers and brassicas and some tomatoes be the focus of the garden tour, and highlight the fall garden starting to take shape. That seems like a more solid and wise plan.
I also plan to utilize a lot of cover crops this summer too, to make the garden lush in July but give me some big spaces I can set fall crops in before we depart.
The third big goal is of course annual goal of increasing and improving our year-round consumption. We want our hundreds of pounds of potatoes, and dozens of jars of tomatoes, salsa verde, and pickles plus loads of shelf-stable vegetables too. We hope to grow at least as many dry beans as this year, maybe more. So the big question is: do we delay our vining crops to come into season starting in mid-August, after we return?
I think the wise answer is YES.
But this might mean my normal, jaw-dropping ripe tomatoes won’t be in season for the July 8 tour. See how inextricably linked these goals are? They really are interdependent. The thing is, those early sungolds are a big part of how and why I push the season here — to start every harvest season as early as possible so they can extend for longer and/or turn over space for new crops. And it’s an really important part of the story I want our garden to tell to those hundreds of visitors this summer.
So the path, by this logic, would be this: still go for early indeterminate tomatoes, the ones that produce until first frost and delay the determinate paste tomatoes to not be ripe until mid to late August. And as I type this, I am realizing that I think I already do this for the most part. I start two succession of tomatoes, one in late February (indeterminates) and a second succession in early April (determinates) for this very reason. I have tried to time my tomato harvest to come after our pickling season.
Which leads me to cucumbers, melons and summer squash. The most difficult one of these is cucumbers and there’s not an easy way around this one. I think ideally they come into season in early August, we miss the first week, the caretakers (hopefully) harvest and enjoy them, and we get whatever comes next. This will, however, delay some fall plantings as that space has become prime fall root crop square footage over the years.
Luckily, there are a large swath of crops and flowers that can be planted per usual, following my sowing guide, including: carrots, beets, lettuce, corn, green beans, potatoes, herbs, fennel, cabbage, broccoli, kale, onions, garlic, peppers, tomatillos, peas, winter squash, watermelon, musk melon, sesame, zinnia, cosmos, marigold, alyssum, calendula, snapdragons, and most of our herbs.
So it really does come down to timing my tomatoes, cucumbers, summer squash, and our final successions of snap beans, those unrelenting summer producers.
Now within these goals, there is the matter of how the garden will be planted. My goal is to go even more flower forward. Yes, this will take up some vegetable real estate, but it also eases the burden of vining crop production in our absence and achieves this goal of a robust and colorful garden for July 8.
I’m hopeful we have enough space for more flowers without losing a lot of functional vegetable square footage. I do usually have some novelty or ornamental crops, ones we don’t really eat; last summer it was the Japonica striped maize corn. And I will probably only do one big spring succession of brassicas and then one more in fall (I usually do 3-4 successions of cabbages, broccoli, kohlrabi, and bok choy). This will certainly open things up.
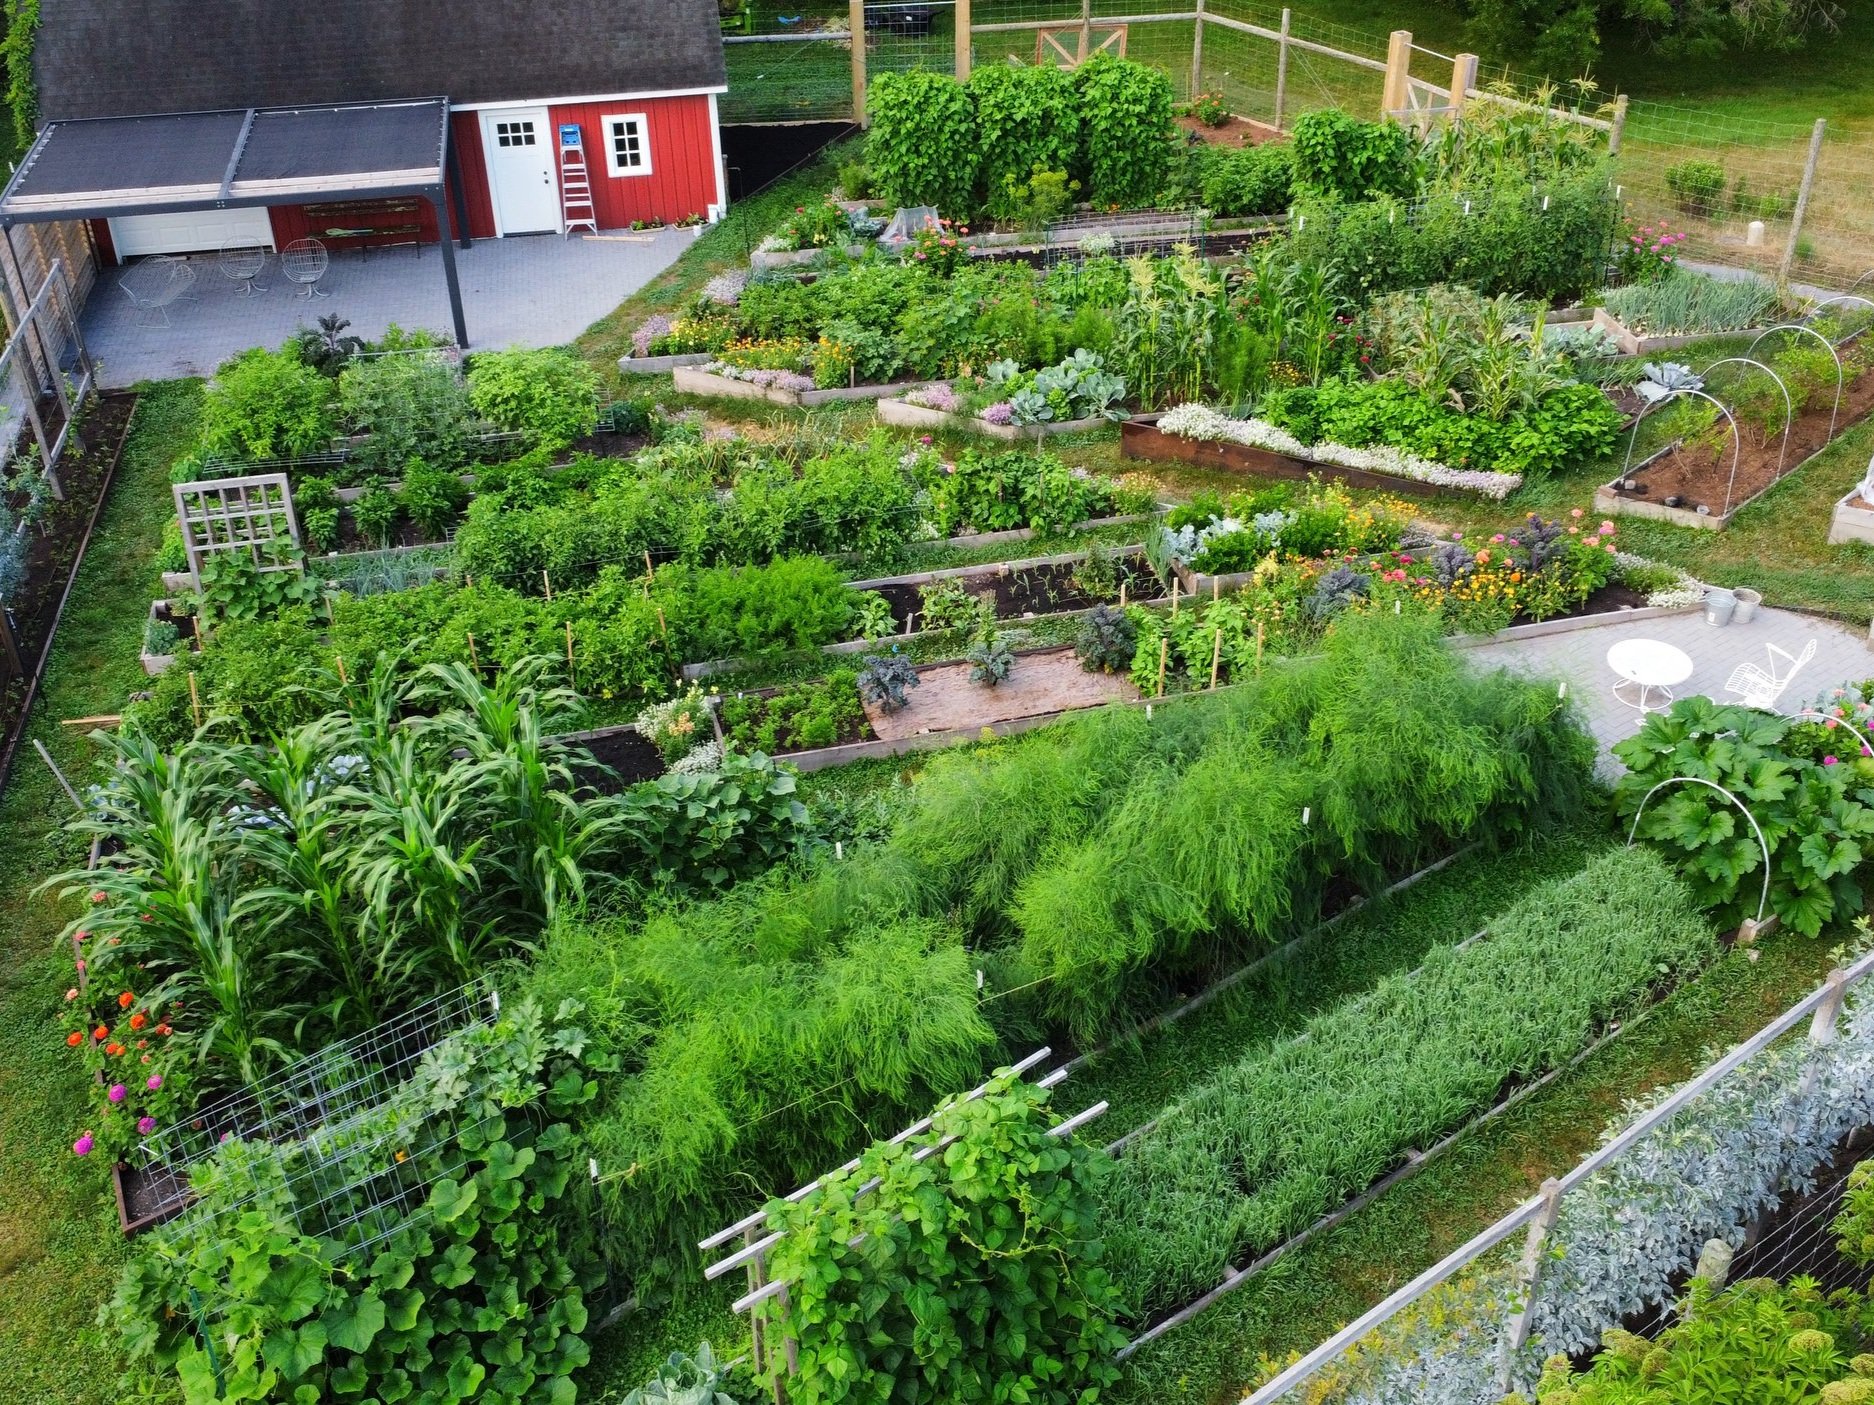
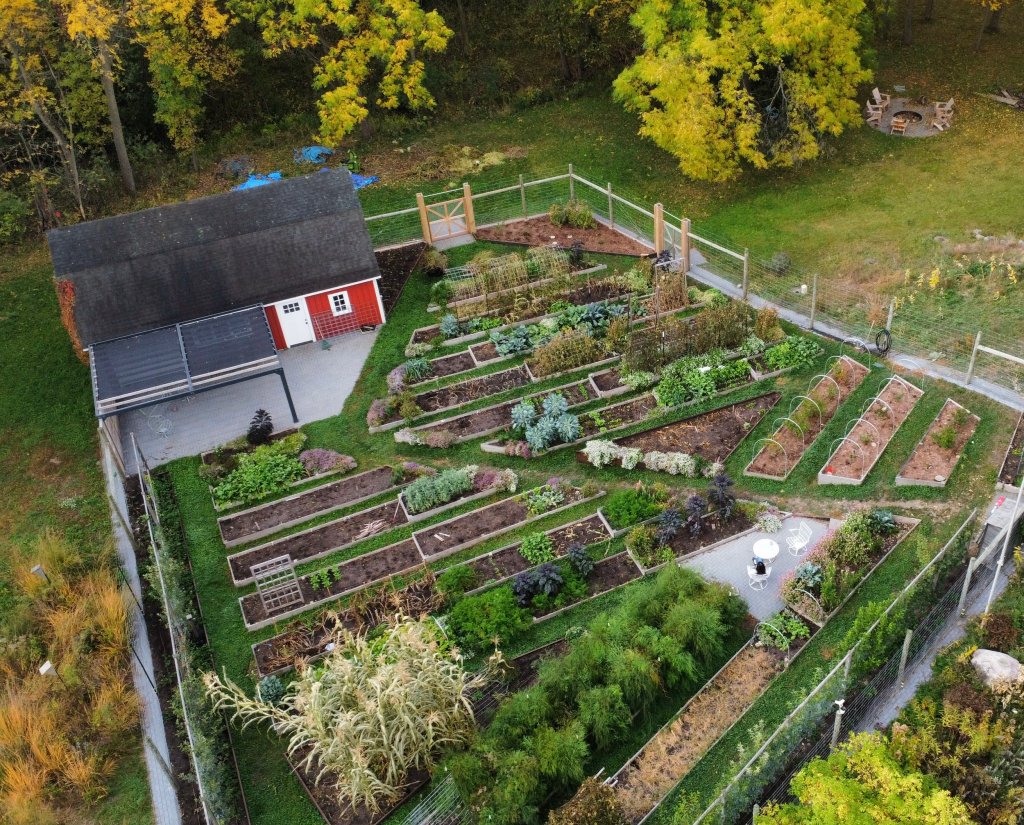
My next step in working to implement these goals is to start thinking visually where I want the anchors of the garden to be: the watermelon trellis, the bean and cucumber trellises, the tomato cattle panel walls, our blocks of corn, and the massings of Benary’s zinnia. These are each really important focal points that draw our eyes in and around the garden.
Lower growing crops like potatoes and tomatillos, carrots, and green beans don’t have the same wow factor on the landscape, though they contribute texturally and impact the garden in other, more subtle ways. So that whole process will in all likelihood come together sometime in late April as I physically move the trellises around. I look for good angles from the top of the garden, the main entrance, as well as the long diagonals from the south entrance and from the northeast corner looking southwest.
I hope you found this out-loud process a bit helpful in understanding the factors that drive how and when I plant the garden. Because these are the framework for the year, a lot of what I talk about in the coming months will be orbiting around these goals and deadlines.
-

The First Gardening Task: Propagating Rosemary
Before the ginger is procured and soaked and the first onion and celery seeds are sowed there is the rosemary to think about. Rosemary is an indispensable culinary herb for us and one that doesn’t easily grow from seed. So we do what the vast majority of horticulturists do all the time: we propagate it via clones.
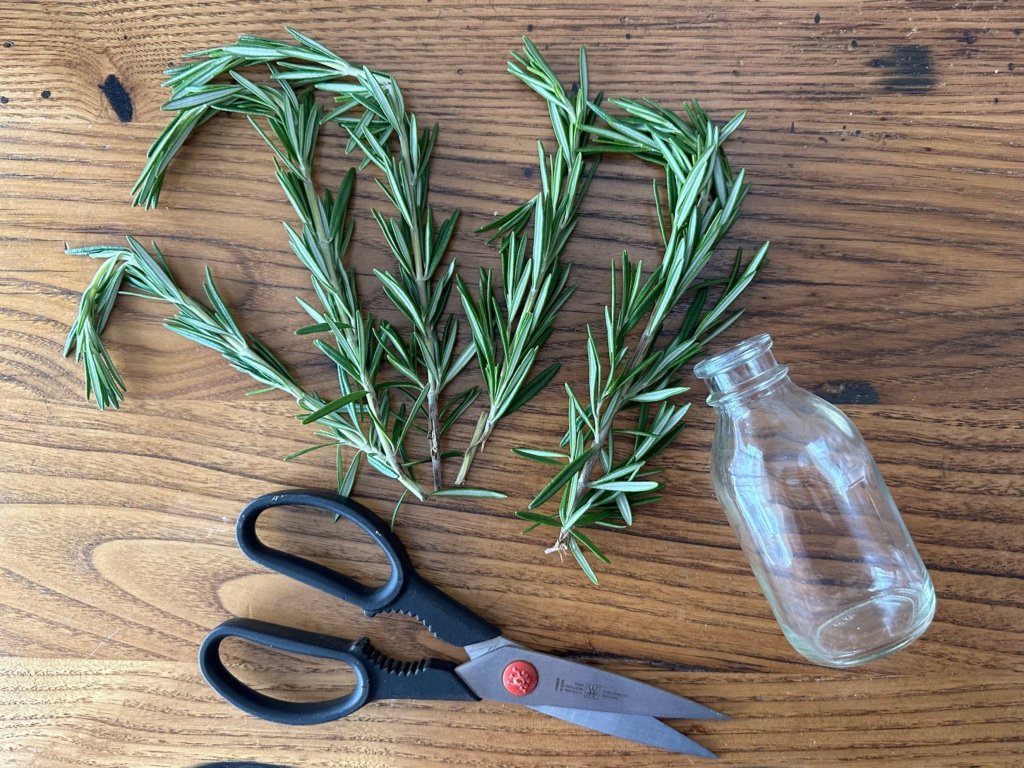
Just picked up a bunch of fresh rosemary at the grocery store. It’s time to start my 2023 herb garden.
Pretty much every single houseplant you’ve ever bought or been gifted has been clonally propagated. Perennials that can be clonally propagated surely are too. We’ve rooted our elderberry in new places around our property, for example. Tomato shoots will readily root from stem cuttings too, if you place them in water. This is a great way to grow extra plants for donating or to perhaps extend your tomato season.
Since I forgot to dig up our rosemary last fall before our first frost, it sadly perished. It was the second year in a row I’d forgotten. As a result, I don’t have a rosemary plant I’m overwintering indoors. And that means we’ve had to buy rosemary stems for holiday meals (gasp, the horror!). So I will either have to pick up new plants in spring or start my own. And I love giving this propagation a try in winter and now is a great time to think about it.
It can be a hit or miss process with the stems. I will have to remove some stems that start to decay rather than thrive, so I like to use a few different types of stems — the softer, more supple stems are usually the best for propagating rather than woody stems. But I do include more turgid (thick and strong) stems as well.
Here’s What to Do
Cut young rosemary stems to about 4-5” in length, or a length that works for your jar size. If you have a long, young stem, you can try to get several cut stems out of it for propagation. Try to cut them a few different lengths in terms of the maturity of the stem and see which ones work better for you.

Strip about 3/4 of the leaves.
Place cut stem in a jar of filtered water.
Save and dry removed leaves for your herb stash.
Keep them in a sunny windowsill.

Change the water at least once a week.
Don’t let any leaves sit in the water as that will promote rot. If you see a stem develop rot, remove from the jar.
If it’s going well, in about a month you will start to see root emerge from the stems. I wait until there are several roots from each stem before potting on into a 3” pot.
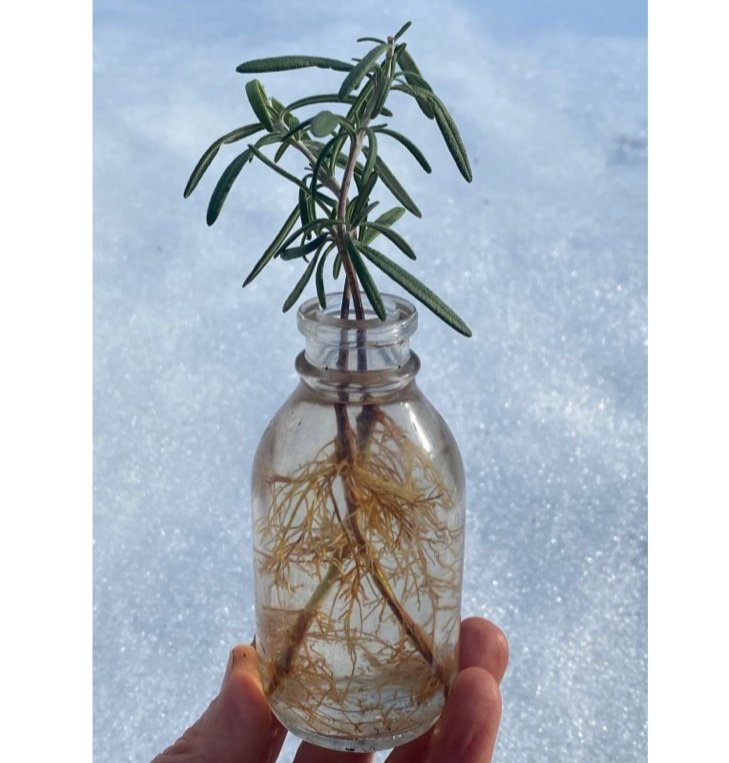
Rosemary thrives in drier conditions, so be careful to not overwater when you pot it up. I admit I’ve learned this the hard way, more than once!
You can use this same method to make new indoor house plants — your pothos, pilea, spider plants, and even philodendrons will all root in water that is refreshed weekly. Succulents make life even easier for us plant lovers: all you have to do is take a leaf and place it on the soil surface and it will root over time.
-
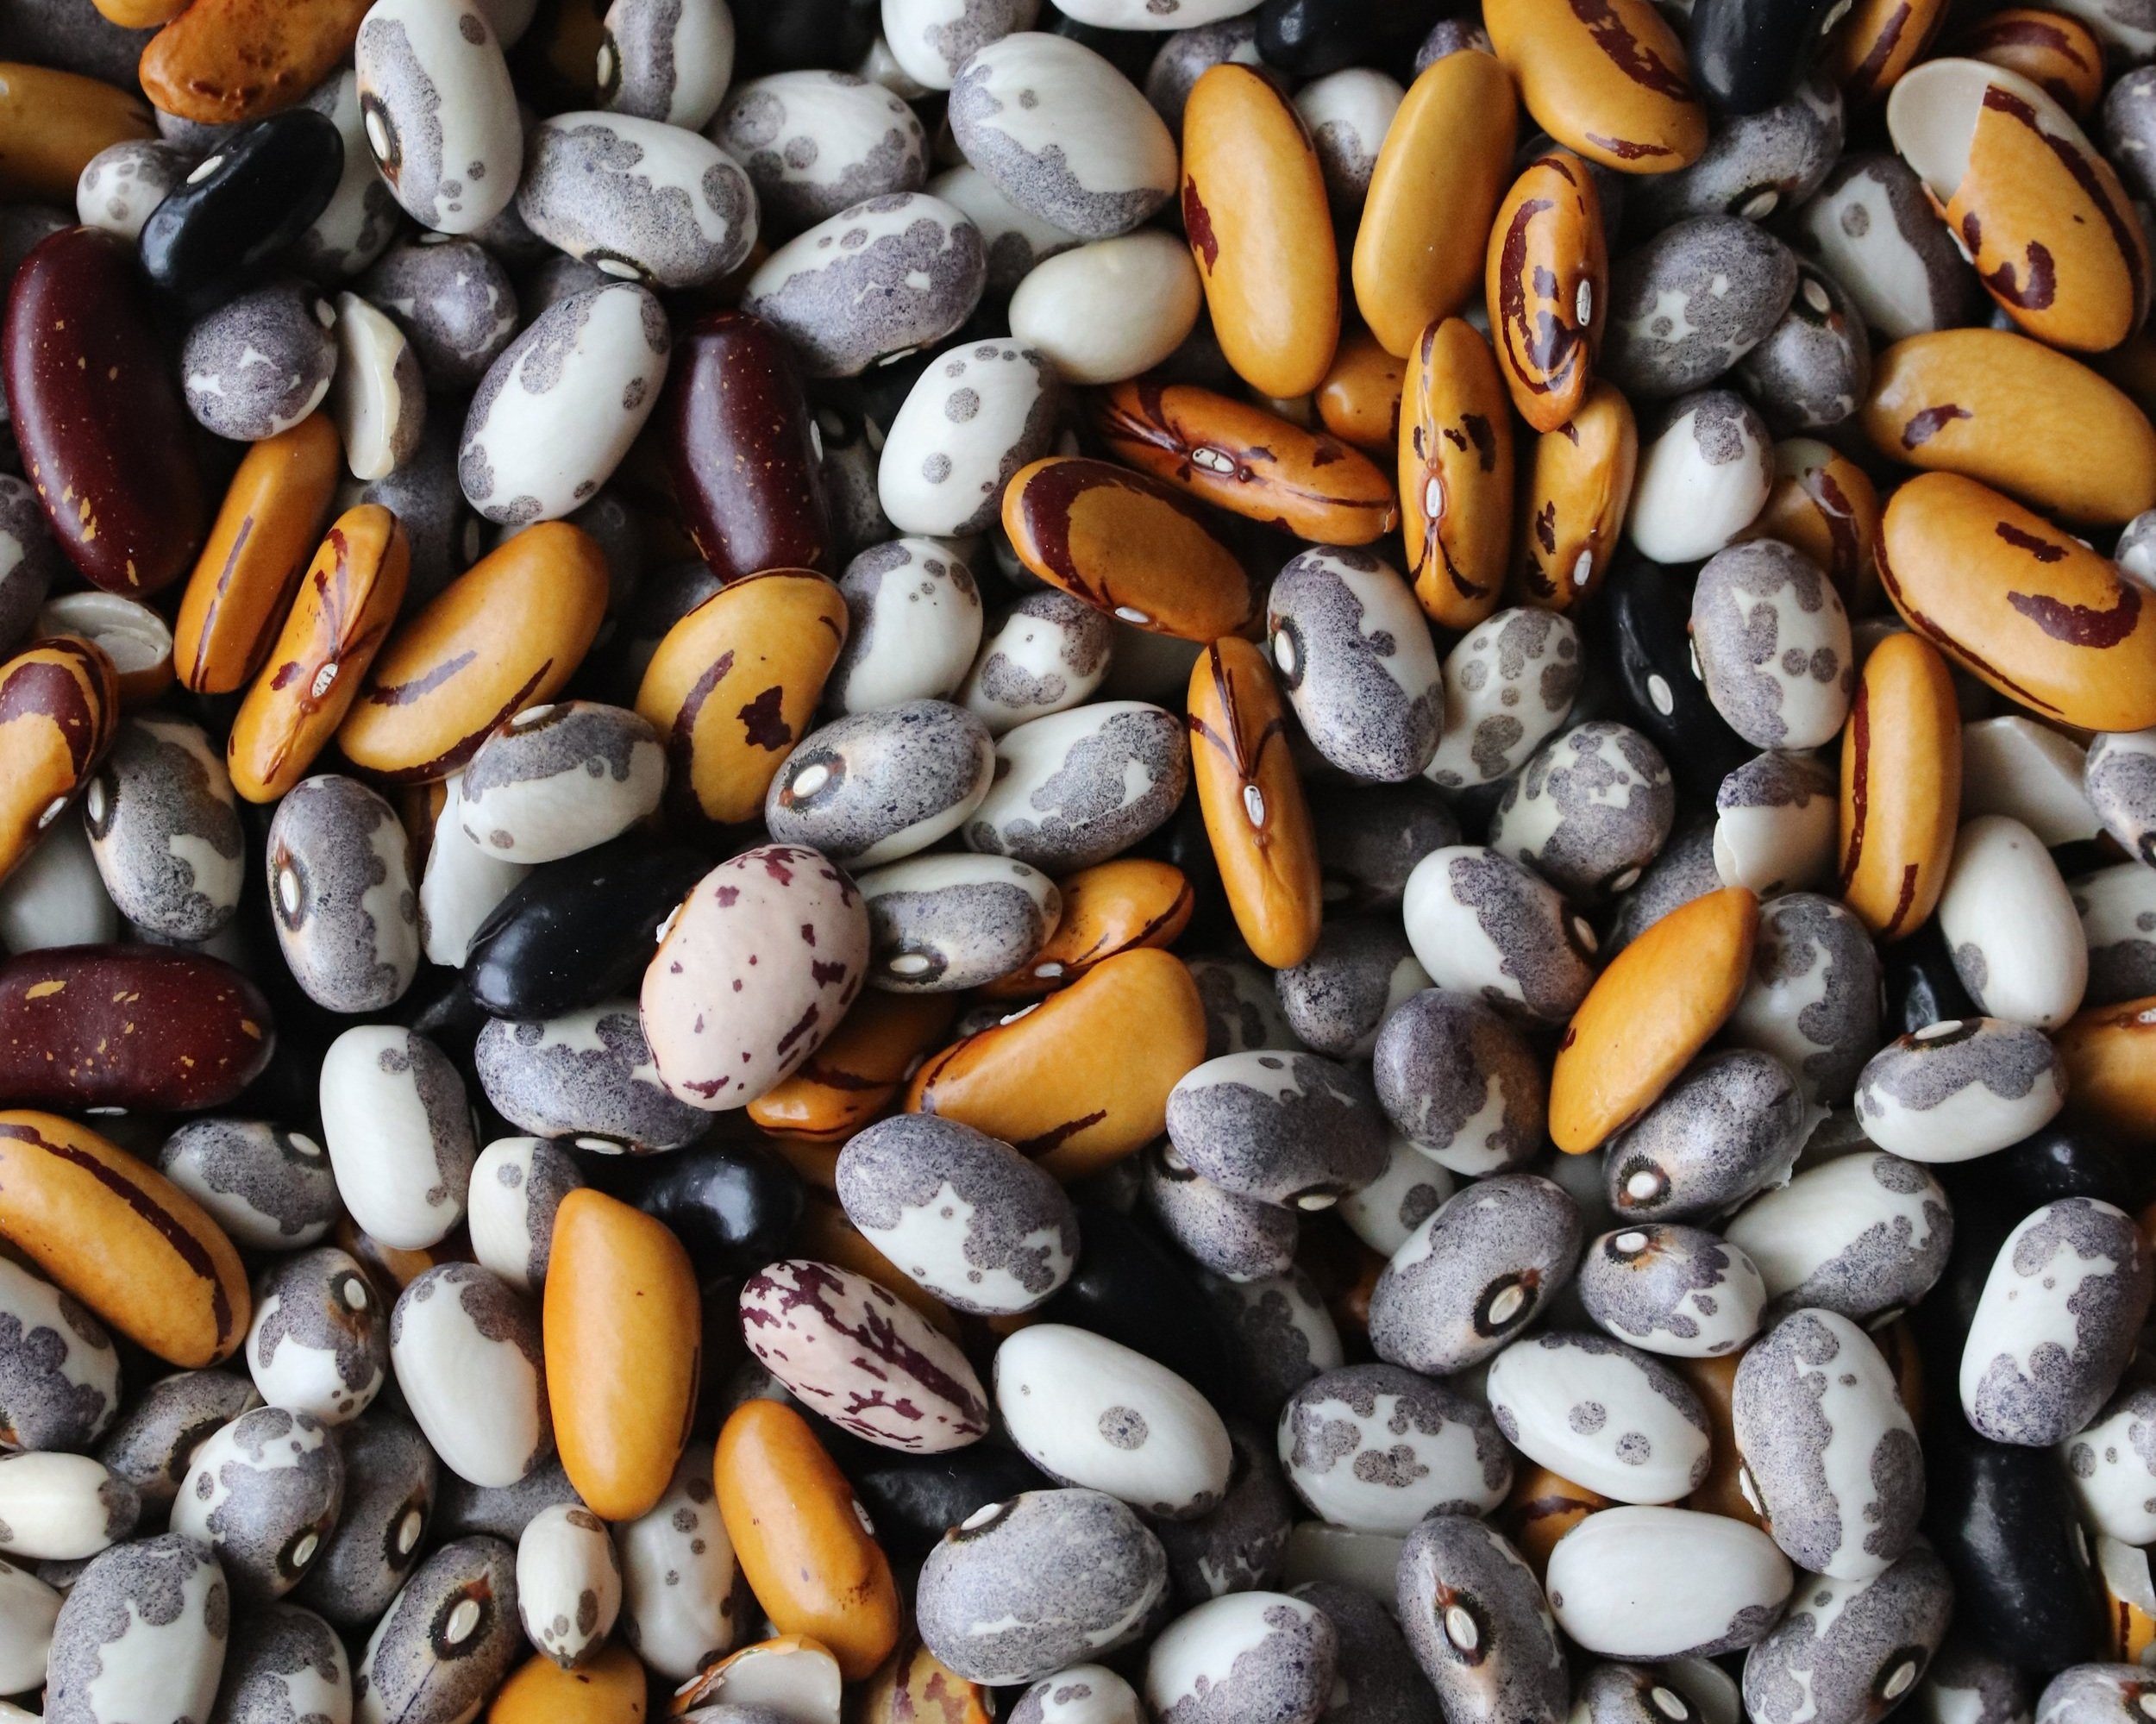
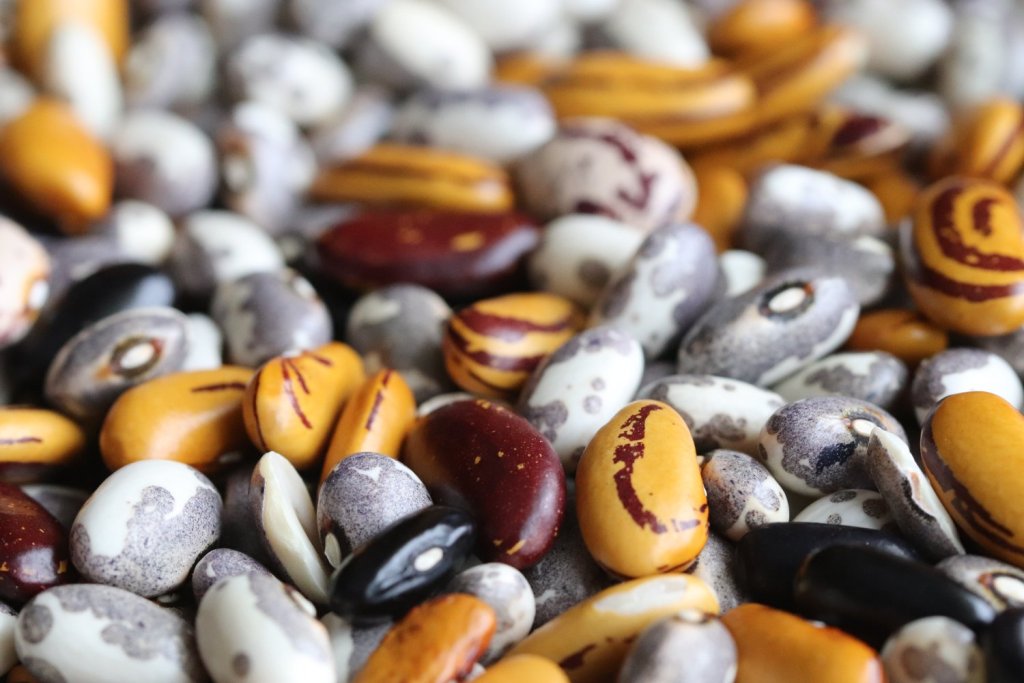
Favorite Varieties: Dry Beans
Growing your own protein is one of our favorite ways to set and forget a portion of our large garden each summer. Like with so much of what has become essential to our home garden and pantry, this was another crop that became possible with extra space. We did grow dry beans back in 2013 when we had land outside the city, but we’d never allocated space in our urban garden for dry beans. And that’s because they take a lot of time to fully dry, and as such are a bit of a space hog.
Dry beans typically will take a “full season” for us. This means from direct sowing the seeds in the beds in mid to late Spring to harvest, the bed is occupied by this solitary crop (excepting interplanting) for the majority of the growing season. I don’t try to get more than one major succession out of our dry bean beds each year, though if I had an extra 3-4 weeks in my growing season I could do some quick spring or fall crops before or after them, respectively.
However, they are an amazing crop to grow on so many levels. Shelf stable and high in protein makes them a very unique food to have in our home gardens. They help me feel deeply connected to the garden when I’m snowed in this time of year. And perhaps most notably, I find them to be vastly pest and disease free, which means less work for me in the height of the season where I tend to be bombarded by other pests and harvest needs. So in this way, they bring a heavy dose of harmony to the chaotic summer rhythms of our garden life.
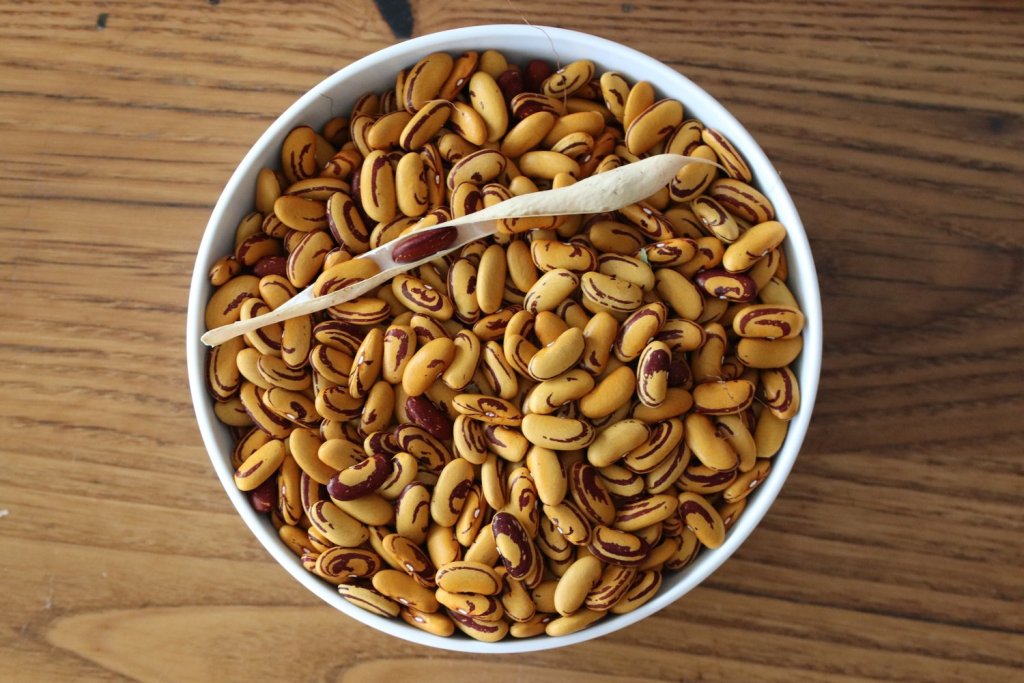
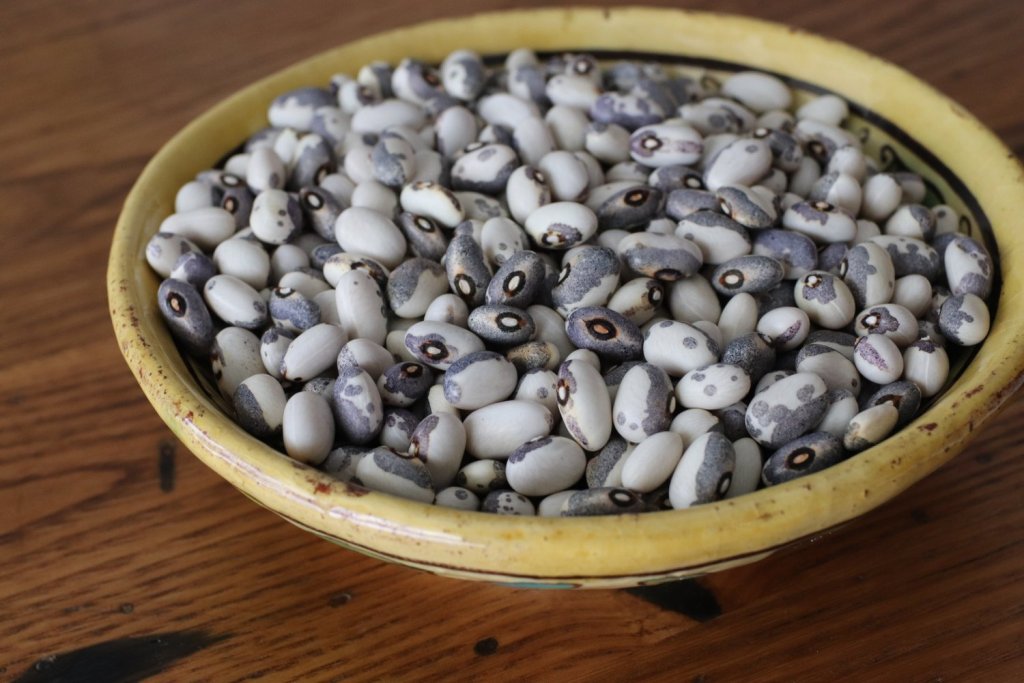
Borlotti / Speckled Cranberry pole bean
This bean is far and away our favorite. It is highly productive, the beans are enormous, and the immature pods are my favorite color: pink! I mean, it’s almost too good to be true. The beans are really easy to shell, which as you’ll see isn’t a given even with dry beans, and they are also delicious. We use them in just about any dish that calls for beans.
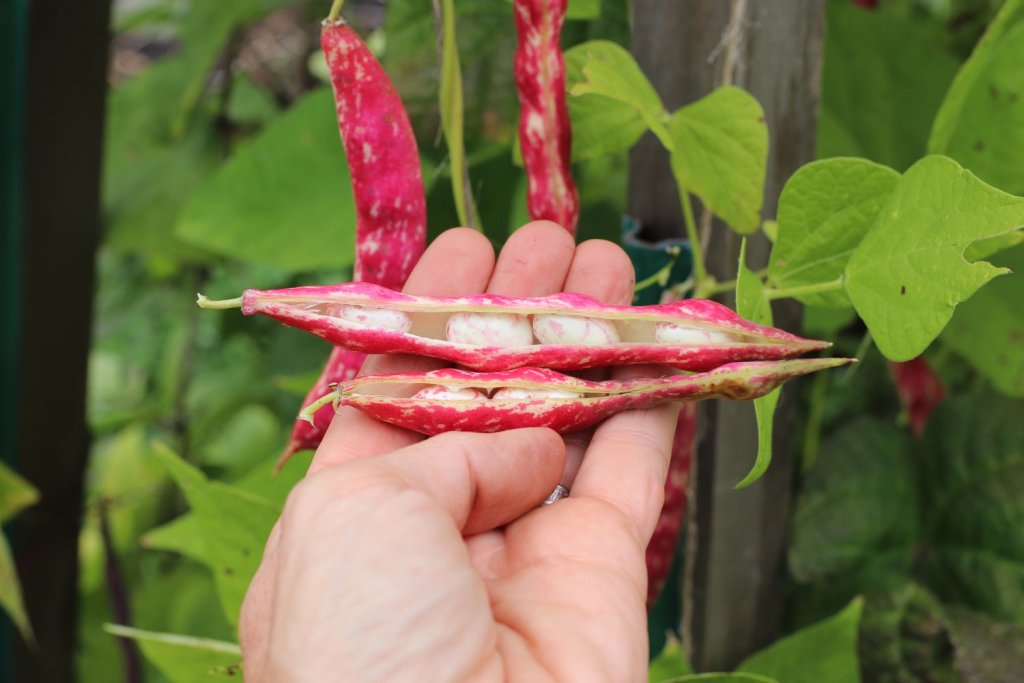
I was given about half a dozen seeds in 2019 during my master gardener core course at the University of Minnesota. I planted them having no idea what they would look like, because I love to grow things blindly and be awed by what transpires. Well, I was completely floored by the mottled hot pink pods and saved the seed for the next year. We did cook with some and like them. I’ve been growing and saving seed ever since.

In 2021, we grew our largest borlotti planting under our new arbor — 25 row feet yielded 14 pounds of dry beans which felt like a mighty fine harvest to us. I haven’t finished shelling the 2022 harvest, but when I do I’ll share productivity by square footage for all beans grown.
Many borlotti varieties out there exist, and most seem to be bush type. If you only have room for one dry bean to try and you want productivity and beauty, I highly recommend this one.
Tiger’s Eye half runner
This is my favorite bean for flavor and texture, but it’s not nearly as productive as Speckled Cranberry. They have a very thin skin and they cook quickly and are silky smooth. They make an amazing refried bean, a perfect stand-in for pinto beans. They do mature a little faster than our other varieties, which is a bonus, but the seed source (Seed Savers Exchange) calls this a bush bean but it’s not. I’ve grown it many times from their seed and it’s more of a half-runner. This means it grows to about 5’ tall and needs support! I think it should be the Minnesota state bean (the University of Minnesota colors are maroon and gold).
If you’re one to prioritize flavor over productivity, Tiger’s Eye is absolutely the bean for you.
Dapple Gray bush bean
I bought these seeds in 2018 from Trade Winds Fruit in Florida. For several years now this bean has not been in stock, so I think I just got lucky. The first few years I grew it, they barely matured in time, even though they claimed to be a 55 day variety. Obviously, that was incorrect information. Perhaps 55 days to setting pods, but what dry bean is mature in 55 days.
This bean ends up being more like a 90-day variety for me. And it does seem to have developed a type of fungal disease, as many pods develop circular black spots on them. It’s not present on all the Dapple Gray beans, but I suspect I’m carrying the disease forward annually by growing from saved seeds. It hasn’t spread to other varieties, but I am watching carefully.
These beans are not as easy to shell as the others we grow, but I think their texture and unique mottling is more than worth the extra effort.
It is another absolutely delicious bean that I have been saving the biggest and plumpest seeds each year since then and it has started to mature a little faster for me.
What I love most about this bean is that the mottling doesn’t disappear when you cook it down like it does with Tiger’s Eye and Speckled Cranberries. In this way, it’s a true culinary delight and we use these for recipes that call for Great Northern or Navy beans like a French Cassoulet and the like.
Fort Portal Jade pole bean
I was given these seeds from an upper midwest seed saver from northern Wisconsin. It is an absolute delight to shell, it’s green-blue pearl-shaped beans are truly jewels of nature. Furthermore, the beans completely transform in the pot to … well, I don’t want to spoil it for you but I guess I will … a navy bean! It’s the wildest thing.
All that being said, these are probably the least productive of all the dry beans we grow. If there were even slightly more productive I’d be growing them more often. I’ve grown them two different years now, and a few years ago when I grew 4 row feet, I yielded maybe a cup of beans. It was very underwhelming and for this reason, I no longer grow them, though I do still have seed saved and I’m sure some year will give them a garden reprise.
Myles Garbanzo bush beans
These biodynamic chickpeas are much smaller than what you’ll find in your bulk food section or cooked and canned on the shelves of your grocery store. Not only are they smaller, garbanzo beans produce 1-2 beans per pod! They are a wonder to me in this way, a very labor intensive crop for sure. I grew them in 2020 for the experience of it. We love hummus, and have several recipes that use chickpeas, and my hope was to enjoy growing them, have them be productive, and an annual staple.
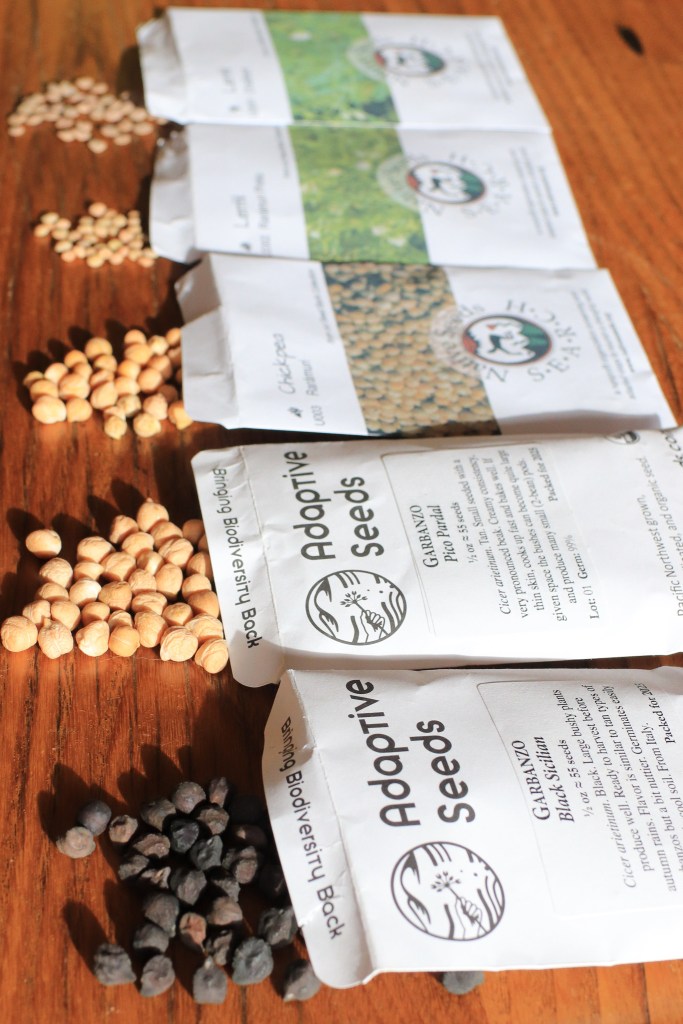
Garbanzo beans come in an array of colors from tan to green to black. I’m excited to try some Sicilian Black ones in 2025! What happened instead is a very laborious harvest, and honestly I haven’t yet shelled those beans! They are still in a bag in our dry root cellar. I think I’ll have my oldest use the pillow care
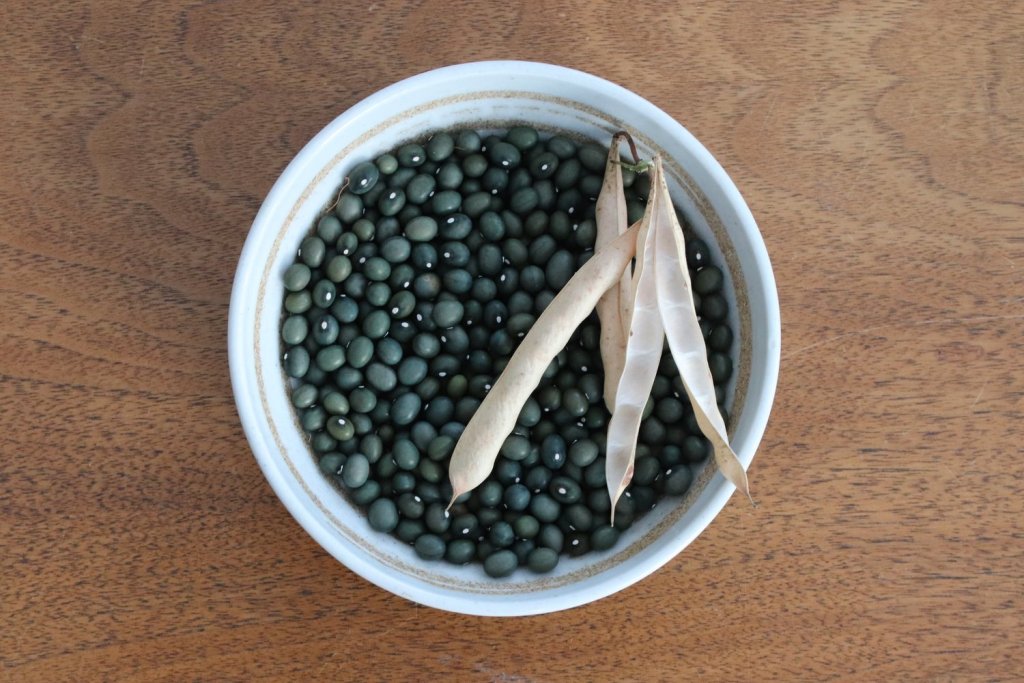
Black Turtle bush beans
We’ve grown black beans a few times and liked them both times. For some reason, I either don’t remember to order seed or we just seem to prefer the Speckled Cranberry even though there’s a time and place for black beans in many cuisines. I’m convincing myself to bring the black bean back this summer as I type this article. I’ve just found them at Hudson Valley Seed.
We’ve grown other beans over the years too, though our top three annual beans are Speckled Cranberry, Tiger’s Eye, and Dapple Gray. If we could find another bean variety that is as prolific as the Speckled Cranberry but a cannelini or black bean, we would be all set for the rest of our years!
What bean varieties do you enjoy growing or have you tried?
-

Ginger Spice Cookies
Sometime in the early 2000’s, my late mother in law shared this recipe with us from an issue of Bon Appetit magazine. I quickly redistributed it to my Mom, an avid baker, and we’ve all baked it for the better part of the last two decades.
While my mom never shied away from margarine in her cookies (her peanut butter blossoms always used margarine, and at some point I stopped eating them), I quickly switched this recipe to all butter. Last week when I doubled the recipe, they did not come out well. I didn’t just double one batch, I doubled two batches! That’s a lot of chopped, crystalized ginger. And it made me question whether it was the doubling or the butter, or the cookie size.

I did try both all butter and an Earth Balance/butter blend (1/2 cup earth balance to 1/4 cup butter) yesterday, and they turned out almost identical looking, which bodes well for my method of creaming and baking. This means, for me, that I can continue to use an all butter recipe with success, and lays to rest my seasonal strife over failing at this cookie earlier this season.
I think it was the cookie size and doubling the recipe that tripped me up. Some recipes just don’t double well, and this is one of them. It makes about 72 small cookies per recipe, which is ample in my opinion. So I’ve written on my recipe Do Not Double in case, you know, I forget today’s wisdom in 2023.
Yield: 6 dozenGinger Spice Cookies

Ingredients
- 2 c all purpose flour
- 2 tsp baking soda
- 3/4 tsp salt
- 2 1/2 tsp ground ginger
- 1 tsp cloves
- 1 tsp cinnamon
- 3/4 cup finely chopped crystalized ginger
- 3/4. cup dark brown sugar
- 1/4 cup light brown sugar
- 3/4 cup salted butter, room temperature
- 1 large egg
- 1/4 cup molasses
- a cup of sugar for rolling
Instructions
- Chop crystalized ginger into small pieces, not as fine as minced garlic but about 1/8” cubes. Measure and combine dry ingredients in a bowl and mix well. Add crystalized ginger and fully incorporate. Set aside.
- Next, cut butter into small pieces and combine with brown sugars in a stand mixer with paddle attachment on medium until the butter is whipped, about 30 seconds to a minute on low to medium. Stop the mixer and with a spatula scrape down the sides to lift any stuck butter from the sides. Turn back on to medium high for another minute or two. Check the batter again to ensure there aren’t pockets of butter and sugar sticking to the sides of the pan; scrape down if needed and whip for another 1-2 minutes on high until very light and fluffy. When in doubt, let it go a little longer than you think you need to!
- Add the egg and mix again for several minutes, scraping down the sides as before, until you have a super fluffy and whipped mixture. Add the molasses and mix until blended. Finally, add the dry ingredients and mix on low until just combined. Transfer to a small bowl and press together. Cover tightly, and refrigerate overnight or for a minimum of 12 hours.
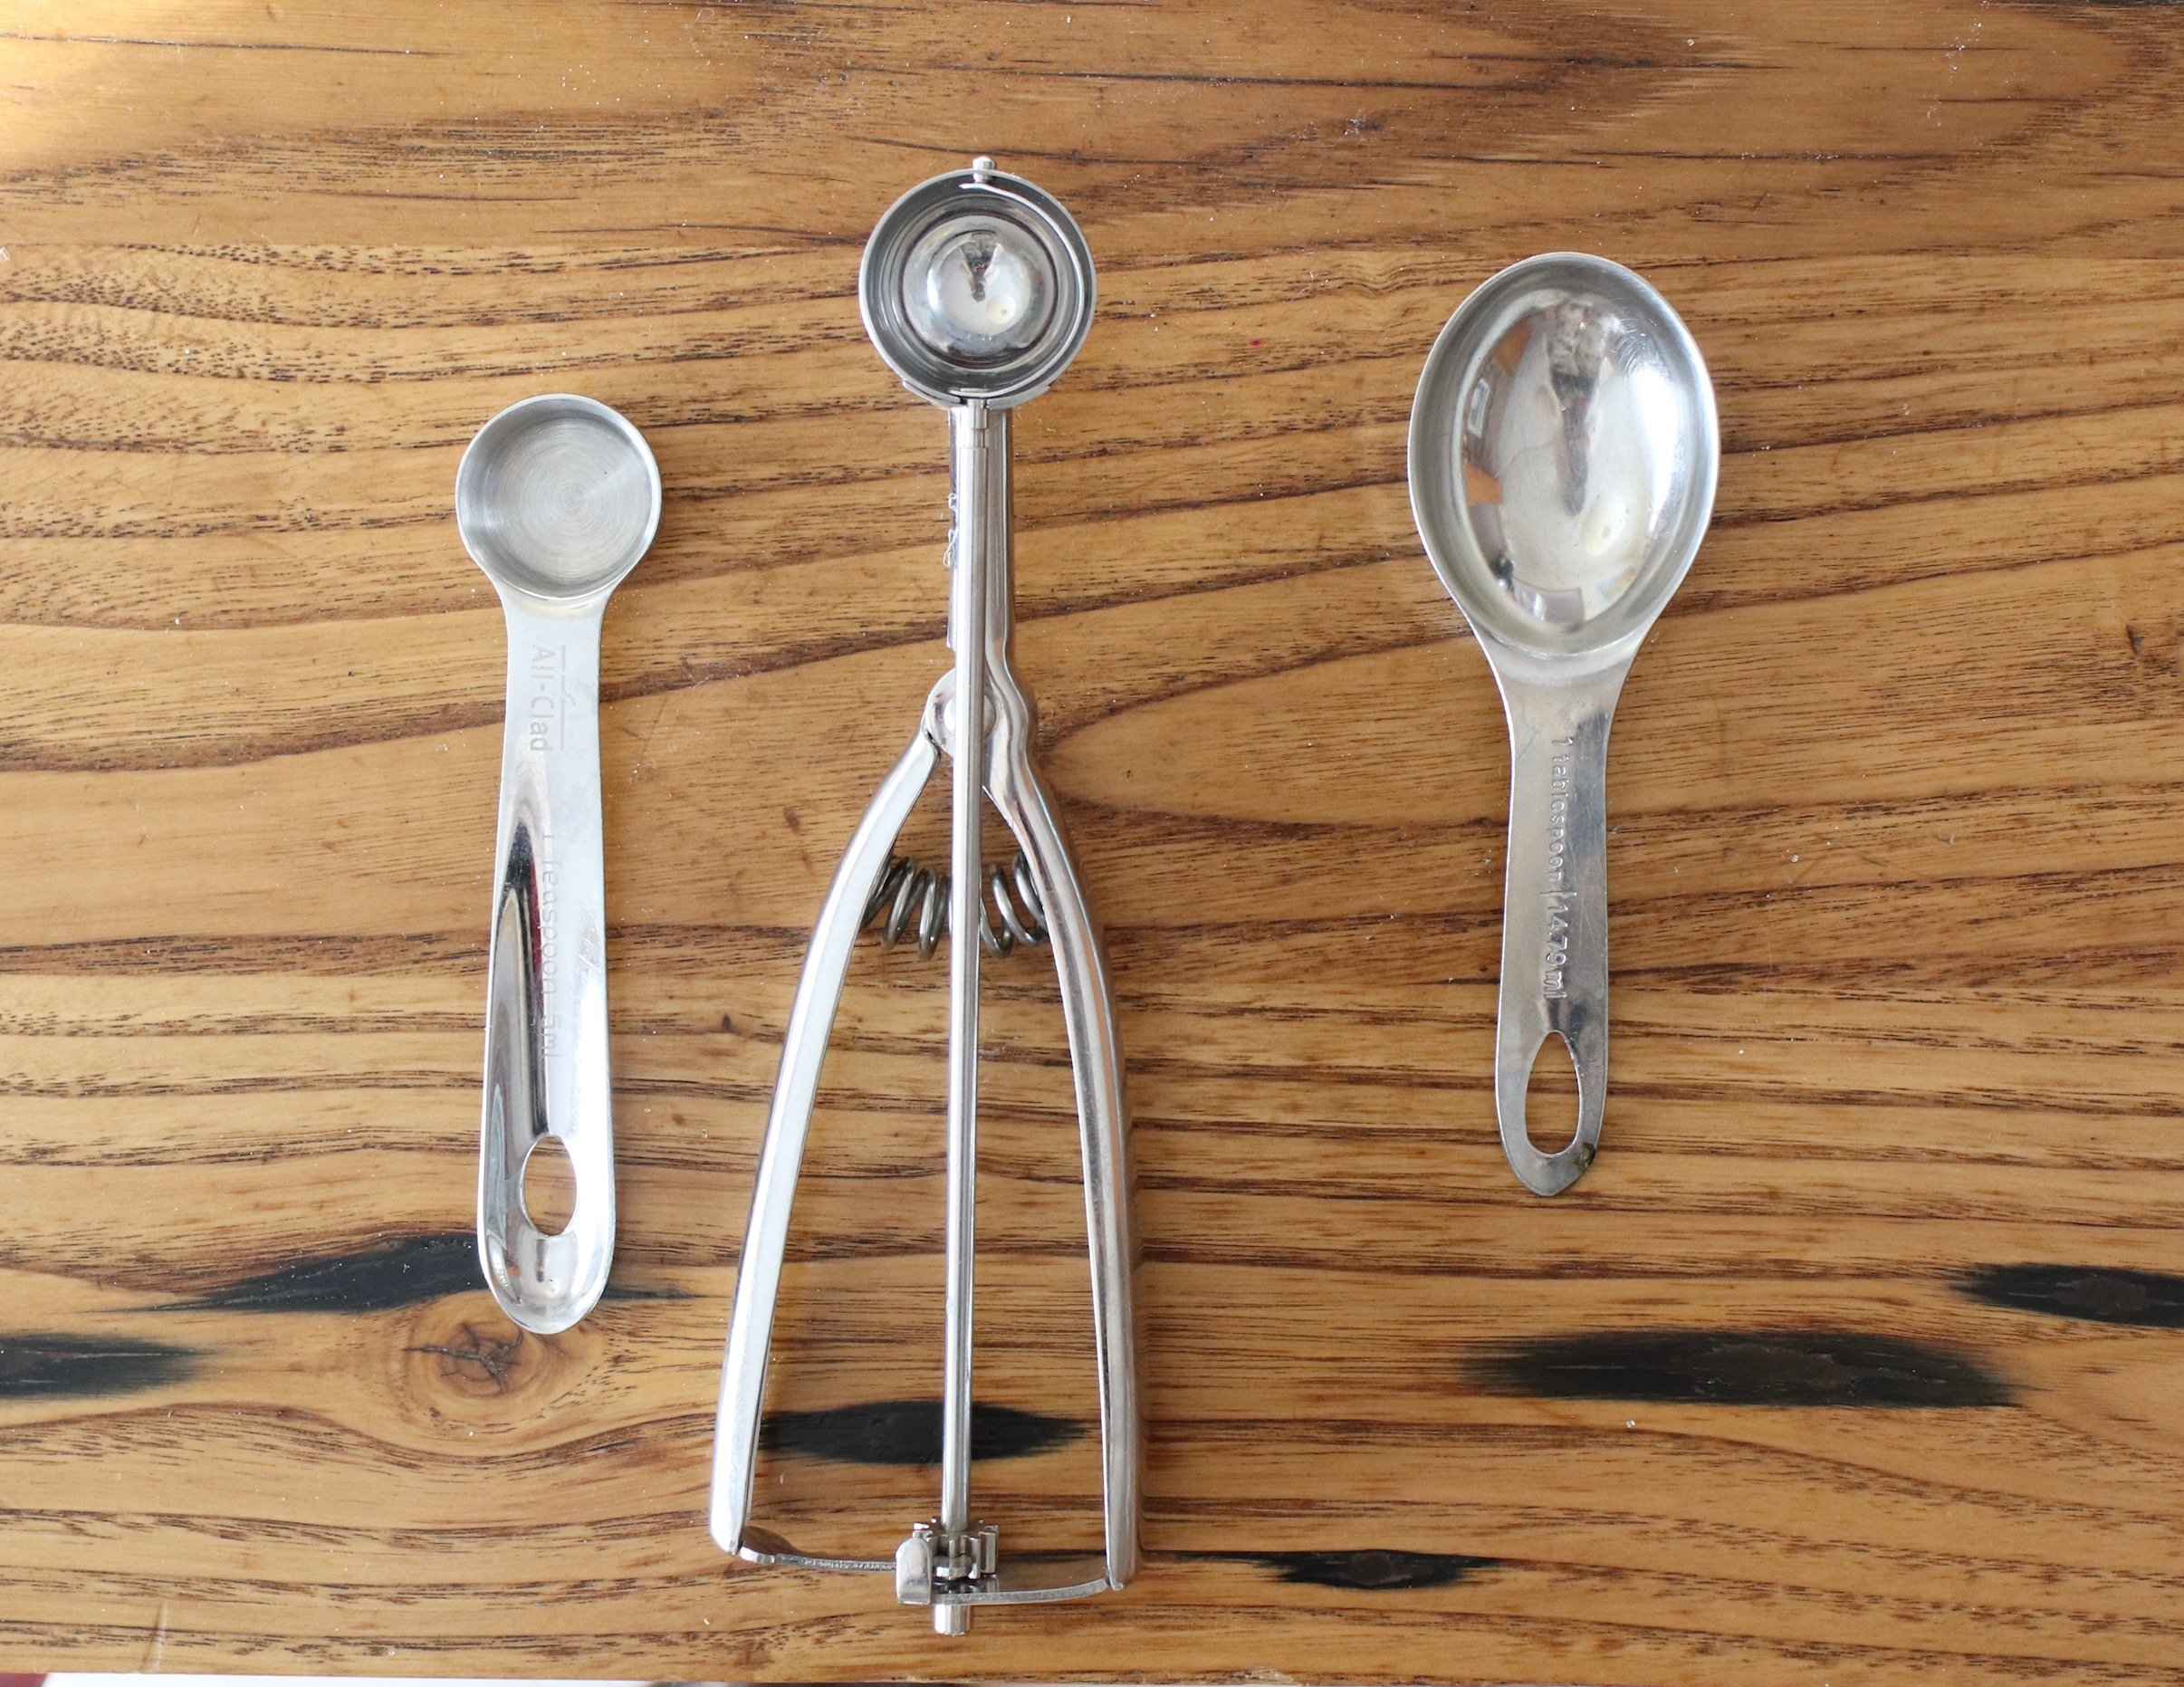 The middle scoop is what we use for these cookies. I think it’s a size 70 or a small cookie scoop. Highly recommend. It’s more than 2 tsps but a little under a tablespoon in volume (as tested this morning with the measuring spoons seen here.
 - Preheat oven to 350.
- Set a baking sheet to the middle rack. Line your baking sheets with parchment paper. Using a small scoop (size 70, which measures 1 tablespoon) or teaspoon, scoop the dough and round with your hands.
- Place in a bowl of sugar and roll to cover. I set about 20 cookies per sheet.
- Bake for 11-12 minutes. They will look done sooner but I’ve learned 11 minutes is the minimum for my oven. (the original recipe called for 9-11 minutes).
- Cool on a wire rack and try not to eat them all that day.
-
The Business of Seed Buying
Such is the day and age in which we live, where we can and should think about the many facets of where our dollars go. When I chose seed companies, I do so because I like the companies and what they stand for and their seed grows well. Often, they are small businesses and I know my dollars go further than with a company like Burpee.
I also enjoy supporting small businesses in this way. Yes, I do love to save seed from time to time, but I am not one to save seed from any cucurbits, corn, peppers, eggplants, radishes, carrots, or even most of my flowers. I leave that business to the seed companies whose scale assures robust genetics. Plus, I grow a lot of hybrids so my ability to save seed is limited. I will occasionally save some early tomatoes, too, knowing those first ones were very likely self-pollinated (and not cross-pollinated, a misfortune if you want to grow the same exact fruit next year).
What you don’t see on my list are companies I don’t support. And as much as this is an inclusive list, it’s also an exclusive list, meaning I’ve weeded out companies that don’t align with my values.
If you think gardening isn’t political, you’re wrong. There are politics to consider when shopping for seeds. It was well before I began to notice discrepancies in the quality of the seeds that I had misgivings about supporting Baker Creek Seeds. I veered away from them quickly after my initial order in 2018, though the seed I ordered has last many years (I’m still growing Musselburgh Leeks from that 2018 purchase). We were really unhappy with the germination rates and seedling vigor of many varieties, and had many seeds that didn’t grow true to type, meaning their seed producers had some hybridization or cross-contamination of seed going on. I’ve heard from over a handful of you this week that you also found their seeds to be of similar low quality. I know, their glossy catalog is ridiculously enticing, but that’s just marketing working it’s magic. To further complicate matters for them, numerous online gardening scandals have marred their reputation over the past 4-5 years, for good reason.
To name a few of the controversial events: there’s been Bundy boycotts in 2019, support of Joel Salatin circa 2020/21, and ongoing speculation about appropriating seeds from Indigenous communities. It’s a lot to sort through, to be sure, and I acknowledge they are also a family-owned, small seed company like many who do make my cut. Yet, you can probably find comparable seeds elsewhere if you don’t want your dollars going to their family business.
I stopped ordering from them in 2021, and found alternatives to that pink nasturtium I so adored at Kitchen Garden Seeds, Eden Brothers, and Renee’s Garden, where I just placed a small seed order tonight.
Why I Love the seed companies I support
Now let’s also discuss for a minute why I love the companies I do support. Most notable to me is Seed Savers Exchange, whose former Board president, Rowen White, is an active Indigenous seed steward. During her tenure there, she worked to rematriate many seeds from their vast seed bank into Indigenous communities across the continent. High Mowing Organic Seeds has made a concerted effort over the last several years to elevate the stories and voices of BIPOC farmers and gardeners, earnestly working to diversify the culture within the farming and gardening world, critical work to help acknowledge the Black agriculturists who, under enslavement, built the country’s wealth and whose expertise educated colonists who profited greatly from it. When we support companies whose work includes these efforts, our dollars are going further in immeasurable ways. To me, this is really important to know what these companies stand for.
And many of these companies are employee-owned, too, like Johnny’s Seeds and Southern Exposure Seed Exchange. That’s pretty unique as well.
Adaptive Seed works to bring back open-pollinated seeds that have been sunset by major seed proprietors (like Bejo seeds, for example, who grows most of the hybrid brassicas I buy from Johnny’s) in favor of hybrids. I’ve been impressed with Adaptive’s open-pollinated cabbages which is helping me unwind my beliefs that brassicas like broccoli and cabbage need to be hybrids to perform well for me.
That being said, I admit that I don’t know very much about some of these companies I support, for better or worse: Wood Prairie, Territorial Seed, and Renee’s Gardens, for example.
The Usual Suspects
Here are the seed companies I most often support, more or less in order of most to least dollars spent:
Johnny’s Selected Seed (most often for brassicas, onions, melons, and flowers)
Seed Savers Exchange (a bit of everything, even garlic some years)
High Mowing Organic Seed (potatoes, tomatoes, peppers, flowers, brassicas)
Adaptive Seed (peppers, brassicas, dry beans, winter squash, and flowers)
Wood Prairie Farm (organic seed potatoes)
Botanical Interests (a little bit of everything, I love that I can buy their seeds locally at our garden center!)
Southern Exposure Seed Exchange (peanuts and sweet potatoes)
Fruition Seeds (tomatoes, sesame, ginger, garlic, flowers, and spinach)
Territorial Seed (brassicas, garlic, and sometimes other veggies, occasionally)
Native Seed Search (flour corn and dry beans)
Keene Garlic (garlic, when needed)
Artisan Seeds (aji amarillo and Mareko Fana pepper seeds)
Renee’s Garden (magyar paprika seeds)
Sandia Seed (hatch chilis, will order for the first time this winter)
Honorable Mentions
While I’ve not ordered seeds from these companies, I would and should:
- Experimental Farm Network
- Two Seeds in a Pod (Turkish seeds)
- True Love Seeds
- Cultivating the Commons
- Uprising Seed
- Siskiyou Seed
- Victory Seeds (lots of dwarf tomato seeds)
- Kitchen Garden Seeds
- Fedco Seeds
and many more!
Please chime in with your favorite seed companies. I’m sure I’m missing many good ones.
-

Seed Storage & Organizing
It’s time to get my seeds organized since the whirlwind of the growing season has long sunset. I do this in part to prepare for seed starting in February and also to take inventory of our seeds in the hopes that I will place 1-2 orders and be good for the entire year. What has ended up happening in recent years is I’ve not accounted for low seed stock and have had to place multiple orders throughout the growing season, which is more expensive with shipping. So I’m determined to go through every bin this month to catalog what needs replenishing and make one big order by New Year’s Eve.
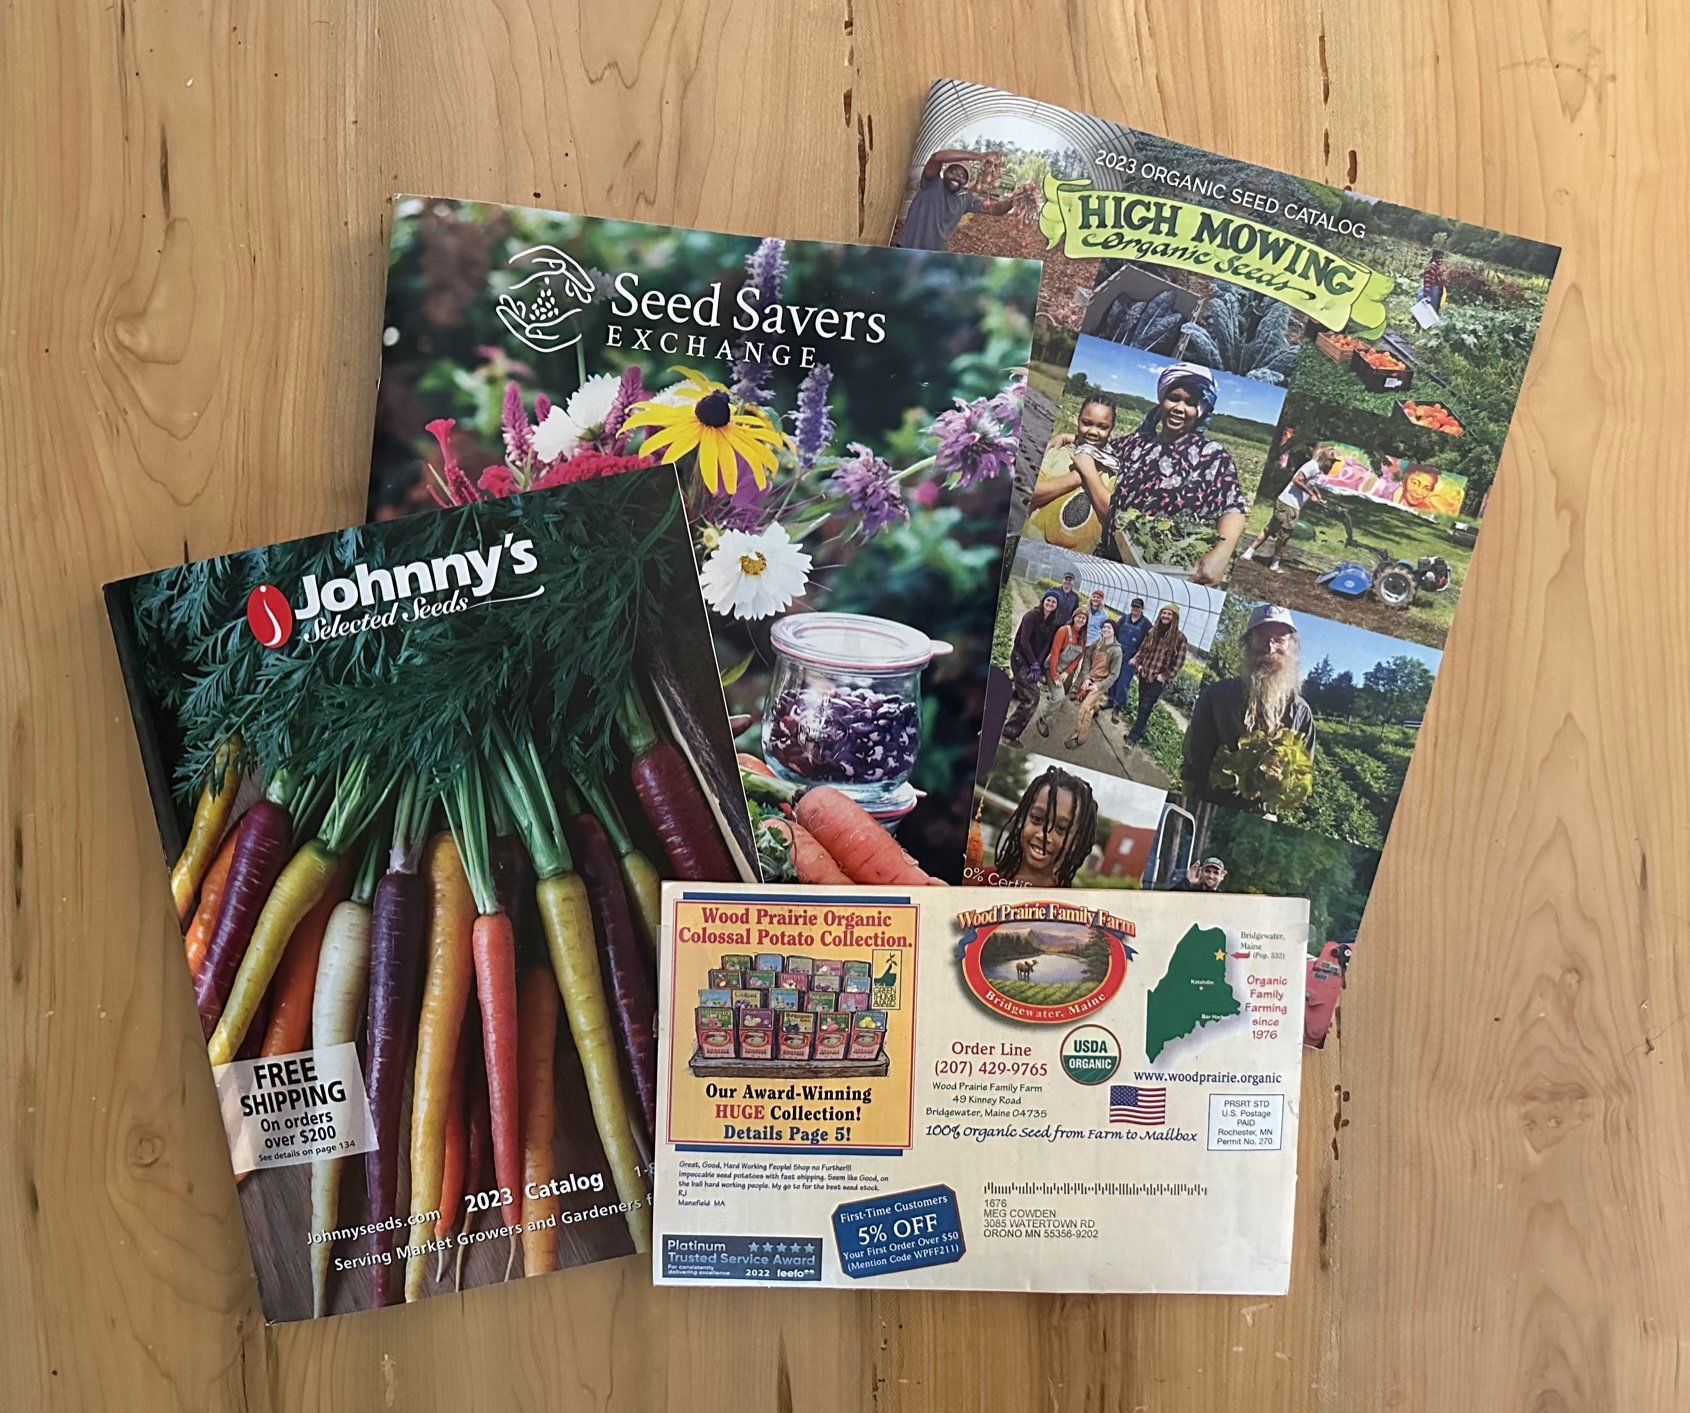
I like to take seed catalogs with me on our holiday travels. So far I’ve got High Mowing, Johnny’s Seeds, Baker Creek, and Wood Prairie (organic potatoes), having arrived in that order, too. I enjoy paging through the catalog though I know it’s not a comprehensive list. Also, some smaller companies no longer print their catalogs, such as Adaptive Seeds, and I love spreading our seed dollars around to small businesses doing great seed stewardship such as those folks in Sweet Home, Oregon.
This is Not Seed Starting
This is what we are doing when we store seeds. We are trying to create the worst possible germination conditions. In other words, we want dry, cool conditions, the antithesis of seed starting. Moisture and warm temperatures will decrease the longevity of your seeds. If you are growing on a small scale, your seeds may last you upwards of 5+ years. For us that was certainly the case, and is still the case for some seeds I overbought like genovese basil, sora radishes, and sweet alyssum where the upcharge to an ounce from a fractional ounce was indeed pennies, though it means I needed a farm to really use the seeds in a few years’ time.
Longevity
I have noticed over the past year that my seed germination and strength is definitely impacted with older seeds, and with the exception of beans and tomatoes, I re-roder seeds every four years or sooner for brassicas like broccoli, cabbage, and kale as I’ve noticed those seeds germinated with less strength and vigor in older seeds. I just happened to have new versus old seed this summer and the difference in size and strength from germination was noticeable, even to a distracted and busy gardener such as myself.
Now that we’re growing on a larger scale, we do tend to go through seeds a bit faster, so for many things we need to order seeds every few years. This includes beans, corn, some tomatoes, onions, zinnia, calendula, nasturtium, strawflower, and many root vegetables including carrots and radish.
Herb seeds I tend to hold onto for as long as there are seeds in the packet, as well as leafy greens. I had a 6 year old radish seed packet that had moisture damage go on to germinate in days. It proves that storing practices directly impact how well your seeds will keep, thus saving you money in the long run.
How you store your seeds is as important as how old they are.
Dry, Dark, and Cool
You must create a dry and cool container for seeds to ensure prime storage. The key to this is using desiccants in every container (more than one). I have been collecting desiccants for years for this purpose and every bin of seeds has 3-6 desiccants in the container absorbing any bits of moisture that may be trapped inside.
The containers themselves all have locking or sealing mechanisms that are airtight. I’ve trialed many different shapes and sizes over the years and while the Sterlite rectangular containers don’t hold the seed packets upright, they are the easiest to get a good seal on and for that reason I’d recommend them, especially if you only need one container.
Organizing within Containers
My containers are organized by plant family, by and large. I have a separate container for Legumes (peas and beans), Tomatoes, and Brassicas (all types including those I direct seed), but all the rest are some combination of vegetables, largely linked to the seasonality of when I sow them:
-
Peppers, Eggplant, Onions, Leeks, Celery, Cape Gooseberry
-
Lettuce, Spinach, Arugula, and Chard
-
Carrots, Parsnips, Beets
-
Corn, Squash, Cucumbers, and Melons
-
Radishes, Turnips
-
Herbs
-
Early sowing flowers (6-8 weeks before last frost)
-
Late sowing flowers (4 weeks before last frost)
Within each container, I also organize by when I’ll need them. So, for example, I purchased Artichoke seeds this spring for 2023 and I just tucked those in the very front of my Pepper, Eggplant, Allium container to visually remind myself to sow them in early February for, hopefully, a successful harvest next year.
When it comes time to updating my soil block sowing charts, I take the appropriate containers out and organize the seeds in the order in which I will sow the seeds, thus creating a sort of sowing calendar from front to back within each seed storage bin. When I sow the seeds, they go to the back of the bin for the season, sometimes until next year if it’s main season crops like peppers and eggplants.
Here’s a short video of my seed storage and organizing system, including the tips listed above and more:
-
-
My Favorite Varieties: Onions, Shallots & Garlic
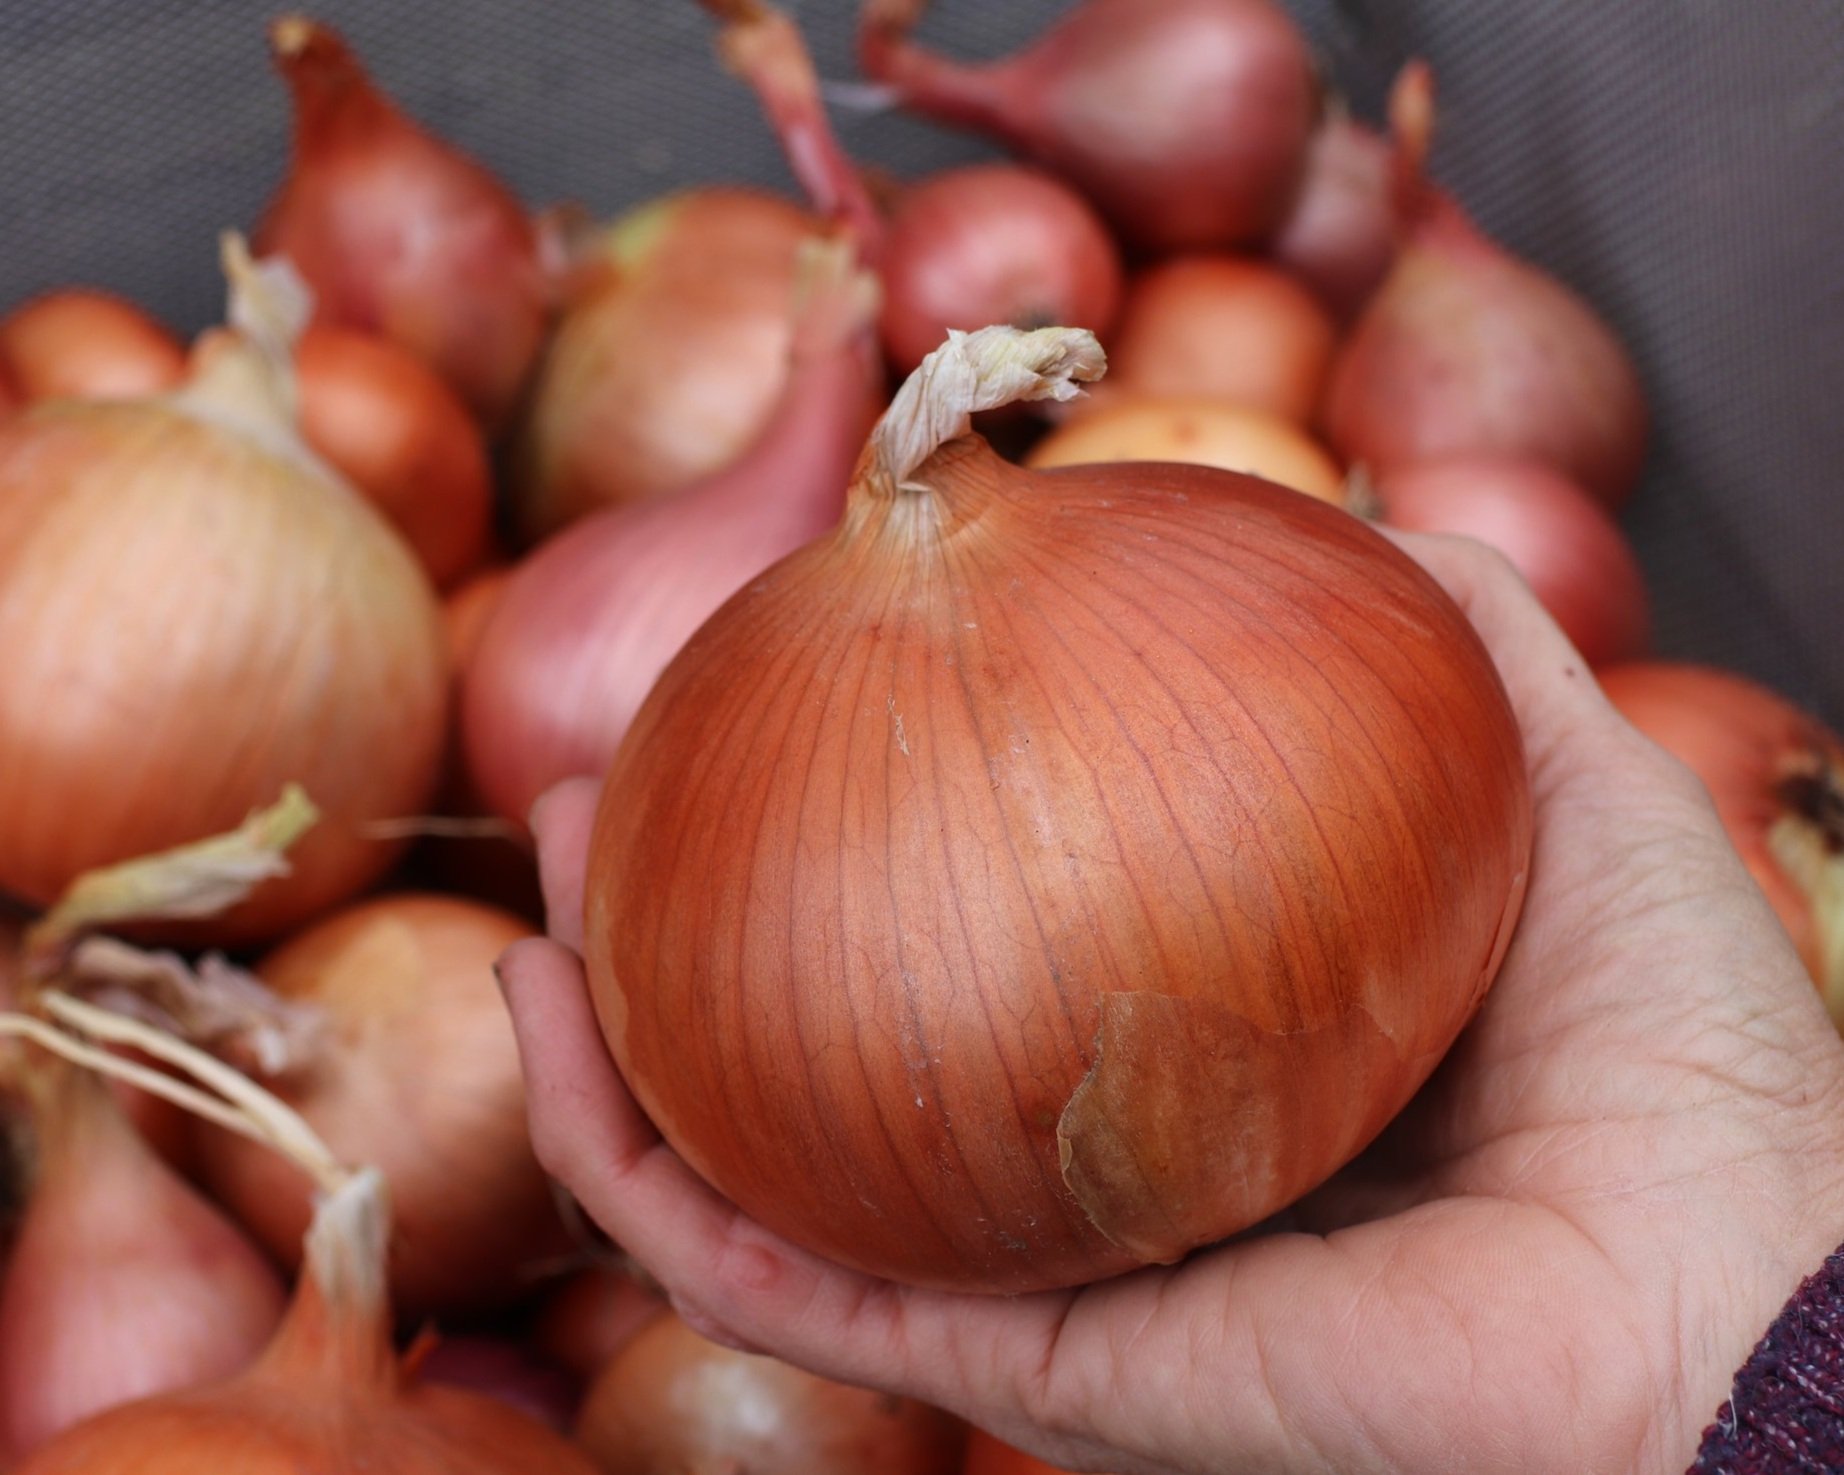
A staple of every home and commercial kitchen. I loathe the moment when my winter stash of onions dwindles, though we do grow enough onions for fresh eating about 80% of the year. And that’s definitely something to celebrate.
We’ve been growing onions from seed since about 2004, though not annually. With our small city gardens, they were an every few years kind of crop, something I enjoyed growing but it never completely wowed me. Prior to that we grew garlic in Oregon the first fall of our first large garden (planted in 2001). We grew it two years in a row until we moved to Minnesota, and similar to how I’ve sometimes squeezed it in here, we planted it outside our main vegetable beds.
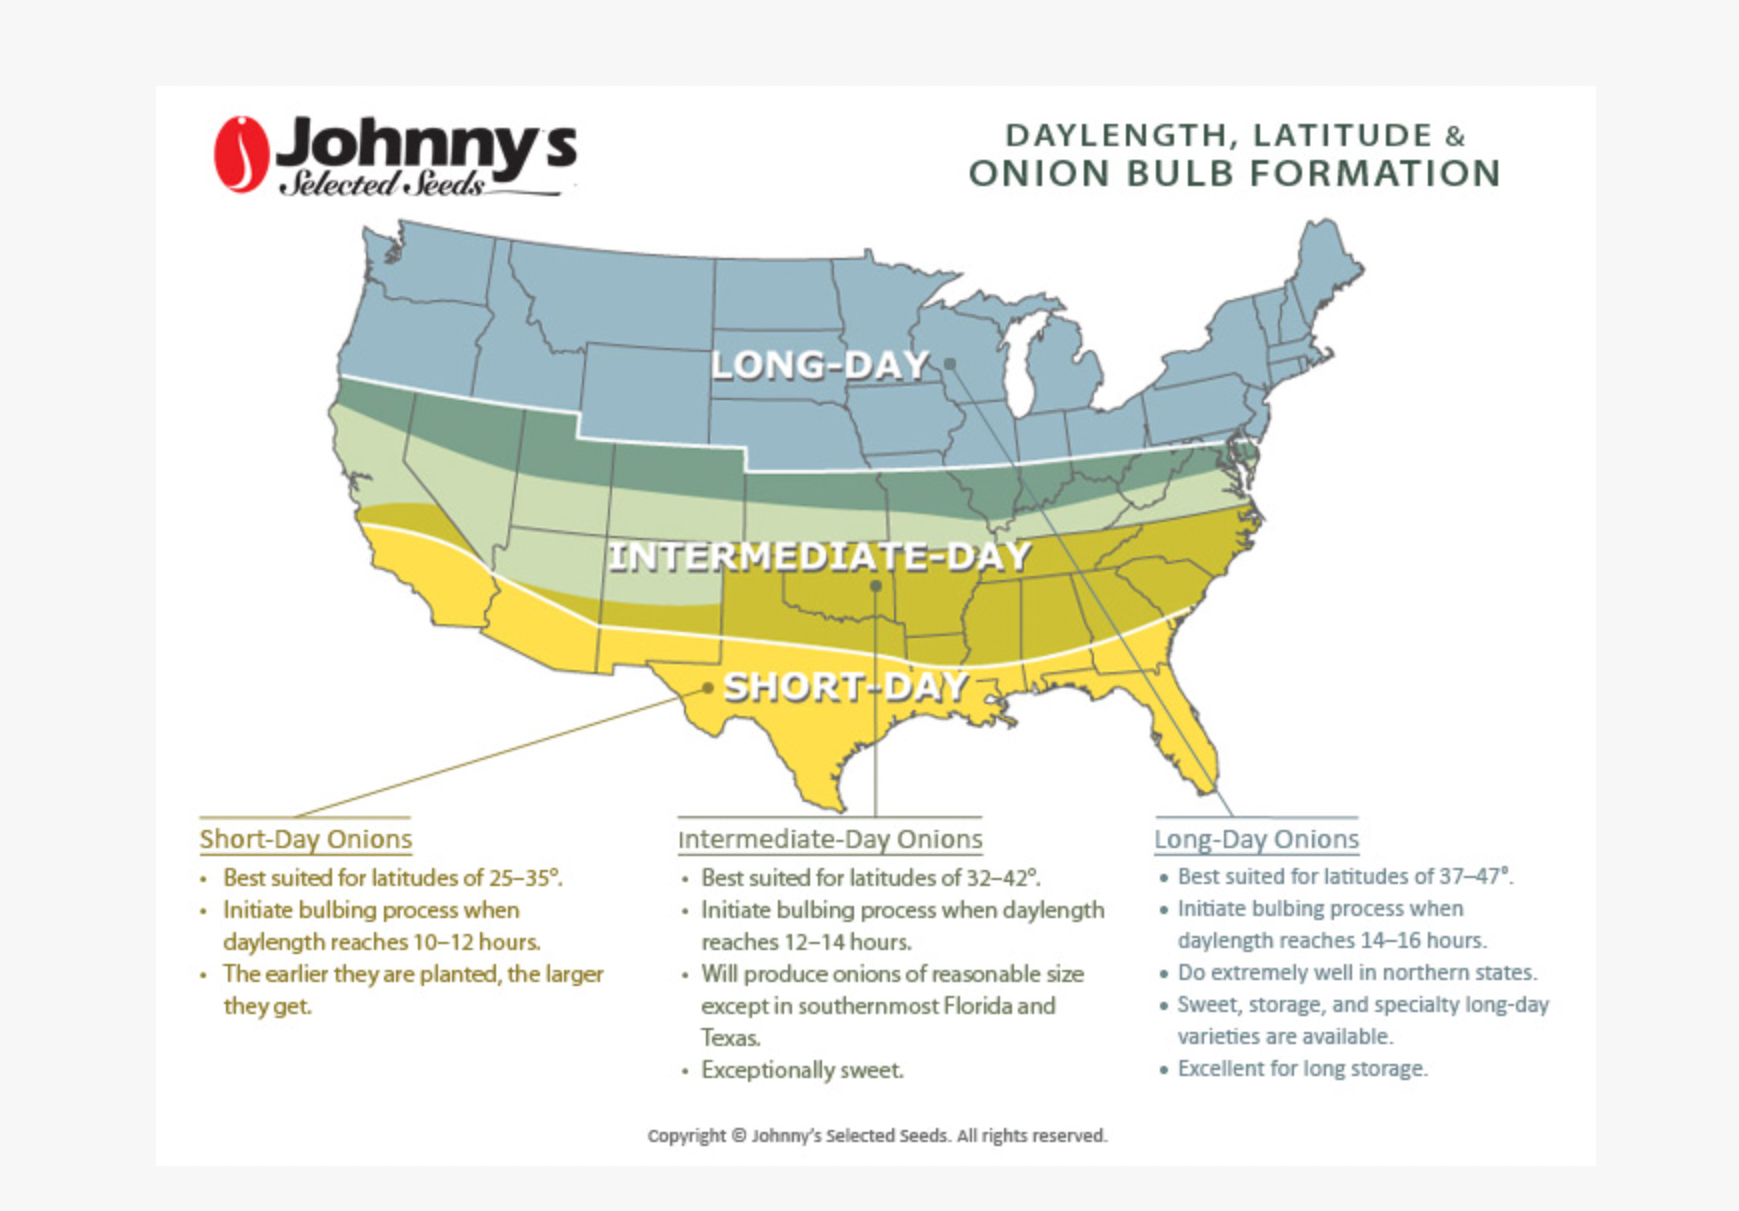
Because we live in a cold, northern climate, all the onion varieties I grow and recommend are long-day onions. If you live further south of us, this article won’t be as helpful as my other favorite varieties posts due to latitudinal / light requirements for bulb formation. Onions
While we’ve trialed many different yellow and red onions over the years, I came back to the same storage variety: Patterson for many years. This is a classic yellow full sized storage onion. It performed most consistently for us for over a decade and seems to be a hybrid that’s stayed the test of time.
We’ve also tried Ailsa Craig and Yellow of Parma as alternatives though they don’t store nearly as long. I’m pretty sure that Patterson is the onion I’ve been growing for over a decade, possibly since 2004, though I don’t have records that go back that far.
However, a few years ago in my ongoing quest to explore open pollinated varieties, I’ve started to grow more and more open pollinated onions. Red Long of Tropea, a fresh-eating onion from southern Italy is a favorite for all our summer risottos. I’ve also completely changed my storage onion favorite from Patterson to Newburg from Adaptive Seeds. It stores just as well, and it’s open pollinated. I’m even going to try and get some smaller ones to flower this year in the garden and see if I can save viable seed, a fun multi-year project.
For red onions, we’ve grown Red Hawk, Red Wing, and this past year, Rossa di Milano. The first two are hybrids while the latter is an open-pollinated variety. While all claimed to be excellent storage onions, we didn’t find that red onions store for nearly as long as yellow. However, I am loving the Rossa di Milano onions so far this fall and plan to grow them again next year. Red Wing we tried for a few years and weren’t impressed with their short-term storage qualities so we no longer. grow it and Red Hawk was a one year trial and we quickly cut it from our grow list.
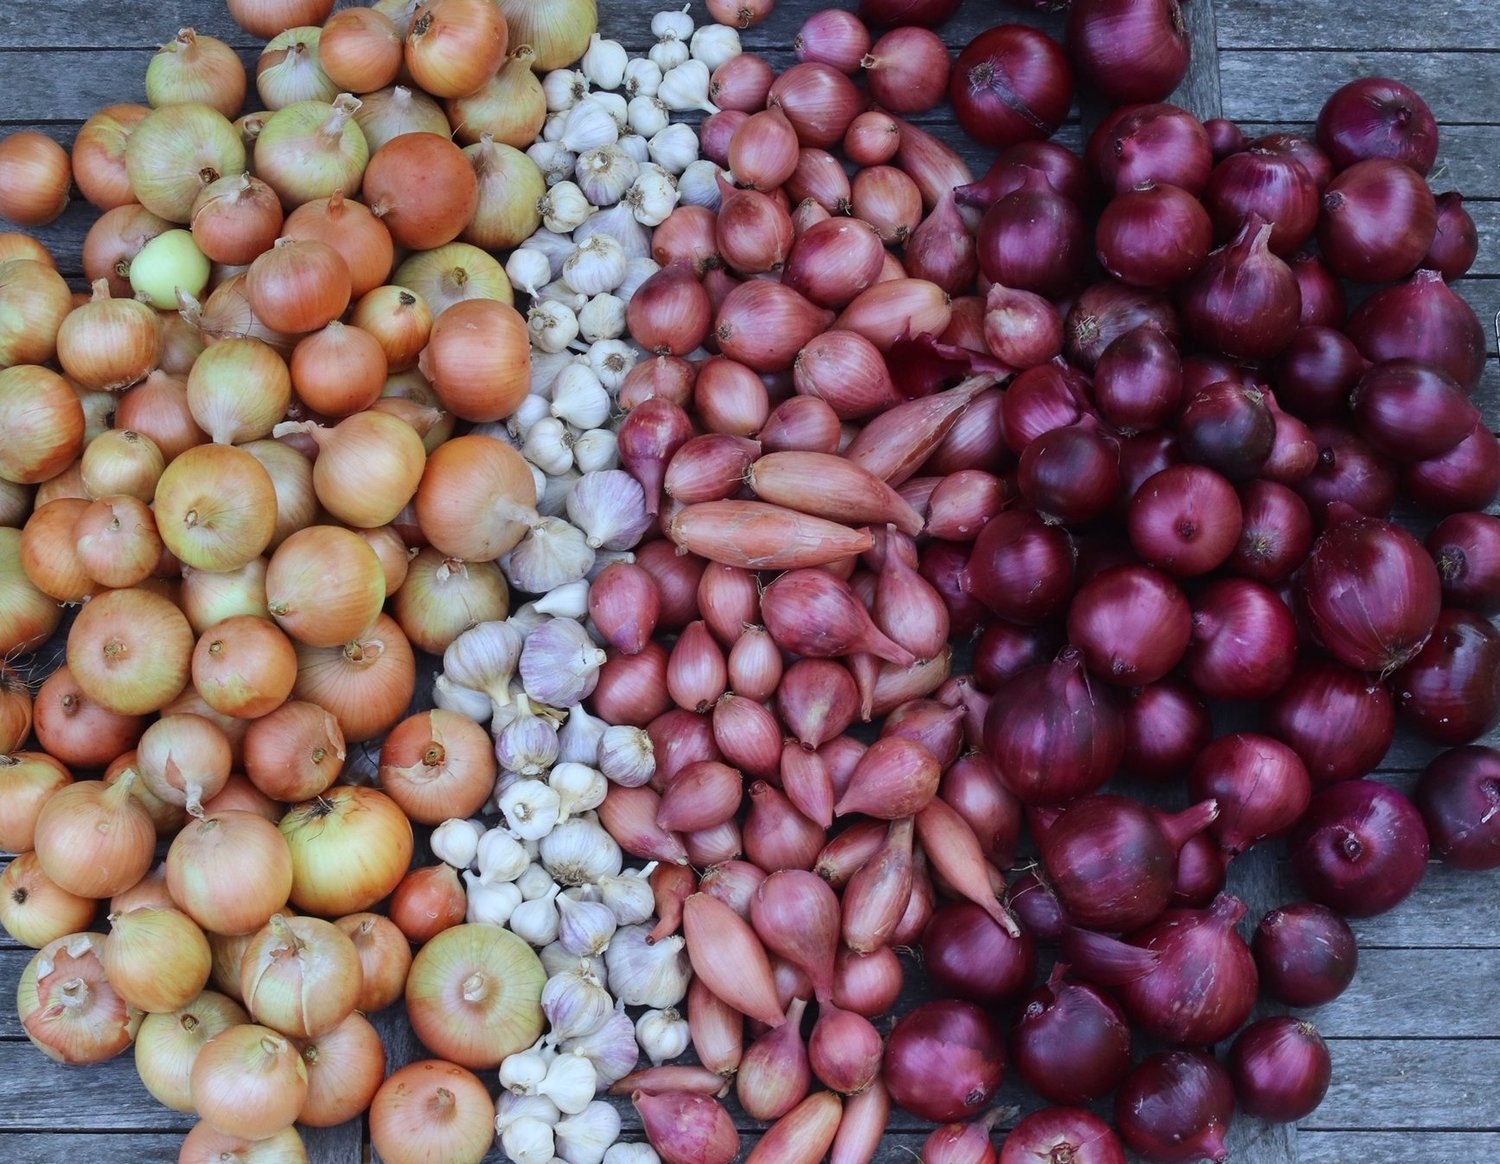
This was probably a 2019 harvest of Patterson, Music, German Red, and Inchelium Red, Conservor and Zebrune shallots, and Red Wing onions. And yes, this was a massive harvest! For fresh eating, I’ve started to grow a third type of onion: Red Long of Tropea. This uniquely shaped heirloom is another wonderful offering from Johnny’s Seeds (where I almost always source my onion seeds). An elongated red onion that instead of depleting our storage onions or young shallot bulbs, I grew in a 4×4 area reserved for fresh eating. We started to enjoy these around the Fourth of July and continued to eat them until September, so this was a wonderful “produce section” of the garden that made for a 5pm garden excursion to harvest our dinner vegetables most nights.
I’ve only growing onions from seed. It just made sense to me to start from a seed. Part awe, and part curiosity, I felt I needed to know an onion from seed. Yes, I’m seed-entrenched, preferring always to start things from seed over sets. It was a crop we didn’t continue to grow annually until 2017 when we planted garlic outside our deer fence.
Shallots
Like with my Patterson, I have a favorite, tried and true shallot variety: Conservor. I’ve also tried Zebrune from Baker Creek Seeds back in 2019 or so, but since our onions are grown largely for storage, we quickly returned to Conservor.
-
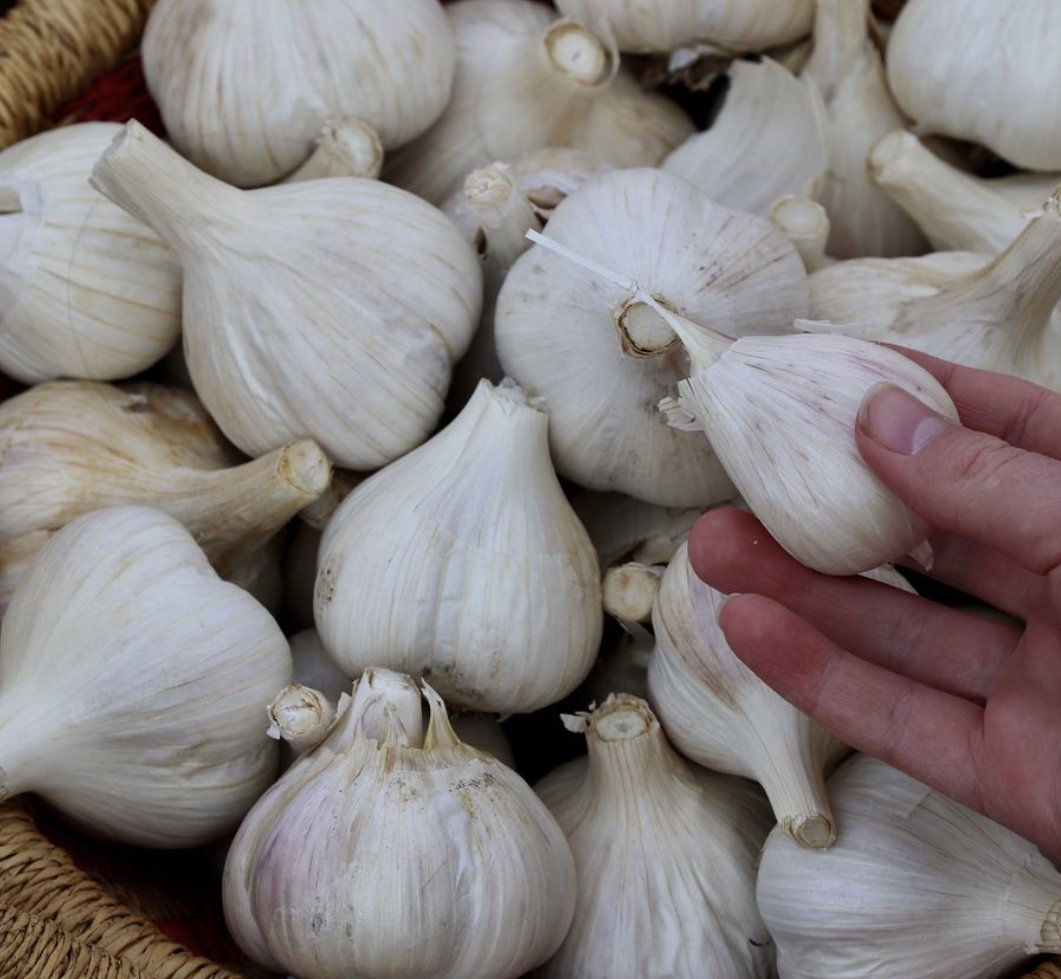
Favorite Varieties: Garlic
This list is probably not 100% accurate because I don’t usually write down what garlic I grow, but our top pick had been Music, a hardneck variety, for a long time. We’ve been growing it from saved seed since 2018 and some large heads are 3 cloves in total. That’s some serious garlic. It’s pretty amazing and I love growing it.
All these varieties, except the ones with an asterisk which are new to us this fall, have performed pretty well for us, yielding medium or larger cloves come harvest. Maybe I’m missing the mark, but to me, garlic, like onions and shallots, should have a stellar storage quality first and foremost for our homestead, while other attributes come in secondary, although a very close second. I guess I’m not much help in specifically recommending garlic varieties because I’m not as picky of a garlic consumer as I am of other vegetables. But hands down, Music is a must-grow for me.
Here are all the varieties I’ve grown over the last 8 seasons here:
- Georgian Crystal
- Red Italian
- Inchelium Red (softneck)
- Transylvanian (softneck)
- Lorz Italian (softneck)*
- Italy Hill Giant Ivory*
- Late Italian
- Chesnok Red
- Russian Red
- Korean Red
Softneck Surprises
I’ve been growing Transylvanian from saved seed since 2020, and they grow decent softneck bulbs here, which is a little surprising. I am still growing them out and I hope in one near-future year, we will have longer storage garlic for our dry root cellar. As it stands, my hardneck garlic starts drying out by Thanksgiving and I rarely get it chopped up in time for the dehydrator (as I write this I know I’ve lost some bulbs entirely). Also, when we reach for one of these vegetables for a meal, it’s 99% of the time an onion over garlic.
Lorz Italian has become our go-to soft neck variety along with Italy Hill. They both produce sizable cloves, ones that rival less vigorous hardneck varieties, and even less vigorous Music cloves that get planted in fall. So, I now grow about a 2/3 hard neck to 1/3 soft neck mixture so that we can use it for planting, dehydrating and grinding, and the soft neck helps extend the garlic season well into spring for us here.
In full disclosure, we aren’t super picky when it comes to our garlic. But we do love to grow it and grow from saved seed. There’s something very satisfying about it. Some years I am able to gift garlic around the holidays to teachers and such, but this year my hardneck went way past prime storage to desiccating rather quickly by early November. Hardneck’s storage is about 4-6 months compared to softneck’s of around 8+ months. The tradeoff is larger cloves for shorter storage times, so if you don’t mind peeling smaller cloves, softneck may be the best garlic for you. You also don’t get the scapes, which are a wonderful bonus crop so maybe do what we do and grow some of both!
For 2023 we grew Music, Transylvanian (soft neck), Lorz Italian (soft neck), Italy Hill, & Northern White. 130 cloves in total with about 60 soft neck. This quantity for us is sort of ridiculous, but it also occupies a nice big bed for some fall plantings like head lettuce, cilantro, arugula, and spinach, which is going to be a large focus for our 2023 summer garden because we are planning a vacation to England and Germany for mid to late July which is equal parts insane and exhilarating.
I am certain many of you are much more discerning with garlic, so I’d love to hear your top picks and why in the comments below. I am sure I’m not done experimenting with new varieties and am always open to adding to my seed wish list.
-

Turkey Posole
As anticipated as our Thanksgiving dinner is using our leftovers for posole. Not a traditional posole, as this is a good bit thinner than authentic versions, but we’ve come to love it and hope if you’ve got some leftovers needing new life, you’ll give this recipe a try.
When I do my Thanksgiving shopping for celery and cranberries, I also always pick up a large can of hominy too, so we’re ready to go.
Turkey Posole
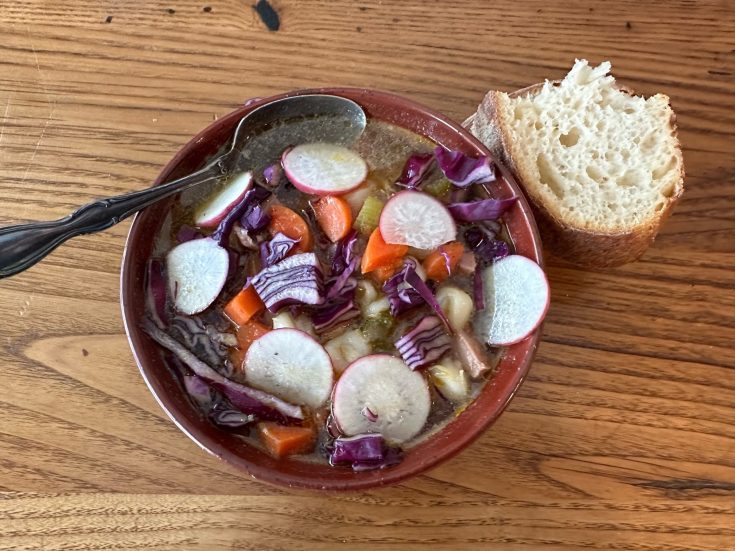
This recipe is completely flexible — think in terms of proportions as about 2/3 veggies and meat to 1/3 liquid. Almost everything in this soup we have on hand. Maybe you do too.
Ingredients
- 2+ cups roasted turkey, chopped into 1/2” cubes or so
- 2 onions, finely diced (2-3 cups)
- 3-4 carrots (3 cups finely diced)
- 4 stalks celery, finely diced (2-3 cups)
- 1/4 cup olive oil
- 1 T salt
- 1/2 tsp freshly ground pepper
- 1/2 tsp ground cumin
- 1/2 tsp oregano
- 1 tsp smoked paprika
- 1 small chipotle ground, about 1 teaspoon chipotle powder*
- 2.5 quarts turkey broth
- 1 28-ounce can hominy
Instructions
- Make your own bone broth with your turkey carcass. We simmer a 12-16 lb bird in about 6 quarts of water for 1-2 hours. Strain and set aside, or use right away for this soup.Chop onion, carrots, and celery all to about the same size pieces. Saute on medium high heat in a large stockpot for 5-10 minutes until the onions start to caramelize slightly, stirring occasionally.
- Add the spices, turkey, and broth and bring to a boil. Let simmer for about half an hour. Add hominy and simmer another 30 minutes.
- *The chipotle in this recipe makes it pretty “Minnesota spicy”, which means it was a lot of heat for our out of shape palates. For us, that means it was spicy! You may want to start with less chipotle, half as much, and taste before adding it all. Alternatively, you could chop up a chipotle in adobo sauce and add that in lieu of dried chipotle. I used dry because it was all we had this year, though chipotle in adobo would be more traditional.
- Garnish with red cabbage, avocado, and radish.
- Serve with cornbread or fresh sourdough.
-
2022 Review: square footage by vegetable
Did my allocated square footage of vegetables yield the right amount of food? If not, how much do I adjust for 2023?
The biggest win of the season was probably potatoes. We allocated more square footage than ever to our potatoes and it paid off — 44 feet of bed (4×44, planted in 3 different locations). We harvested over 200 pounds in fall, in addition to many pounds from August to the final harvest when I’d pull some up for a specific meal. We increased our square footage too, by probably 30%. Our winter eating will determine if we keep that square footage or decrease it (last year we harvested 170 pounds and we didn’t eat them all by April).
I usually allocate about 4×20 to our peppers, and that feels like the just right amount. It ends up being about 30 plants or so, and we will continue to grow a wide variety.
I also didn’t get my fall brassicas in nor did I have the right mix this year, but the square footage we have for them, which is about 4×20 or more does seem to be the right amount, given the Brussels sprouts occupy other beds, and other successions like turnips, carrots, and radishes are allocated elsewhere.
Sweet corn also had the right amount, thanks to how I succession planted it. In the past, I often planted it late but only one succession. This year I did two succession, and the second was slightly larger than the first succession. The first planting was about 4×4 and the second 4×6. We yielded several meals out of each planting over two weeks, spread out across about 6 weeks.
Our Brussels sprouts were a larger allocation this year, and because our cabbages came up short, we are relying on them more this fall. We grew 12 plants, spaced 24” apart for a total of 4×12. Sadly, my last 3 plants we didn’t harvest before the bitter cold a few weeks ago caused them to start rotting on the inside so we lost several pounds of sprouts this fall due to that lack of action.
Our carrot bed might have been a little short this summer for the root cellar. I had three different areas with a total square footage of about 4×12. I will probably do a large sowing of fall carrots in late June in 2023 due to our summer plans. We also always plant a 4×4 bed of early carrots (sown around April 1, uncovered) we enjoy throughout summer and that is a solid plan for us annually.
Dry bean productivity is still in process as we shell them all, but it’s safe to say we’ve increased productivity immensely. We grew 26 row feet of borlotti under the bean tunnel; another 8 row feet on a trellis; 16 row feet of Tiger’s eye; 10 row feet of my Borlotti F3, a saved seed experiment; and approximately 24 row feet of Dapple Gray beans interplanted with our flour corn, for a total of 84 row feet or the equivalent of a 4 x 28 foot bed, over 100 square feet, or about 3 1/2 raised beds.
Cucumber square footage of 24 square feet is ample for us, when in the right proportions. I like about 2/3 in pickling and 1/3 in slicing.
The dry corn we grew was an experiment and a lot of square footage — we will see how it cooks up, but it occupied most of our largest triangle bed and another 4×6 bed for our cornmeal corn. In total we had about 130 square feet in dry corn.
Winter squash had a slightly less prominent place in the garden this summer. I grew four plants, two each of Candystick delicata and Waltham butternut. It was in a large bed, 5×6 feet, so they enjoyed a 30 square foot area plus whatever they ended up doing in the adjacent asparagus and into the paths. We have a decent harvest, but I would be happy with more butternuts than we have.
It’s hard to say how we did with onions because the goal is storage through winter, and they store with mixed results. However, we grew more onions this year, and were never skimpy with them, and so I think our extra square footage is paying off. We have shallots and 3 kinds of onions in our root cellar, plus we had another variety strictly for fresh eating too. All told, we had about 4×14 allocated to onions and shallots.
-
2022 Review: Most missed vegetables
Accepting unplanned abundance and absence is the ultimate goal. Absence can be a perennial thorn in our sides. We grow something once, and then when it’s not here come summer, even with a conscience decision to take a year off, it still sometimes nags at our hearts. What we do with these pangs of regret is key to how we can enjoy our gardens fully each year. I have worked hard to develop a love of each season for what it is. The garden is not meant to be a rubber stamp, a replicable and reliable assembly line that churns out bushels of food without incidence. It’s meant to yield unique and dynamic results that keep us curious, humble, and excited for more. The choices we make in going into relationship with the specific seeds and plants reflects our mood and desire of the time when we set those intentions. There are always off-plan tomatoes that get seeded here, and I’ll safely say it will happen again in winter and I will regret it come August. Other than tomatoes, I have become more at home with the unpredictability of gardening. As the seasons pass, I become more at peace with the absence and abundance of food that inevitably varies season to season. What I miss most is that the same intentions never yield the same results. So do I stay the course or chart a new one? That is a question I continue to grapple with, sometimes giving into the the newness of an unexplored garden and other times leaning into a previously tried and true planting plan that very well may produce ideally once again. The aspirational zen gardener in me wants to arrive at a place of complete acceptance of each season as how the season was always meant to unfold: disease pressure, surprise gluttonous harvests, and an eternally novel balance of food included.
-
2022 Goals vs Reality
Our biggest goals of the summer garden were to increase the total amount of canned tomato sauce, dry beans, and continue to expand our root cellar garden. Here’s how we did.

Goal: 75 Quarts of tomato sauce
Actual: 55 quarts, after buying 25 extra lbs at a farmers market) — we grew more determinate paste tomatoes but fewer over all paste tomatoes compared to 2021 (which also yielded 55 quarts + more ketchup than this summer)
Next year: Increase the number of determinate paste tomatoes from 14 to 20. Increase the number of indeterminate paste tomatoes to 4 (all Speckled Romans)
Goal: More cabbages for the root cellar
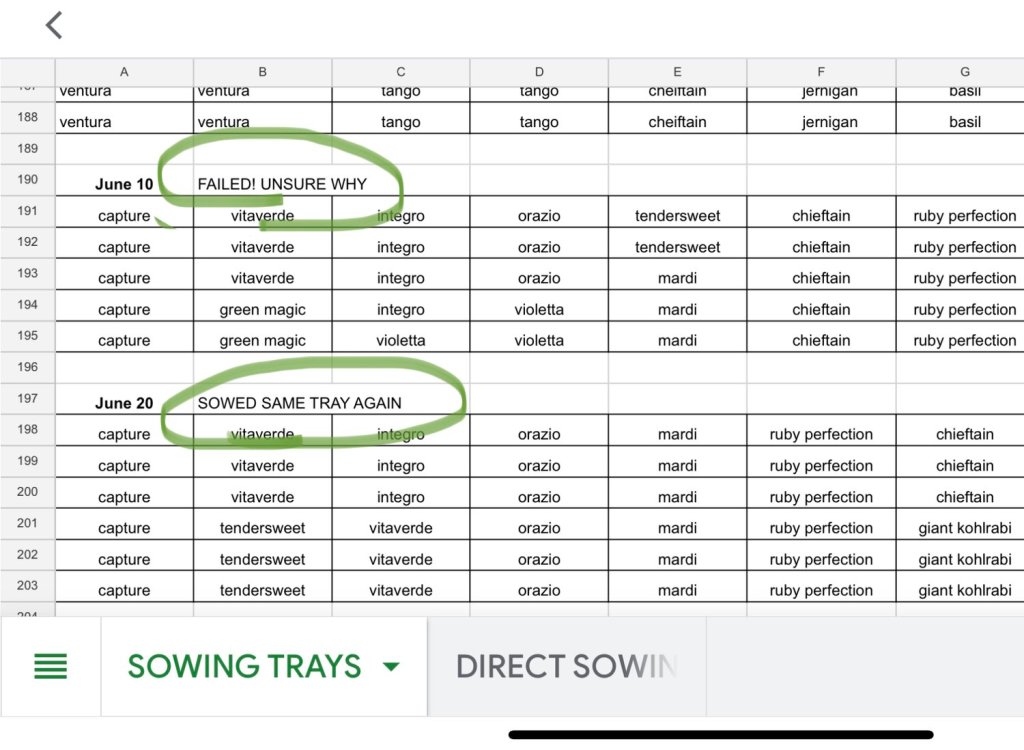
Actual: A resounding fail, due to zero germination on my June 10 tray which resulted in a two-week delay. That translated to many fewer head cabbages because those two weeks were critical for their development.
Next year: Start my head cabbages on June 1, which will be a little early but because of summer travel I’m planning to weight the garden more heavily to fall crops.
Goal: Produce enough sesame to give as gifts.
Actual: I planted about 3x as many plants and they all yielded really well, and I think we achieved this goal.
Next year: Grow as many sesame starts as this year (about a dozen plants)
Goal: Grow enough pickling cucumbers to yield about 2 dozen quarts over 2-3 canning sessions.
Actual: Canned 12 quarts due to a lower number of pickling cucumbers (4 plants instead of 8)
Next year: Grow 8 pickling cucumber plants to yield faster canning results so I can turn the space over for fall root crops and leafy greens in mid-August
Goal: Grow our own flour corn for tortillas
Actual: It was a long season variety from Native Seed Search, but I think it worked.
Next year: TBD. I won’t decide until we nixtamalize the corn and make tortillas, but it’s promising
Goal: Plant more flowers on both sides of the main path to add visual interest
Actual: I overcompensated and weighted the right side heavier than the left.
Next year: Keep working on this by adding blocks of flowers and interplanting between large plantings like potatoes, tomatillos, and watermelon.
Goal: Grow enough tomatillos for a year’s worth of salsa
Actual: We canned about 24 pints of salsa. I don’t think it’s quite enough.
Next year: Plant 3 tomatillo plants? This sounds like a very bad idea because as some of you know tomatillos are extremely prolific, but I’ll decide in late March when I assess how many pints remain at seed-starting time.
Goal: Double our dry bean harvest (from 14 to 28 pounds) so we can cook either chili or beans and rice weekly throughout the year.
Actual: We grew at least twice the linear footage (row feet, measured by how many feet of bean rows you planted) as last year, though some with less productive beans. We are still shelling them, but so far it looks like we may top 30 pounds of beans, and that’s a pound of beans a week for more than half the year, which is great.
Next year: I imagine I will grow at least as much square footage in beans next year, in part because of our travel plans. Dry beans are a set it and forget it crop, and I need to be sure our garden is in good shape for summer travel, and dry beans are super simple to manage — I mean, safely ignore.
In summary, we fell short of several of our homesteading type goals this summer — our tomatoes didn’t yield quite enough for what I believe we need to enjoy chili or lasagne weekly in fall, winter, and spring. Those meals consume 2 quarts of tomato sauce, which is roughly 10 pounds of ripe tomatoes weekly, or 500 pounds of ripe tomatoes processed annually. That would be 100 quarts canned, which is not our goal because in summer we don’t crave these warm meals nearly as much.
Our fall brassicas were a sad state of affairs, one of my least successful seasons to date. I know our failed sowing tray drove those dismal results, but it’s no less stinging because this is a huge part of how we extend our harvest season and delay the purchase of greens and brassicas in winter.
On the bright side, there were more flowers, maybe even enough, and I just need to play with placement, like a florist working her landscape-sized vase. I’m delighted to continue that slow study of our garden. I will keep visualizing the garden from my favorite angles and try to imagine tufts of zinnia breaking up long, homogeneous green blocks of potatoes and popping up through a bed of rambling melons. Additionally, our increase in bean, tomatillo, potato, and sesame square footage yielded positive results that will feed us well into spring 2023.
Every year will have disappointments, failed crops and unimpressive yields all the while other crops will delight and exceed your expectations. It’s a grounding exercise to depend on what our land produces, and we are grateful for all that we can enjoy and share from our planning and hard work in 2022.
-
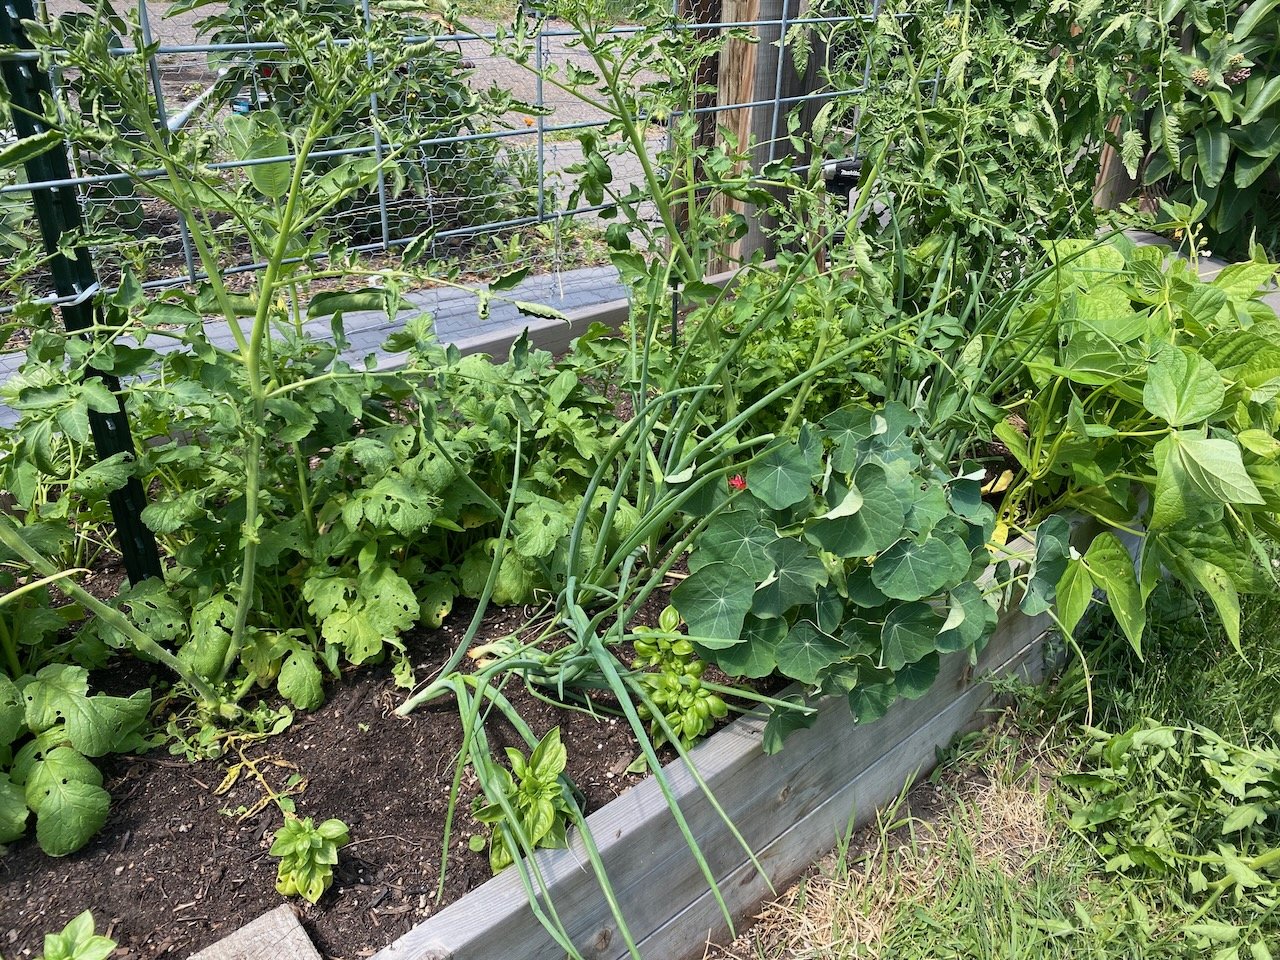
2022 Review: Intensively Planted Bed
I planted one 4 x 10 foot raised bed intensively this summer. I was attempting to replicate a small-scale garden to both remind myself and help be a better teacher to the many of you who grow in limited square footage. I fully recognize the scale at which we grow is a luxurious, and permits a lot of exploration of vegetables and ensures ample plant spacing, but these things, especially plant spacing, are no less critical at any scale.
And I admit with the onslaught of abundance at large, I didn’t prune my tomatoes as much as I should have. I initially pruned to 3 main leaders like I’ve done for the past four years, but it quickly got out of control and top heavy. Sprouts also continued to come out of the ground level, especially with our Vesuvio di Piennolos.
Why didn’t I prune as much? The drought was the main reason why. We had minimal disease pressure, so the tomatoes weren’t screaming for attention — this is true not only for this planting but in the garden as a whole. My tomatoes took over this bed by mid-August. We had one semi-determinate and 4 indeterminate tomatoes. They were a real mess, and completely shaded out the onions and cilantro. At the same time, they were also really productive and are the reason I was able to make a few batches of bloody mary mix in September.

Onion in the top right was from our normal onion planting (block planting, no interplanting) versus this mixed bag I harvested underneath sprawling tomatoes.
The onions, interplanted in front of the tomatoes along with cilantro, were a sad attempt at what we know should be. It was reminiscent of our former urban gardening attempts to interplant onions – they were more like pearl onions than useful medium sized onions for a family dinner.
The cilantro, however, lingered for a good 2 months or so. It was probably one of the biggest wins of this bed. We relied it from late June until August. It was the best cilantro garden I’ve planted to date, and I hope to replicate it for many years to come. The shade of the tomatoes definitely helped it linger for a long time.

The Vesuvio tomatoes did not grow true to form and seemed determinate for about half the season and then eventually also started to climb, causing quite a mess that I didn’t manage as actively as I could have.
The flowers in the corners were also a bit of a gamble, occupying much needed leaf area for food production. Definitely grow your flowers outside this bed if this is your only space – take over a bit of grass adjacent to this, add a planter, or grow flowers in part-shade (they’re much more adept at this than food) if that’s all you have.
The carrots I planted in the northeast corner behind the tomatoes did okay. I didn’t thin them to the degree they needed, and they produced 3” – 5” carrots. Definitely not the beefy ones I grow elsewhere, but also not the same variety so that’s also why. The massive carrots we grow, Danvers 126, are a specific type of carrot known for its massive girth.
The gold rush bush beans in the corner did not fare as well as I’d hoped. We got some handfuls, but not as many meals as I’d hoped to get from these. The nasturtiums were definitely inhibiting their productivity. If Japanese beetles weren’t an issue for me (they decimate the foliage of pole snap beans here), I’d maybe do a main trellis with half tomatoes and half pole beans as the main planting in this bed.

I still think splitting the bed in half is a good method. This way you can get a few extra plantings in back while still harnessing the full sun aspect in front of the trellis. The veg in back is carrot, parsley, and parsnips from front to back in this photo, all that remained after our first fall frost.
The parsley and basil tucked behind and in front of the tomatoes, respectively, also fared well. I made a batch of pesto for the freezer with the basil and we enjoyed the parsley as needed in various salads and some chimichurri.
The head lettuce I interplanted early on also did pretty well, and the timing was good — it went in with the tomatoes and was mature in June and early July.
As I’m writing this I’m realizing I haven’t yet harvested the parsnips! Gah. I started to late last week and decided to wait. Why, oh, why did I decide to wait?
What will I do the same?
- I liked the tomatoes placed in the middle of the bed, leaving equal space both in front and behind for lower growing veggies.
- The basil in the front of the bed did really well and I’ll definitely do that again.
- The direct-seeded cilantro between each tomato plant was awesome and worthy of being expanded to our main tomato beds too.
- Place shade tolerant leafy crops behind (parsley, lettuce, cilantro) the tomato trellis and full-sun veggies in front (basil and beans).
What would I do differently?
- I would return to our single leader style of tomato trellising we used to do in the city, which will remove much of the sprawling leaf area that shaded so much out. I will also only plant half the width in tomatoes, leaving the other half for squash or beans.
- The carrots probably need to be planted in front of the tomatoes, and maybe even as a fall crop instead of a main season crop, allowing lettuce and arugula to go in first and then in July transition to fall carrots.
- The onions really need their own space, so I’ll have to dedicate a portion of the bed entirely to them – I think onions are amazing homegrown and will try this in part of the open half of the bed, along with some green beans too.
- Summer squash is a huge producer and worthy of small gardens because of how productive they are, so I’d like to try a summer squash too, though I already know this is problematic for the amount of space I’ll have.
- Flowers will need to be re-evaluated. I feel so strongly that flowers are necessary, but I am not sure with such limited square footage the flowers I love to interplant are suitable.
It all comes back to what our goals are with our space. My goal was to grow a wide variety of food, and several successions within the same bed, in a small space. I will replicate this again next summer but likely in a different location within the garden. It’s a great learning tool for me and also helpful for garden visitors to see the difference between overplanted beds and plants that are more spaciously cultivated.
-

The Final Harvest: Taking Notes
Are you a notetaker? I hope so, because I need you to take notes.
On your phone. In a journal. Even just make sure you’re taking pictures. Ideally, you’d do all and any of the above whenever something strikes you, then on a snowy or rainy late fall or early winter day, you’d sit with it all and let it marinate and reveal the lessons of the year.
I have a really strong visual memory which is a blessing and a curse because my brain is full of visual stimuli that are hard to turn off. And even though I will probably visually remember each season, I still like to write things down. There’s something in the writing things down that solidifies the memory for me. I think this is a well-studied fact, too, hence why note-taking is a thing. And, well, I fully admit to revising my garden history from time to time, so having a record keeps me honest and helps to bring those wandering stories back into focus.
I love love love my google spreadsheet. One tab is for my indoor sowing trays and the other for direct seeding. I highly encourage you to consider using an online spreadsheet for documenting because then it’s in the palm of your hand whenever your phone’s with you. I also use it to take notes on what to do different next time and to document what failed.
The biggest mental garden task I do every autumn is inventorying the season. Here are the big things I try to actually document — not just keep rolling around in my head all winter — for my early January garden planning:
- What goals did I set? How close did we come to achieving them?
- Did my allocated square footage of vegetables yield the right amount of food? If not, how much do I adjust for 2023?
- Are there vegetables I missed growing this summer, and do I need to source seed?
- Are there vegetables we won’t grow next year? Who’s not worth the space?
- How did my flower beds work out? How will I adjust them for 2023?
- Which beds MUST I crop rotate around next year and what might I put in those key beds next summer? (Hint: Nightshades are my biggest crop rotation must-do.)
- What surprised me most this year?
- Favorite flower + veggie pairings from 2022? Least favorite?
- Biggest disappointment in the annual, perennial, and flower gardens?
- What are my top 3 goals for 2023?
A large part of this end of season reflection is creating the space to just be. It’s a fine line for me, as I imagine it may be for you too. I am on my technology too much, and it’s “part of my job”. I often feel I’m losing the intrinsic skill of listening, of slowing down, when I don’t actively work to put the phone away for hours at a time. As I write this, I can feel it nestled next to my leg in my seat, nagging me to check my messages. There’s so much knowledge that comes in due time when we rest just like our gardens do now, and more than ever we need to create that space because it’s a space that’s truly in danger culturally.
It requires stillness, something technology does not value and fights against minute by minute, pinging, alerting and enticing us to keep staring so they can profit off our attention.
-

The Letting Go
I used to deeply loathe fall and winter. I didn’t grow up in such a cold climate, and my husband grew up in an even more temperate climate (the Bay Area), so learning to love a place where trees are devoid of leaves for more than half the year really does take some practice. A lot of practice. I chalk it up to the slow trickle of life’s wisdom that accumulates across the decades, how I’ve learned to love the letting go that is autumn. I truly relish this time of year and the cathartic erasure of my garden season, bit by decayed bit of beautiful and bountiful memories onto their next phase of life. Composting.
They are being reborn in this way, not dying. And that is a critical mindset for me as I slowly undo all that I joyfully did in March, April, May, June, and July. Yes, we have oodles of food to show for it, but the overall feeling is somber. The colder and shorter days, often under a heavy bank of clouds, only adds to the ominously depressing nature that can be tearing out your dead tomato plants. I’ve already forgotten how colorful life was just weeks ago, living instead in this more muted landscape already, its dampened vibe seeping into my soul inviting the season of contraction that is the dormant season.
As I become friends with the empty garden beds once again, it doesn’t mean life is less colorful. Instead, the colors remain obscured to the eye, hidden and safe belowground. Just pull a garden carrot or daikon in November to remind yourself that color in this dark season can and does sustain us. It’s essential to recognize and remember that cleaning the slate now is the start of spring gardening, in fall. I have to really force myself outside this time of year, as my body yearns for long, quiet days by the fire and a months-long knitting marathon with delicious, warm foods for months on end. The fall cleanup is about to be renewed with warming temperatures returning in the coming week.
I forced myself to venture into the garden yesterday with a mindset to just do a little bit. Clean up one aspect of the landscape that is nagging at me. I had been avoiding the garden all week because I was a bit overwhelmed with the noisy detritus. I needed to let go of some of the mess. The defeated sweet alyssum from our cold nights last week were an obstacle to enjoying my viewshed, a barrier to appreciating the garden returning to more minimalist months. Past tense, because I did it. It took all of about 20 minutes. I carefully twisted them at the base, disturbing as few roots as possible (I was too hasty to get my pruning shear, and yes, I know better) and in a matter of moments the space had a renewed hope for what is to come in 2023.
In this letting go and undoing, I always end up evaluating not just my plants, but also my life at large.
What is working in my life right now? What is nagging me and needs to be composted? Every fall I take a full inventory of not only the plants I grew and which ones I loved, but also of the patterns I’ve been living and breathing and whether they serve me going into winter. It’s a time to downshift, but it’s also a great season for change too. Our weather is changing. Our seasonal menu has dramatically shifted. And I’m here for the deeper and true personal and spiritual change that I’m ready to take on as well.
I invite you to pay attention to this really important seasonal shift that is autumn. Take inventory, free of judgment. I know, it’s so much harder said than done for some of us, but I encourage you to practice radical self-compassion. And just see where it leads your heart and soul.
-

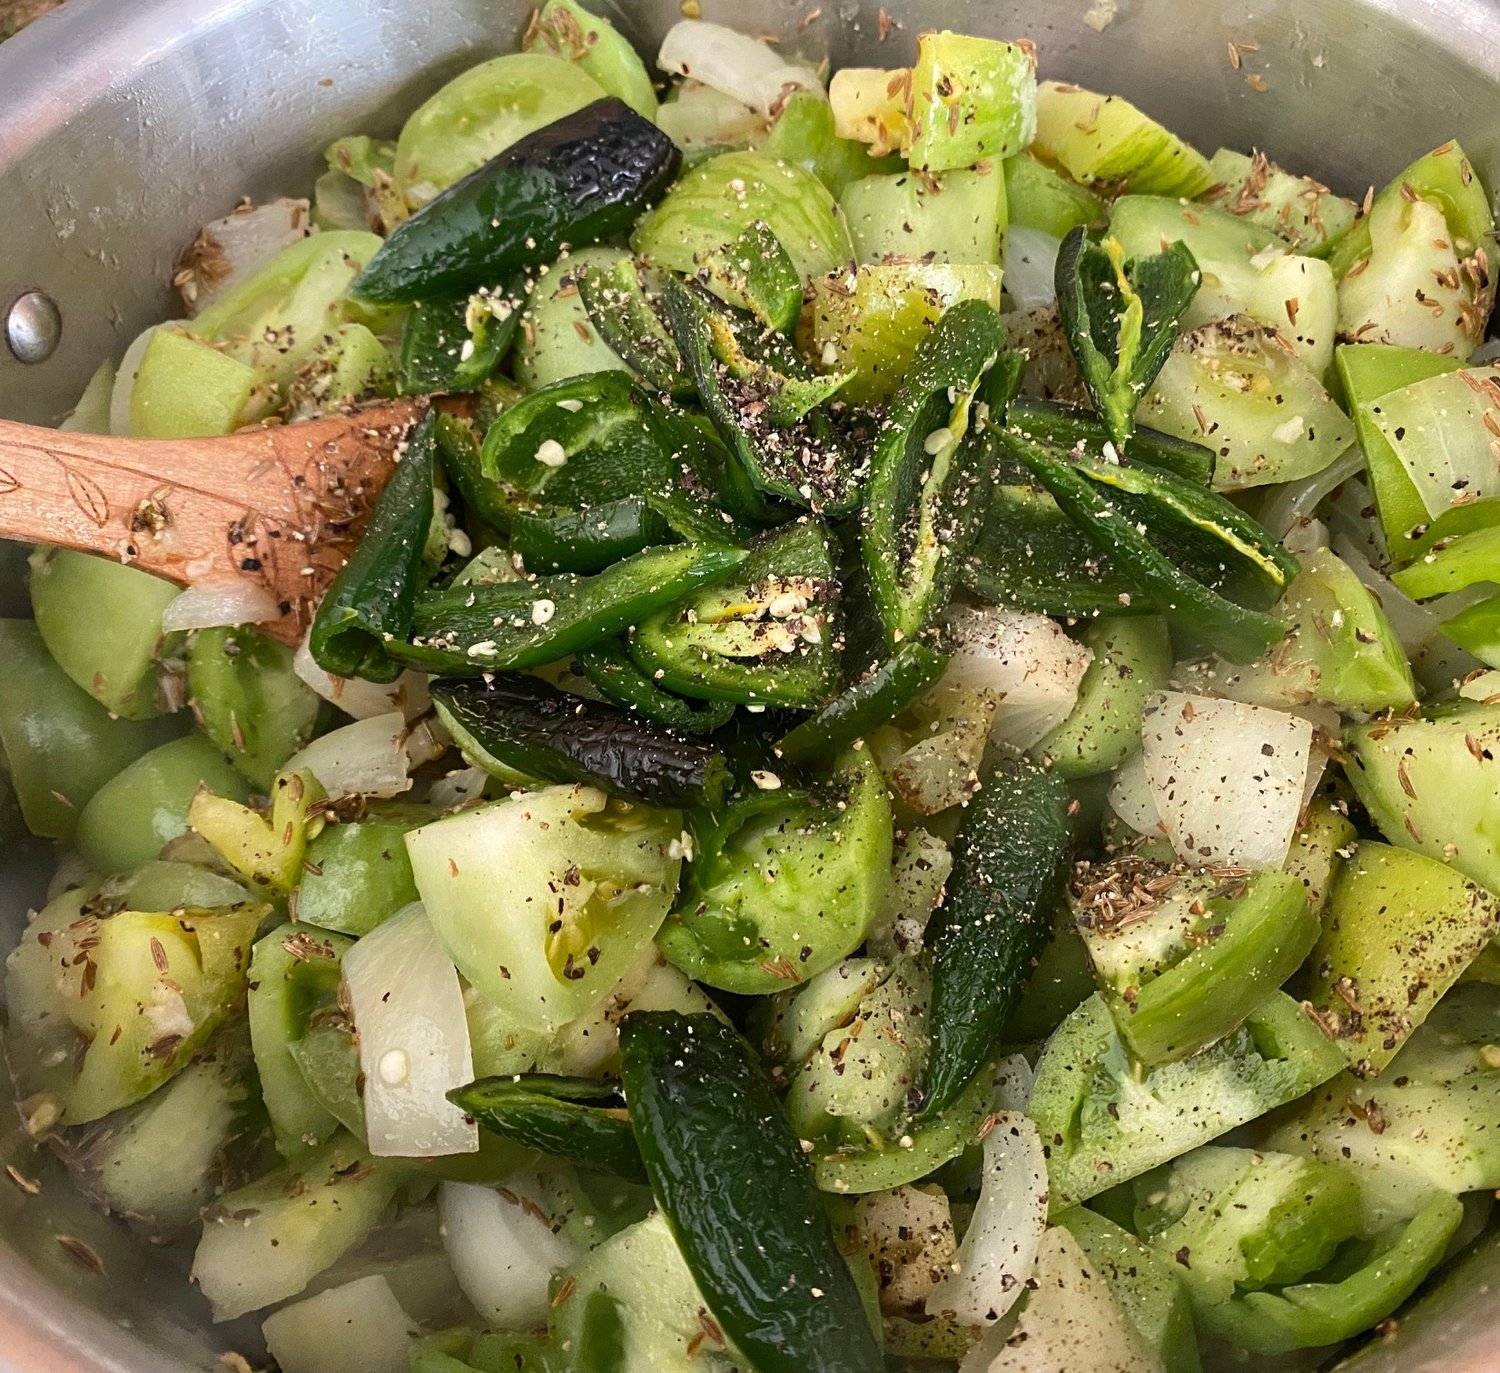
Green Tomato Enchilada Sauce
I had an unusually large amount of green tomatoes in late September before a slightly early frost took my plants out. Unusual because we typically take our tomato plants down due to disease pressure by mid-September, well before a frost. The singular benefit of this summer’s drought was the diminished fungal disease pressure in the garden.
I harvested probably 30-40 pounds of unripe, green tomatoes. Largely beefsteak and romas, I let them slowly ripen on the shelves of the root cellar while also wondering if fried green tomatoes are worth my time or not (I don’t love fried foods). I’m yet to fry up green tomatoes, but I did take the green tomato enchilada plunge, and it is a perfect stand in for tomatillo-based green enchilada sauce.
Yield: 2-3 quartsGreen Tomato Enchilada Sauce

This makes great use of those late summer/fall unripe green tomatoes. It's a one-pot endeavor, and it’s relatively quick and packs lots of flavor.
Prep Time 30 minutesCook Time 30 minutesTotal Time 1 hourIngredients
- 1 pound chopped onion (about 4 cups)
- 3 large cloves garlic, minced (about 2-3 Tablespoonfuls)
- 4 pounds chopped green tomatoes
- 1 T sea salt, or to taste
- 2 T cumin seeds
- 1 1/2 T freshly ground black pepper
- 4 ounces jalapeño (about 8 jalapeños — deribbed for medium heat)
- 2/3 cup chopped cilantro
- 5 cups chicken or vegetable broth
Instructions
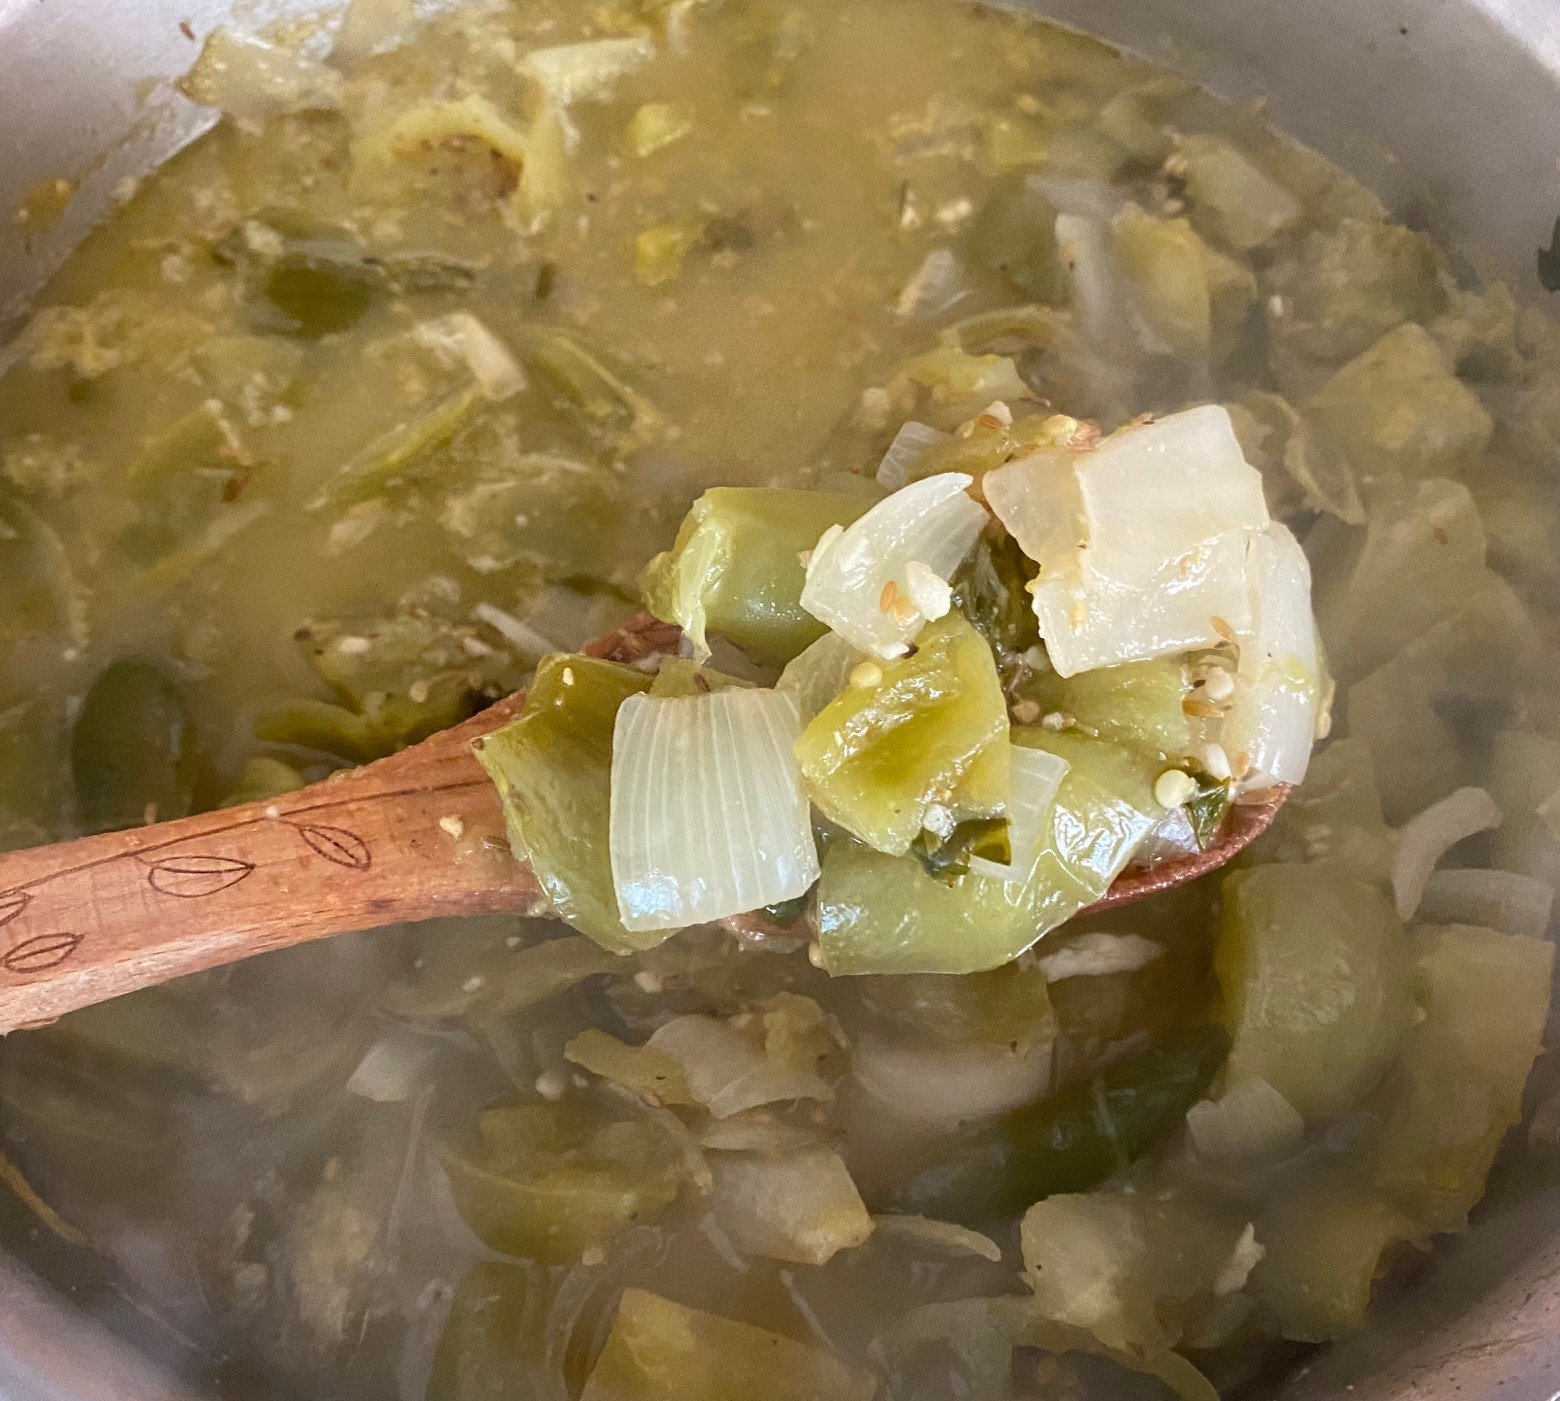
- Saute onion in a large stockpot with about 3 tablespoons of olive oil on medium high heat until translucent. Add jalapeño, tomatoes, garlic, cumin seeds, salt, and freshly ground pepper and cook a few minutes more, stirring frequently – but don’t let the garlic burn. Once the tomatoes have started to soften a bit, add the broth and bring to a boil.
- If you aren’t a fan of heat, I’d recommend halving the jalapeños. Also, you can easily substitute other peppers too — hotter or milder. If you prefer this not spicy, try a green bell pepper. If you want it hotter, throw the whole jalapeño in there! I used up what we had harvested before the frost.
- Boil, partly covered, on medium heat for 35 – 45 minutes. To puree, you can either use an immersion blender in the pot or transfer to your blender (a Vitamix handles hot liquids much better than our old Oster blender, no more boiling liquid pushing out the top) and puree in batches.
- When making for the freezer, let cool before placing into your containers for freezing. Always leave a good 1” of headspace when freezing in glass jars (I’ve had too many glass jars explode on me in the freezer). Freezing in ziploc bags is a great method too. Fill a bag, close it and then lay it flat on a small tray to freeze. It will make the freezer jenga that much easier.
Notes
This recipe yields a 2-3 quarts of enchilada sauce. I cook this way, in
batches, both because of the scale at which we grow and because we have a deep freezer for such things are storing sauces for winter meals. This
recipe is completely scalable, so feel free to halve it for a weeknight
dinner situation. I don’t know about you, but when I use a can of
enchilada sauce for dinner, one can is never enough for us, not even a
28 ounce can.I like my enchilada sauce on the thin side, si I made this recipe with close to 6 cups of broth, though I only call for 5 cups. You can choose to start with a scant 5. cups and adjust after blending. Easier to make thinner than boil down to thicken.
Uses: traditional chicken or vegetable enchiladas, enchilada lasagna, slow-cooker pulled pork, chicken or vegetable soups, spice up your mac and cheese, rice, or any other one of your mainstays. This will bring loads of flavor to a base of any recipe.
I’m most excited to cook a vegetarian enchilada lasagna with butternut and other root veggies. I’ll open roast my butternut, beets, and other roots until cooked but still slightly firm, then slice them thin and layer in with the corn tortillas, sauce, and cheddar cheese. I could see topping this dish with fresh avocado, thinly sliced red cabbage, and quick fermented radishes too.
-

The Garden After A Deep Frost
There’s a handful of vegetables that I never worry about, until my ground is about to freeze. These are really the jewels of a fall and winter garden. If you live somewhere warmer than me, say a zone 5b or 6, these are foods that could plausibly winter in your garden. In this case, you’d use your garden as your root cellar. But for me, with deep frost arriving before the end of the year, I can enjoy their sturdiness for some time yet, though they are the next phase of harvesting for our root cellar.
Carrots are an incredible vegetable to grow anytime. They do well in every season, and this is why I categorized them as one of my “generalist” vegetable successions in my book. They will overwinter in your garden, though harvesting them in winter takes quite a bit of covering and effort to try to prevent the deep freeze from settling. This is why we lift ours and store in our root cellar, a close second to leaving in the ground.
It would be leagues more comfortable doing this before the soil is approaching 32F, but you know, I like to make things difficult.
Leeks are another amazing food that I never, ever worry about. I often don’t harvest mine until late November. I wait until frost has started to accumulate in the top inch or so, perhaps a bad habit but again, I work from most sensitive to least sensitive. We store these as well in our root cellar, burying the roots into damp sawdust. We are not that creative with leeks, but have a few soups we like to use them in, so I’ve now back way off on our leeks and only grow a few rows each year — just enough for a few good meals.
Kale is another mighty fine, stress-free late fall garden companion. It is the only vegetable that will sometimes overwinter in my garden because I leave it out so late and then the snow suddenly comes and I close the gate for a few months on the garden. It can be harvested down as low as 10F for me here. So it’s in the ground for a good while longer. We will enjoy garden-fresh kale into December here.
Parsnips (edited when I realized I forgot I was growing them!) are new for me this year. I sowed them in early June and they will also need to come out of the ground before it freezes solid but likely not a day sooner. I can’t wait to harvest and roast them and hope to grow more next summer.
Spinach and cilantro are two more I don’t worry about as well, as I’ve noted earlier in the season I think. Spinach will overwinter for me without any special efforts. It’s really amazing and more people in cold climates need to give this a try! A harvest basket of fresh greens in late March here from a September sowing is one of the coolest things I do in fall.
Regretting These
There’s also a group of vegetables that I regret not plucking a few out earlier this week before I left. While experience has taught me that they can handle air that cold, you just never know. Gardening on that edge of our climate means you have to get really comfortable with a lot of unknowns, and be prepared to lose vegetables every spring (when I push it with late frosts) and fall (when I push it with late harvests).
This was so fascinating — a few years ago I let these sweet baby daikon remain in the ground in late fall with plummeting temperatures. These experienced multiple nights below 18F under row cover and you can SEE where the frost hit them, a line indicating what part of the root froze (where the root turned translucent) and the deeper portion that remained safe. It was all edible, but storage quality is not great when this happens.
I am most concerned about our beets, kohlrabi, and napa cabbage. These are pretty cold hardy. Napa cabbage is more cold hardy than my tatsoi and bok choy, and it’s why I love growing it in fall. It also stores like a champ in the root cellar, something I learned by experimenting a few years ago.
Most were covered up, though the kohlrabi was not. It didn’t size up well anyway, and I know that’s why I kept ignoring them. If they were softball-sized, I guarantee I’d have harvested them and put them in the fridge with our turnips, daikon, and watermelon radish. I expect some frost damage to them and I’ll show you when I harvest and slice them open.
I’m most curious while also regretful about the beets. Beets store really well in the root cellar, but I don’t really know how cold hardy they are. So it will be fascinating to peel and slice them open and see how they fared.
-

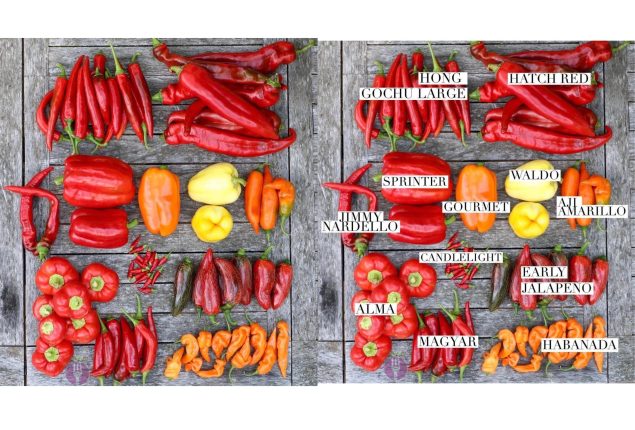
My Favorite Varieties: Peppers
It has taken us many years to learn to grow peppers well. Surely we’ve grown them every year of our nearly 25 years of growing food together, but not all years or varieties have fared well.
Jalapeños, bell peppers, and serranos were often annual traditions for many years. A small urban garden meant I had to grow in small proportions. We were content with the few colorful bell peppers we’d pluck in late summer plus the heat we’d add to fresh salsas and such.
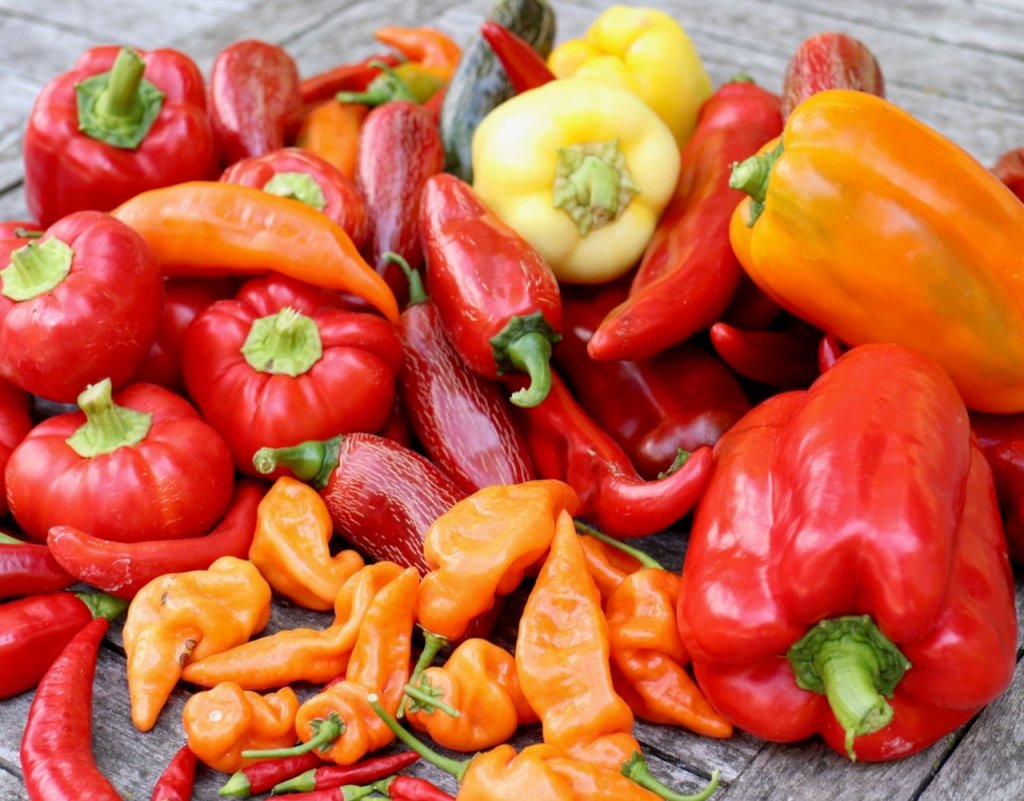
Like with much of our garden journey, transitioning to growing at the expansive scale of our current garden meant blowing open the doors of creativity and exploration. And peppers were as important in that seed search as any other vegetable or flower. So here’s a comprehensive list of all the peppers we’ve grown and which ones are my top picks for you.
Bell/Sweet Peppers
We’ve been growing Gourmet bell peppers since sometime in the ‘00s. It’s a thick-walled orange bell and as the years have passed, our pepper quality has definitely improved. If you’re new to growing peppers, keep at it. I find they are the hardest veggie to grow for me here, but they are so worth it. By and large, I only grow hybrid bell peppers but lean more toward open-pollinated for other pepper types.
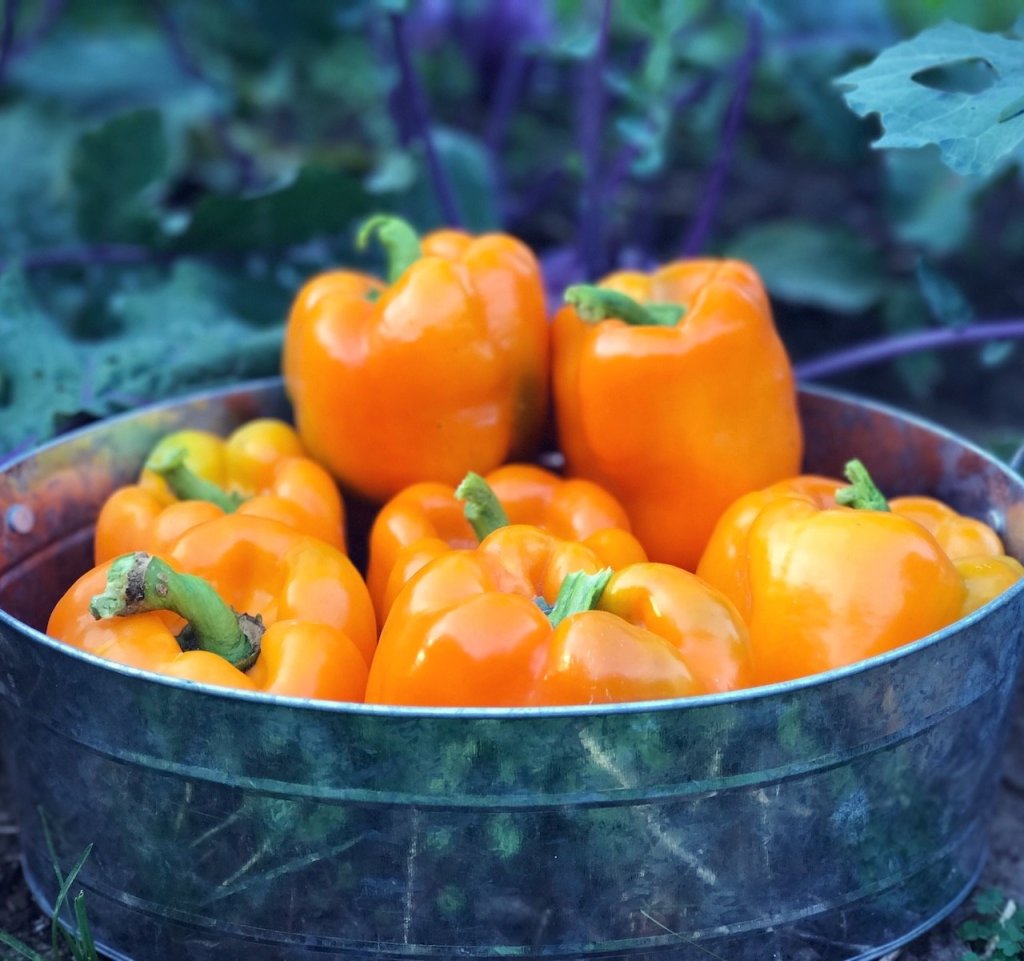
After year 1 of pepper failure here, our 2 Gourmet bell peppers went off the rails in 2018, just in time for packing school lunches.
Canary — A yellow bell pepper, we grew this a few years ago and it wasn’t very productive for me, which is a key attribute for growing again. This one quickly fell off my grow list. (Seeds from Baker Creek.)
Madonna — Another yellow variety, I found this pepper to be a bit better in productivity than Canary. The price difference in seeds these days is astonishing, and I just checked and 10 seeds cost $6.30 from High Mowing Seeds. Now, if you successfully grow 10 pepper plants, you will yield way more than $6.30 of peppers, more like $15/plant I’m guessing with 3-6 or more large peppers per plant.
Gourmet — As mentioned above, this is our garden staple. If I only had room for one bell pepper, this would be it. It’s sweet and thick-walled and often produces abundantly for us, though this year it wasn’t very impressive. In fact, most of our bell peppers didn’t ripen on the vine — there were a lot of green bells before first frost. I heard from farmers this happened to them this summer too, so I know it wasn’t just me. This is why you grow more than one type of any vegetable to thwart these seasonal nuances. (Seeds from Johnny’s Seeds.)

Quite possibly the most “store bought perfect” veggie we grow is this Sprinter bell. Not necessarily a measure of success most of the time, but nothing beats a sweet, crunchy and thick-walled, sun-ripened bell pepper in late summer.
Sprinter — Another hybrid win is this newer to me variety of red bell pepper, Sprinter. Another High Mowing Seeds investment, I was skeptical a few years ago when I was sent 10 seeds for over $5. It was the most expensive seed I ever bought at that time. But this plant is all it is hyped up to be. As thick-walled as Gourmet, it’s flavor isn’t quite as sweet as Gourmet but it’s as essential in our pepper garden for the color and productivity it yields us. This was our best-producing bell pepper this year. Worth the investment.

Waldo — Trying to grow a rainbow of peppers (I’m not into purple peppers, so I stop at yellow) led me to this pale yellow variety. It grew okay for us, but I wasn’t into the flavor. What it added in meals and photographs didn’t compensate for its lack of sweetness, so we don’t grow this variety anymore.
King of the North — Spoiler, the seeds I bought for this (Baker Creek) did not grow true to seed. Actually, I stand corrected: one year. they grew well and then next they didn’t … so it was perhaps a case of a mislabeled soil block. However, Sprinter is so reliable for me I’m good sticking with it, though I should give this variety another try before I divorce it. I should give seeds from Seed Savers Exchange a try before I decide if this is a bell pepper worth the space in our home garden.

Sweet but suspcious-looking pretty much sums up the Habanada.
Habanada — I really loved this “grassy” flavor if this brainchild of Michael Mazourek of Cornell is a culinary experience you all should have in the coming years. It looks suspiciously hot but the heat has been bred out, and what’s left is a vegetal delight. One of our friends who tried them — we simply pan fried them like folks do with shishitos, a pepper fad we haven’t jumped on yet — said it tasted like ‘grass-fed beef’. And I think she’s right. I had intended to grow it again last year, and received seed from a gardening friend with whom I sometimes seed swap and her habanada seeds turned out to be Jimmy Nardellos instead, so I need to buy new seeds for this one to return to our gardens. (Seed from Botanical Interests and many others, including Row 7 Seeds, I believe where it was first introduced into the market.)
Jimmy Nardello — The very tastiest sweet pepper I’ve ever grown. I love giving one of these to folks and watching their experience unfold. I pan-roasted them as a pizza topping this summer when some friends came over, and they could not get over how delicious they were. They look suspiciously hot, too, but as so sweet, which can be confusing in your harvest basket if not managed properly, so take note and plan accordingly! Nothing worse than biting in a hot pepper you thought was sweet. I speak from experience. (Seeds from Seed Savers Exchange.)
Winners: Gourmet, Sprinter, Madonna, Jimmy Nardello
Losers: Waldo, Canary, Habanada
Neutral: King of the North
Paprika & Other Culinary Peppers
This is a huge area of focus still for me, finding food we use on a regular basis and growing it for our pantry. Paprika is maybe the most fun of all, because the smell of smoked, drying sweet paprika is a heavenly scent I’ll now forever link with autumn. Having a smoker is a very new thing for us as of August, and we are loving it!
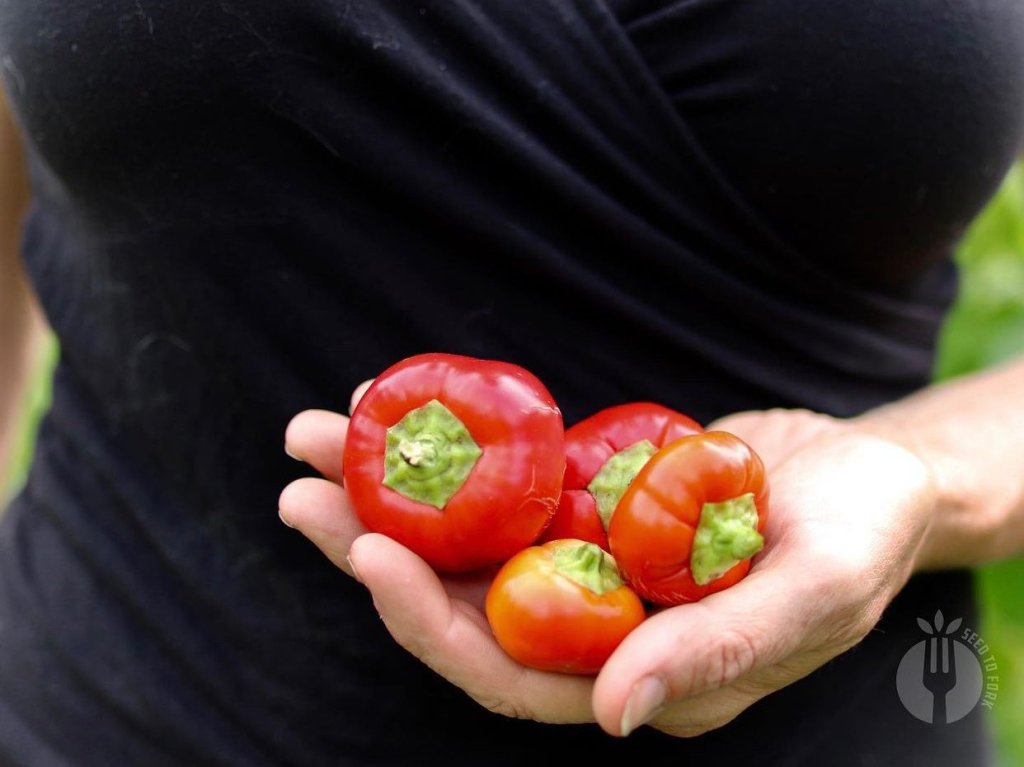
I really love the shape, thick walls, and versatility of Alma paprikas.
Alma — If you’re short on space or want a multi-purpose sweet pepper, this plant is for you! It can be stuffed, pickled, or dried for a sweet paprika. It’s small and thick-walled so naturally matures faster than larger bell peppers, making it suitable for short growing climates especially. A compact habit, it would do well as a border plant at the edge of a bed. They ripen from a pale yellow to a deep red and I harvest them at any stage depending on my needs. (Seeds from Seed Savers Exchange.)
Feher Ozon — Another paprika variety I tried during my first year growing them. Unlike Alma, this is a thinner-walled pepper. It was a beautiful plant but it’s not one that made a lasting impression on me. Because I only gave them one growing season, this will be a variety I’ll grow again to see how we like them. They are larger so like Alma, could be a nice multi-purpose sweet bell — they ripen from a cream to a red and can be picked at several stages. (Seeds from Seed Savers Exchange.)
Gernika — In my effort to continue to search for a wonderful paprika, I found this variety offered by a favorite small Oregon seed company called Adaptive Seeds and had to try it! Their varieties have largely done well for me, except their bush shelling beans whose productivity last year was mediocre and I didn’t grow again. But they’ve turned me on to open pollinated cabbages as well as the Gochu pepper listed below. I love that this one is thin-walled and produces a lot of peppers that ripen across several months. When needed, these are also a great stand-in for a sweet bell pepper. Gotta love this about paprika peppers.
Leutschauer — this is a hot paprika variety we grew and enjoyed it. I only grew it one year (it was highly productive) and we dehydrated enough to last us several years. It will return to our pepper grow list occasionally. (Seeds from Baker Creek.)
Magyar — The final reach across seed catalogs was this one I found through Renee’s Gardens. They claim they are the only ones with this seed source, and they might be right. I haven’t seen or grown any other paprikas that are as small as this one. It looks sort of like a hot pepper, but it’s another sweet variety. Because it’s small it’s also great in our short growing season because smaller peppers ripen faster in general.
Other Culinary Peppers
This is the second most important area of exploration for us as we try to utilize our garden space for specific culinary agendas.

Always a late season pepper, Aji Amarillos make an incredible sauce or dry pepper flake.
Aji Amarillo — The ultimate flavor in a culinary pepper, I am obsessed with this Peruvian pepper who’s name translates as “Yellow Pepper”. It’s packs a lot of heat but is so much more than that. It has a sweetness that balances out the heat on your palate and it’s my secret ingredient when I want to add a complex heat to a simple dish. Sadly, this year they also didn’t ripen on the vine and I’m hoping some do so in our root cellar as I pulled the whole plants out before our frost. These seeds were from my same friend with whom I trade initially, but I believe she got them by way of a California gardener via Fred Hempel at Bene Seeds (Formerly Artisan Seeds). I believe I grew Aji Amarillo Grande from his seed source this year, and my original seeds weren’t specified as Grande or not.
Hong Gochu Large — A medium-spicy pepper that we started growing for homegrown gochugaru, kimchi chili powder. It remains in our rotation and we use it not only for kimchi but also as a hot pepper as needed. I dehydrate all of them whole in our dehydrator and keep in a ziploc bag. It’s quite productive and the size and shape can be confused with sweet Magyars. (Seeds from Adaptive Seeds).
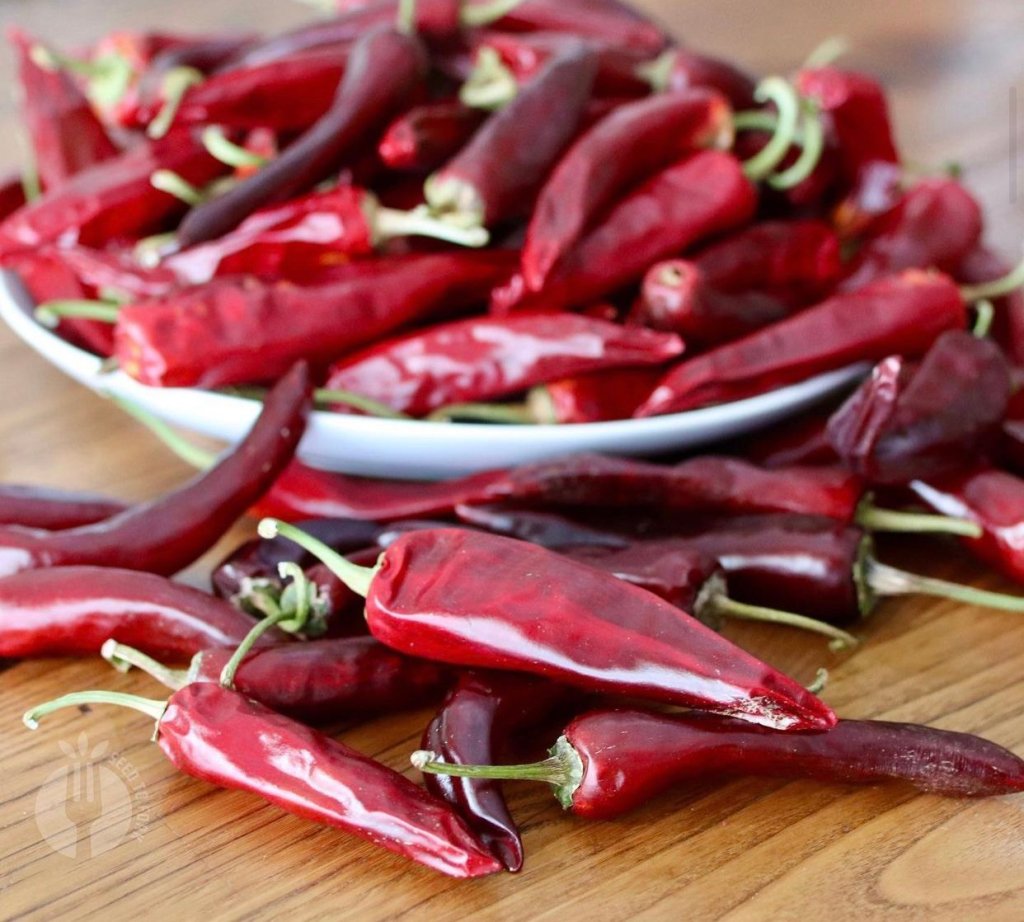
We dry our hot peppers whole, then they go into plastic storage bags usually with food-grade desiccant packs. These are Gochu’s.
Poblano — We loved this pepper last year as a stuffed pepper. It brought a twist to our often entrenched weeknight meals. I would saute onions, peppers, garlic, herbs, carrots, and any other veg I had around with rice and sometimes sausage and stuff the peppers and top with cheese. So delicious. Sometimes the peppers are hot, which makes eating them risky and fun because you don’t know what you’ll get. My poblanos didn’t germinate this year for me, but I’ll try again next year. (Seeds from Botanical Interests.)
Hatch — Another seed from the friend I’ve mentioned a few times, this cannot technically be called a Hatch chili because I don’t live in the Hatch Valley of New Mexico (just like Champagne being from a specific geographical region of France and all else deemed sparkling wine). However, this is another fantastic addition to your culinary pepper lineup if you enjoy Latin cuisine and delicious sauces. Next time I grow this, I’ll be purchasing seeds from Sandia Seeds.
Pasilla Bajio — I only gave this pepper a one season shot. And they start out really dark, almost black. Didn’t get a lot to turn colors and when I dehydrated them they looked, well, unappetizing to me. I don’t know, maybe I need to learn more but this was a pepper I was really excited to add to our homemade enchilada sauce lineup and I guess it fell short for me. But I think it has a lot of merit if you love cooking Mexican. (Seeds from Botanical Interests.)
Winners: Alma, Gernika, Hatch, Poblano, Aji Amarillo, Hong Gochu Large
Neutral: Pasilla Bajio, Feher Ozon, Magyar, Leutschauer
Hot Peppers
We don’t eat a ton of spicy food, and when we grow hot peppers most often I end up fermenting them into a hot sauce, dehydrating them and occasionally tossing one into our cooking beans or grinding up for a rub. But we usually grow too many hot peppers because I like to use them as endcaps for my garden beds, lining the main aisle with unique peppers and eggplants too.
Candlelight — a wonderful ornamental chili pepper for any landscape. I harvest a fraction of what grows, more love enjoying its form in the garden and then we compost it. (Seeds from High Mowing Seeds.)
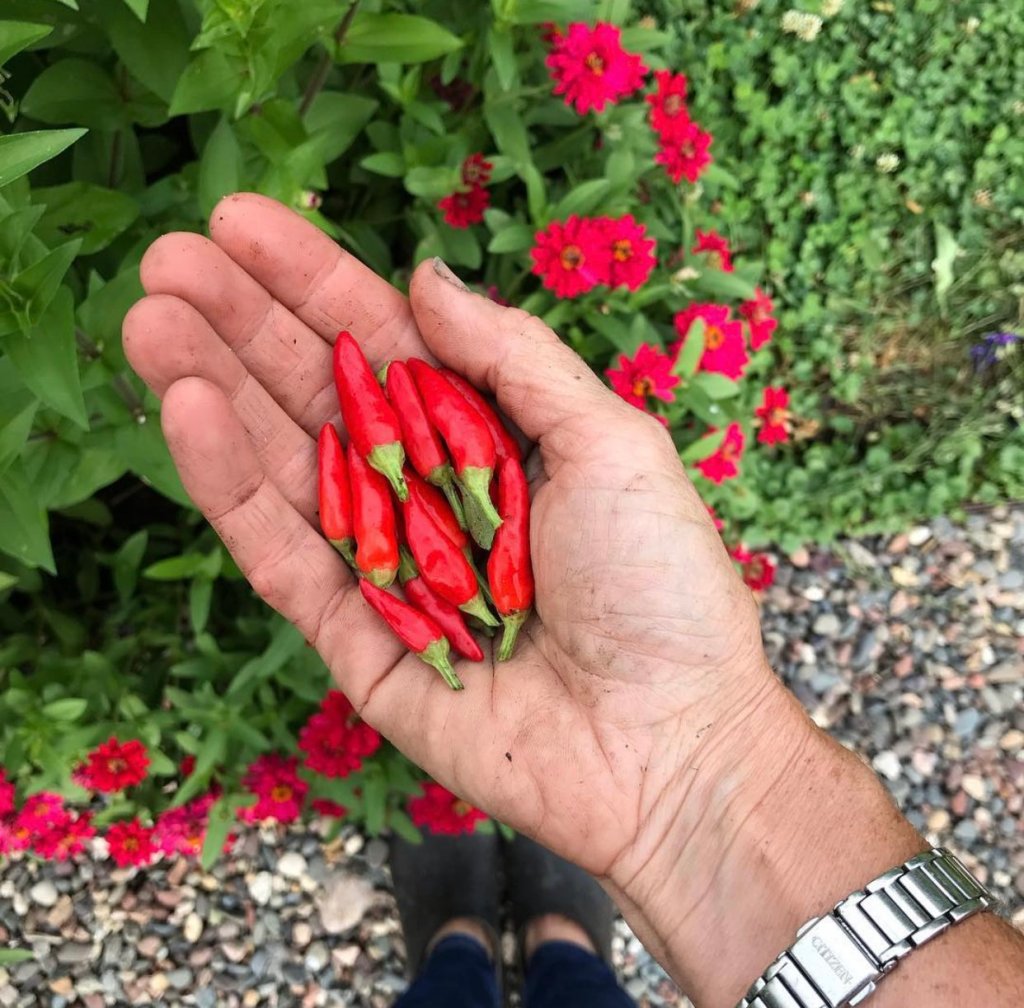
Cute candlelights, but don’t let their demure stature fool you, these are spicy!
Black Hungarian — Another pepper grown for my heritage, it was a fun pepper to grow, but the theme in this section is that I’ve grown a lot of hot peppers and we don’t always use them. This was one I enjoyed growing but we really didn’t make use of it well in our kitchens.
Chinese 5 Color — This is a super fun and quite hot pepper to grow. So if you only need a little bit of heat but want the fun of a rainbow, this is your pepper. We don’t have a palate for super hot foods, so this one is grown entirely for looks.

Early Jalapeño — Our go-to Jalapeńo, this usually ripens well for us starting in August. Alas, the theme this year was peppers that didn’t ripen well, and these were among the cohort that didn’t perform to our expectations. However, we really love this variety and will always grow it. (Seeds from Johnny’s Seeds.)
Fish Pepper — Sadly, this plant didn’t produce well for us. The plant struggled all year. I want to try again because I’m growing it for the variegated foliage more than the fruit! (Seeds from Seed Savers Exchange.)
Habanero — This pepper is too hot for us, so we don’t grow it anymore.
Hungarian Wax — How many different medium hot peppers does one garden need? That is what I ask myself when I start harvesting so many. Because I have Hungarian roots, I love growing these peppers, and hope to cook more traditional Hungarian meals with them. We mix them into our normal cuisine — salsas and chilis and such, and I’ve dried some too which I suppose could maybe be a stand-in for “hot paprika’“ for us this winter. If I had my wits about me, I may have thought to pepper some this summer. (Seeds from Johnny’s Seeds.)
Ralph Thompson — I honestly thought this was a mild, sweet pepper but it turns out it’s a medium hot pepper which reads for our family as a Habanero! Haha, such it was as my husband and oldest bit into an extraordinarily hot specimen on a pizza one night.
Rooster Spur — Similar to the Candelight in form, though it grows much taller and is purported to be up there on the Scoville scale. I’ve dehydrated some for “cayenne powder” this year. I will probably not grow this one again .. it was a but unruly for my gardening style, as I need these types of pepper to have a compact form .. this variety needed staking. (Seeds from Seed Savers Exchange.)
Serrano — A classic heat, but too hot for us.
Thai chili — I enjoy growing this pepper, but I honestly can’t taste too much of a difference between it and other hot peppers. If you’re a Thai cuisine enthusiast though, this pepper, like all hot peppers, was a prolific producer and they ripened well on the plants too. (Seeds from
Winners: Candlelight, Chinese Five Color, Early Jalapeño
Losers: Serrano, Habañero, Rooster Spur
Neutral: Black Hungarian, Hungarian Wax, Fish Pepper, Thai Chili, Ralph Thompson
Hope this roundup was informative and helpful. As I find more images of the peppers listed here, I’ll work to add more images to this post. (Surprise, my digital organizational skills are sorely lacking.) And remember, that our climates and soil impact how well plants do for us too, so just because things didn’t grow well for me doesn’t necessarily make them unsuitable for your garden.
-
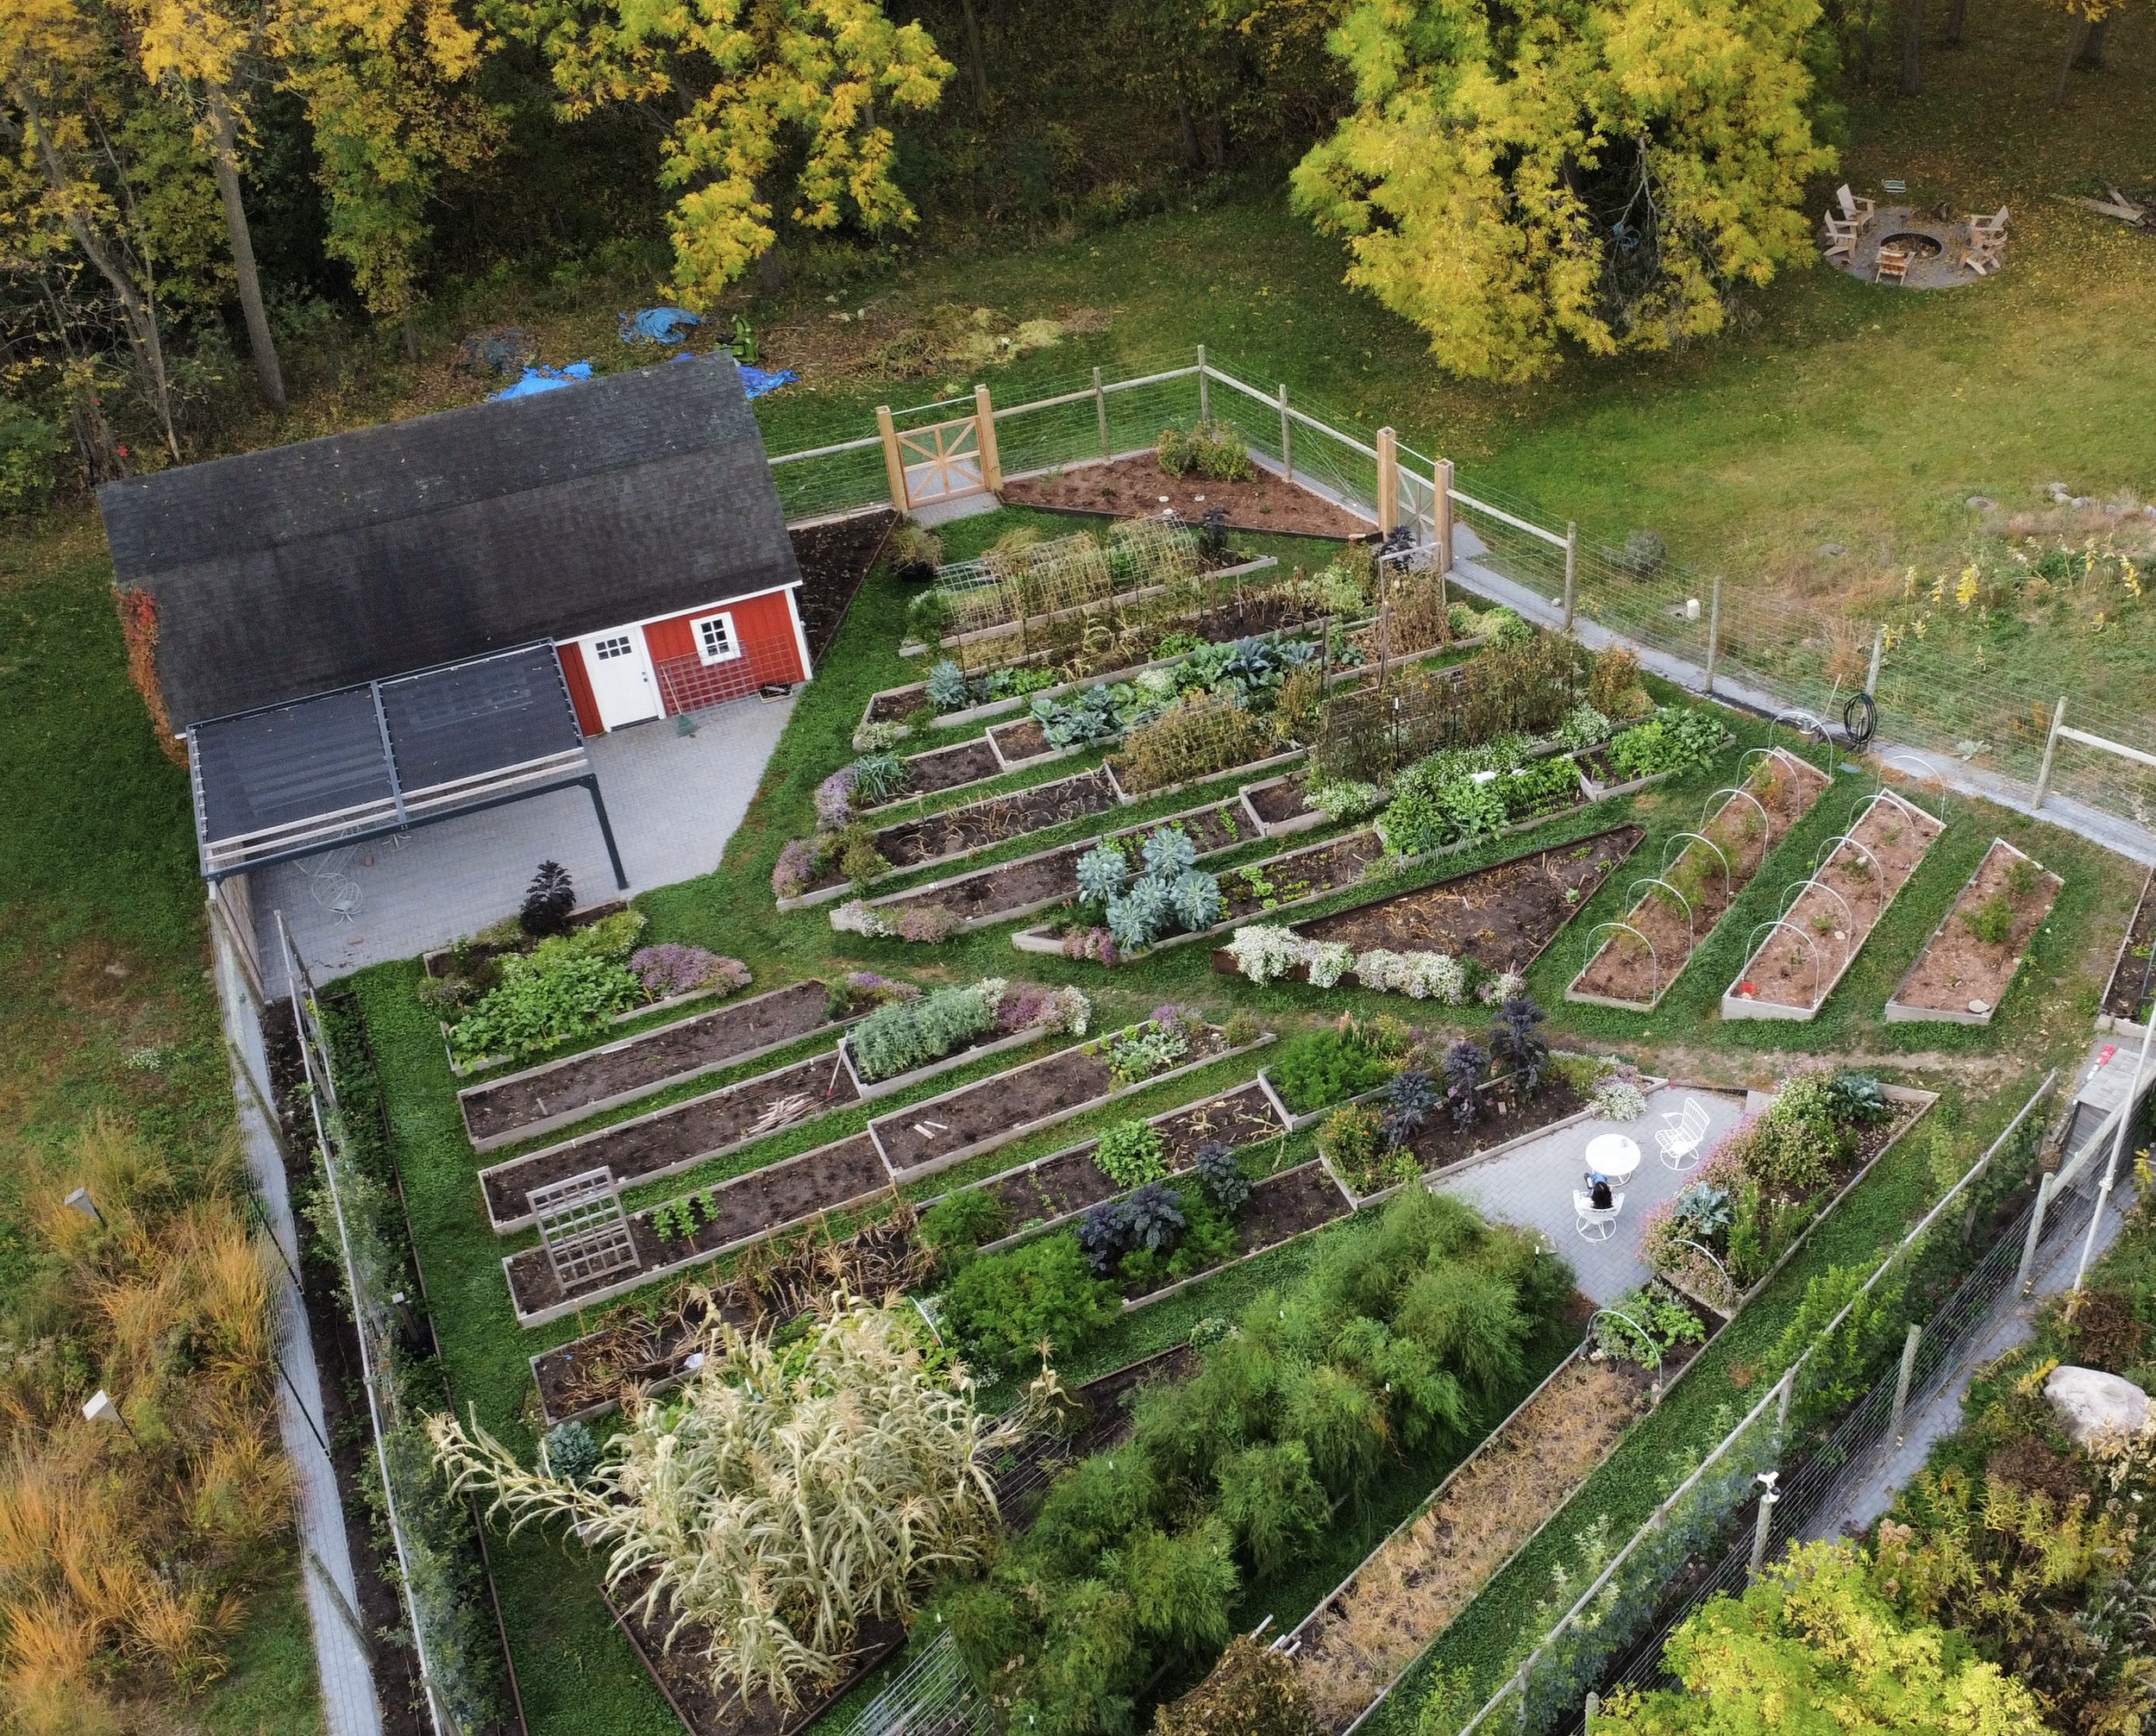
Fall Garden Chores: Setting Priorities
Since I haven’t been feeling great this week, it definitely made me be very specific with my garden chores. I’m still suffering from an ongoing headache, congestion, and a bit of brain fog but it’s not covid. I also get sick every fall, a symptom of my fibromyalgia, so it’s hard to completely parse the two apart as they’re certainly connected.
It means, though, that my summer energy levels have evaporated. Combine that with a high of 40-something today, and I barely want to get out from under the blankets. I got lucky overnight without a frost because I forgot to harvest our shelling peas yesterday, though I did pull the edamame, some gorgeous carrots, and a handful of green beans (that I did cover last night, go figure). The peas were hit last week with our mild frost but so far have persevered with some damage to some peas. I’m gonna let the plants ride out this next cold snap and see if they can hold on as next week, again, looks warmer than last week.
We’re in this yo-yo pattern with frosts and then 70s that follow, so on the one hand it’s tempting to try and save all the plants that have signs of newly set fruit, but the days are rapidly shrinking, the soils are cooling, and our sunlight is skirting the treeline to our south. All this means there’s really not much growing happening in the garden this time of year. We’re nearing refrigerator season at this point, and so I work to set plants free, dropping them off by the shredder for our growing compost heap. Here’s a link to the chipper we invested in last year for building our massive compost piles.
I set meager goals this time of year of doing one or two things a day in the garden. Many days it’s not quite enough to eliminate what can feel like a burdensome task list, but it’s all my body can handle and it’s equally critical to get something done each day because in reality, we could get snow in a few weeks, or better yet a week of drizzly weather (we’re 8” behind in rainfall this year) in the 40s or 50s, conditions at which I want to crawl into a bear den and huddle for the foreseeable. So as I survey the garden or my weekly task list, I’m constantly assessing and reassessing the plants I’m thinking of working with, deciding who is more sensitive to the cold. I’ll always work with the less cold-tolerant plants first unless a harvest of something that doesn’t keep well in the garden necessitates my attention.
If you’re in a warmer climate and you’ve still got all your summer veggies in the ground (peppers, tomatoes, eggplant, cucumber, summer squash, green beans, corn, and melons), you’ll soon need to consider which ones to prioritize first. Or maybe you’ve got a reasonably-sized garden and you can handle it all in the early evening hours after work if a frost is predicted (this was us years ago, and it was a good life too!). I encourage you to assess your warm-season crops and start to make a plan for which ones to pull first — maybe it’s due to disease pressure that’s been building or maybe you need room for some fall/winter veggies. Or maybe it’s a size and scope consideration.
Today it’s the flour corn and the peas for me. Peas are more tolerant of some cold air and light freezes than corn. The corn is really a prized food here; it’s the first time we’ve grown a flour corn variety specifically for tortillas. So I will start with that because it will take much longer as I need to cut down the entire plant, thus it’s a lot heavier, and I need to carry it into our garage to dry a bit longer on the plant before I pull the ears off the plants. This variety was a complete experiment this far north and it looks like we are barely squeaking by but it’s working.
As hard as working in the cold is, tending to things like the flour corn will make room for the yards of compost needed to top dress the beds. Working with wheelbarrows full of compost is actually a great project for a cold day because you warm up rather quickly moving around so much — definitely a warmer activity than harvesting peas and carrots. So I’ll throw some wool on and my winter parka (not joking!) and lopper or saw down the corn forest today ahead of what is sure to be a frost tonight.
If I’m feeling extra sprightly tomorrow, I’ll go pick up our first yard of fall compost this weekend, which will break the seal on compost for us and get me rolling with that critical fall chore.How is your fall garden cleanup coming along? And how are you making sure to listen to your body as you balance the endless garden tasks?
-

Fall Cleanup: To Pull or Cut at the Base
Grab your sharpest loppers or shears and get cutting, not pulling, this fall.
Why? The roots of all of our vegetables and flowers are chock full of soil microbes, organic matter, and, well, soil — key ingredients to soil health. Our soil, like our plants we cherish, is a living, breathing organism, so we need to be sure we’re feeding it. It’s health is demonstrated in the vigor and health of the plants we grow. So take up the no till method and leave the roots this fall.
I go right down to soil level and cut my plants off whenever and wherever I can. I admit with tomatoes I’ll sometimes just pull the straight out of the ground, but I always regret the unnecessary mess and soil disturbance I cause with my impulsive nature. And what better way to feed it than to leave behind organic matter for the microorganisms to consume (compost) in place, returning the nutrients back to the soil as bioavailable compounds next year’s plantings will consume.
Also, think about how important air is to our soil profile. Air (gas) comprises almost 50% of soil and water. Roots create air pockets, and leaving them behind, especially in soil that is marginal (too heavy or too light), is an essential strategy to building your soil organic matter and increasing pore space. It’s a slow but steady way to build a healthy and active soil profile. Combined with not tilling and adding a generous amount of compost and/or mulch on top of the soil each fall, it’s a key management strategy for our organic garden and a proven way to build soil heath.

Just look at how many fine roots and soil I’ve disturbed by pulling out the plants rather than cutting at the base. I’ll then have to shake as much soil off as possible but I’m losing a lot of soil biodiversity through this process. Does it save time? I don’t actually think it does — cutting at the base is faster and cleaner. It might be fun to yank a plant out root ball and all, but we are removing so much beneficial activity that occurred this season. Just look at all the soil I’ve disturbed and all those fine roots that could easily be consumed this fall before the ground freezes. So every place you can, take the loppers or pruning shears and cut right at the base. For some larger stemmed plants, it will be difficult, like your cabbages or broccoli. For those, I tend to use a sharp shooter or spade and try to slice the root ball right below the surface.
And yes, sometimes I do yank things up in a haste or a moment of sheer and selfish abandon at wanting instant gratification pulling something up. But it’s always met with regret as I quickly realize just how much soil I’ve disturbed and displaced and all those roots that will now simply get transferred to our compost heap instead of composting in situ.

My patio zinnia-kale bed that’s now just a leaning planting of kale. Can you even see where the zinnia once grew? No, because I cut the plants at the base and the soil is completely intact. This is the no-till/no dig way of gardening. Use it as much as is feasible in your home garden. Now to the question of disease. If my plant is diseased, will the disease persist in the roots persist? Yes. But let’s dig in a little deeper. It’s likely the fungus has already permeated the soil that season with the dead or decaying leaves that fell to the ground, spreading spores anyway. With some diseases like fungal diseases that attack leaves of cucumbers or tomatoes (anthracnose, septoria, etc), water needs to splash onto the plants next year to help the spores spring up onto the plants. By adding fresh compost or mulch to your beds next year, you will be creating a barrier for that potential cross-contamination. You’ll also be doing your best to move those highly susceptible veggie groups (for me it’s cucurbits (cucumber, squash, and melons) and solanaceous plants (tomatoes, peppers, eggplant, and potatoes)) to new beds so that is a second way to prevent disease year to year.
Potatoes are a crop we love but it always irks me that it requires intense soil disturbance to harvest them all. There’s no way around that and you just have to roll with it.
Potatoes, sweet potatoes, and even peanuts require some digging to fully excavate the crops, thus these crops have maximum soil disturbance. I can feel the difference in the soil with them. There’s no way around this unless you grow them in grow bags, but that’s not something we’re setup to do here (I’d need to think through irrigation and that just hurts my brain).
Once you start doing this, I think you’ll be quite happy with the results. If I’m going from an early to late succession in my earliest beds, I may pull out the plants or some of the roots. For example, when I follow earliest cabbage and broccoli with fall carrots, I definitely disturb the soil more than if I was coming through with summer beans or late corn, because those crops don’t need the soil to be loose for crop success as the crop produces above ground.
Carrots are the one area where I am careful to be sure I don’t leave roots behind. However, even with massive corn roots I will leave them in place through winter and decide next spring how much to cut back before planting. Typically I am able to further chop the roots right around the base next year, leaving the bulk of the larger and fine roots in place to decompose and fuel the biodiversity we’re working to cultivate below ground.
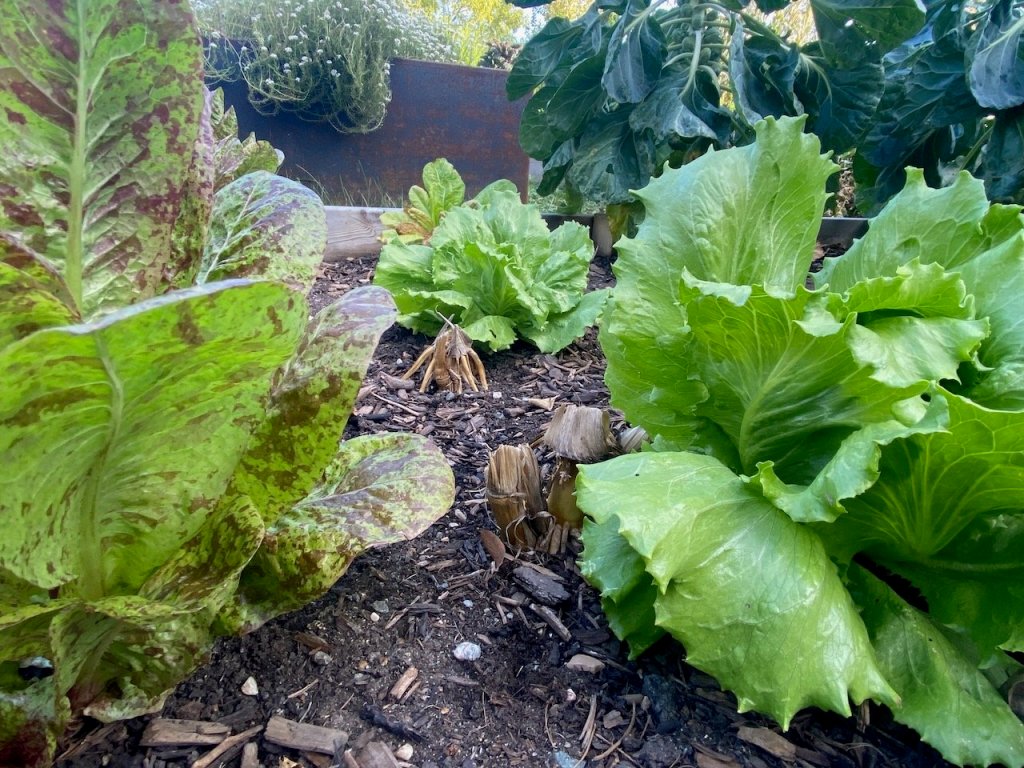
These remnant sweet corn stalks are decomposing in place. Depending on what gets planted there next spring, I may need to further cut them back but at least for now I know they are feeding the soil microbiome and I’ve minimally disturbed this bed this season helping to build soil health.
It’s equally mysterious and as it is simple. Our soil is a highly complex and diverse organism, and I try to support it like I do my native pollinators with as many different types of flowers as possible. I want as much diversity to develop below ground as possible, so the more roots and organic matter, different sizes and at different depths, I can leave behind, the more productive and healthy the soil will be in turn. We need our soil health to feed us, so it’s our job to feed it. And the easiest and best thing to do is to simply let it be.
-

Meg’s Ketchup
Welp, it’s here. Now this recipe came about last summer right after my Dad passed away. I cannot find the original recipe, but I know no other recipe called for oven roasted tomatoes as the base. Personally, I think it makes this ketchup so dang delicious.
Other notable changes I’ve made to this recipe relative to the USDA tested recipe are:
- reduced sugar and salt
- reduced vinegar (by a scant 1/4 cup relative to the tomatoes)
- reduced spices
All that being said, when I had my ketchup lab tested this week for pH, it came in at 3.96 (without added citric acid). The batch that I did last week where I added citric acid tested at 3.83 pH, even lower. For safe canning, tomato-based products and other “high acid foods” must be lower than a pH of 4.6. So, if you follow this recipe and the canning process, your product should produce a similarly acidic and safe pH.
This recipe yields about 4 pints.
Yes, that’s 17.5 pounds of ripe tomatoes distilled into just 4, 1-pound jars. But if you have high quality excess tomatoes, it’s definitely a culinary experience worth trying at least once.
As an alternative to canning, you can also refrigerate and use within a month, and freeze too. As I’ve never frozen it, I don’t know if the texture would change, but the option is there for you.
Finally, I ask that because this recipe is my little creation and there’s nothing out there like it, that we keep this just between us. It may someday make it into a future book, but that’s not even on my distant horizon at the moment, though a gardening book with recipes is a goal of mine.
Yield: 4 pintsMeg's Ketchup
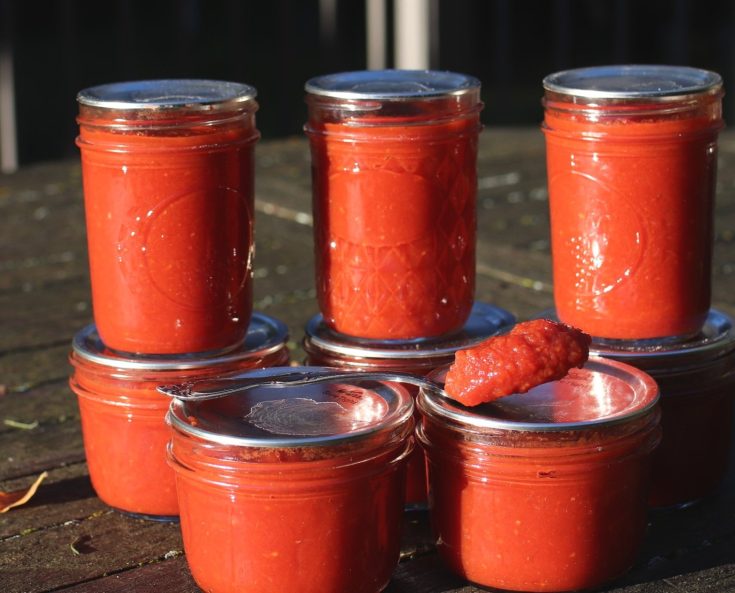 Prep Time 2 hoursCook Time 8 hoursTotal Time 10 hours
Ingredients
- 8.75 pounds oven roasted, skinned, and pureed tomatoes (approx. 17.5 lbs raw tomatoes, depending on the varieties)
- 2 pounds 2 oz yellow onions, diced (measured after peeled and diced)
- ½ ounce garlic (~8 small garlic cloves)
- 2 ounces diced sweet red bell pepper (optional — will add more sweetness; my lab tested recipes included red pepper in them)
- 2/3 cup packed brown sugar
- ½ tsp mace
- 1 tsp ground mustard
- 2 cinnamon sticks
- 1 T allspice berry
- 1 T clove
- 1 T celery seed
- 1 T peppercorn
- 2 bay leaves
- 2 cups cider vinegar
- 2 T sea salt
Instructions
- Mix tomatoes, onions, garlic, and optional red pepper in an 8-quart stainless steel stockpot, bring to a boil, and then adjust to medium low. It will sputter quite a bit. Wear an apron and even shoes you don’t mind getting tomato splatters on, because it will happen. I am nearby the entire time and stir every few minutes with a ladle. Wear comfortable shoes and stream your favorite music, audiobook, podcast, or show because you’ll be on your feet for many hours to come.
- About 20-30 minutes in, puree with immersion blender in pot and then add the brown sugar, mace, and ground mustard.

- After the second 30 minute boil, run through a food mill in batches with the fine sieve attachment. You’ll lose some meat and seeds with this process — about 2 cups of pulp and seeds will be discarded. This is progress!
- Now add the sachet of spices and boil for another 45 minutes to an hour.

- Remove sachet from pot, allowing the liquid to drain from the sachet. Note: After the spice boil when it’s good and thickened, it’s optional to run through food mill one more time. It’s a texture preference — I don’t usually do this, but it will result in an even smoother ketchup, and yield slightly less; mine has a bit more texture than Heinz and we like it that way. Your choice!
- It’s time to boil a while more, but we are getting closer. (If you need to do this over two days, this would be a good time to stop and refrigerate until tomorrow.)
- Add vinegar and salt and boil for another 1-2 hours. I usually go somewhere between 90 minutes and 2 full hours, depending on how my ketchup is mounding.
- You know your ketchup is done when it remains mounded on a spoon. This is the universal key I’ve read on every site, including the National Center for Home Canning, to determine when the ketchup is cooked down and ready for canning. Very technical, and not subject to interpretation, eh?

- Prep the hot water bath, jars, lids, and utensils about 1 hour into final boil as instructed in my tomato canning post.
- Fill jars, leaving 1/4 inch headspace. Use a bubbler to get any air pockets out and adjust fill as needed. Wipe rim clean and place lid on center of jar and then screw the ring on until it is tight to the touch, but don’t overtighten.
- Boil for 20 minutes in a hot water bath (1000-6000 ft elevation). Adjust for elevation as needed.
- Turn water off and let stand for 5 minutes.
- Remove jars and place on a clean towel. Let stand for 12-24 hours.
Notes
Our immersion blender is an indispensable kitchen utensil in our home. I recommend the KitchenAid brand. You can use your main blender for this but beware than blending hot liquids often causes the blender lid to blow off and it can be quite dangerous (just me?). It’s happened to me many times, hence, the investment in an immersion blender.
-

My Favorite Varieties: Tomatoes
Choosing tomato varieties is tricky business. I’ve trialed a lot of popular and obscure tomatoes over the past decade in our gardens. The thing I’ve learned is that our microclimates will ultimately determine how a tomato grows and tastes in each of our gardens.
Also, I’ve found, as someone who only consumes vine-ripened organic, homegrown tomatoes, my idea of a good tasting tomato does not resemble what the general public thinks of as a tasty tomato. It’s happened to me again and again with people visiting our gardens.
So with that, I give you my top tomato varieties for each tomato type as well as what tomatoes I’ve tried and canceled. And I encourage you to keep exploring and develop a go-to list with a deep bench for when you feel like changing things up.

Cherry + Grape Tomatoes
Sun Golds are our standard cherry tomato, and one of the only hybrid tomatoes we grow. It can be disease prone, but the flavor is unlike any other tomato out there and worth it in our opinion. If I could only grow one tomato in a small patio garden, it would be this tomato.
I like to grow a few different shapes and colors of cherry tomatoes for visual interest, and I started growing yellow pear this year to fit that bill. It’s a family favorite on my husband’s side, and he immediately exclaimed, “My grandfather used to grow this!” when he saw them fruiting on our deck; it’s why I grew them.
I don’t have a favorite red cherry tomato at the moment, and may keep searching. I’ve tried Sweet 100, Sweetie, and Colombianum Wildform. I’m pretty sure Sun Gold’s extra sweetness makes all other cherry tomatoes taste bland, and it sort of is an actual problem.
I’d ideally have a green or purple variety too, for a full rainbow effect, but our canned tomato garden takes precedence over that somewhat superfluous goal.
Cherry tomatoes I’ve trialed and quickly divorced include the Berry series from Wild Boar Farms. I have a theory about his tomatoes: they are bred and grown in a very different climate and with our generally, though more and more erratic, wetter summers than the west coast, I think our summer rains may dilute the flavor of these somewhat beloved tomatoes. Are they beloved for their dark shoulders, or do they really taste spectacular to some? It was one and done for me, though they were extremely prolific. (Just writing about them makes me want to give them another try, a problem only gardeners truly understand.)

This was the year I grew Blue Berries, Gold Berries, Sweetie, and Sun Gold together. An incredibly beautiful image, but a bowl largely lacking flavor. A reminder to choose your goals for what you grow and be clear with how you assess what’s working for you.
For 2023, I plan to grow 4 cherry tomatoes (I had 7-10 this year, if you count the 3 Piennolo del Vesuvios): 2 Sun Golds, 1 Yellow Pear, and 1 other cherry, possibly Sweetie or Piennolo del Vesuvio.
Cherry Varieties We’ve Grown
- Sun Gold
- Tigerella
- Midnight Pear
- Blue Berries
- Gold Berries
- Sunrise Bumblebee
- Sweet Million
- Sweetie
- Yellow Pear
- Blush
- Colombianum Wildform
- Brad’s Atomic Grape
Winners: Sun Gold, Yellow Pear
Losers: Berry series (too bland and watery for us), Sunrise Bumblebee (texture was all wrong), and Blush (tough skin)
Neutral: Sweet Million, Colombianum Wildform, Brad’s Atomic Grape, Tigerella, and Sweetie
Beefsteaks + Slicers
This is a very difficult group of tomatoes to narrow down. Each winter I seem to find a new variety to trial and, at the same time, I’ve already committed to grow fewer. This summer I grew 7 beefsteak varieties and I’m cutting at least 3 of them for next year due to various issues: Green Giant, Berkeley Tie Dye, and possibly Pink Berkeley Tie Dye. I had quite a bit of fruit rot develop on the vine for the Berkeley Tie Dye and Green Giants, so I’m sunsetting those varieties. I would bring back Berkeley Tie Dye again in the future as it’s color is quite unique (deep red and green mottled flesh), but for now it’s goodbye. Afternoon Delight didn’t perform per usual this year, largely lacking its beautiful dark shoulders and so it’s on the chopping block for next year too, which is too bad because it, too, has gorgeous mottled interior flesh.
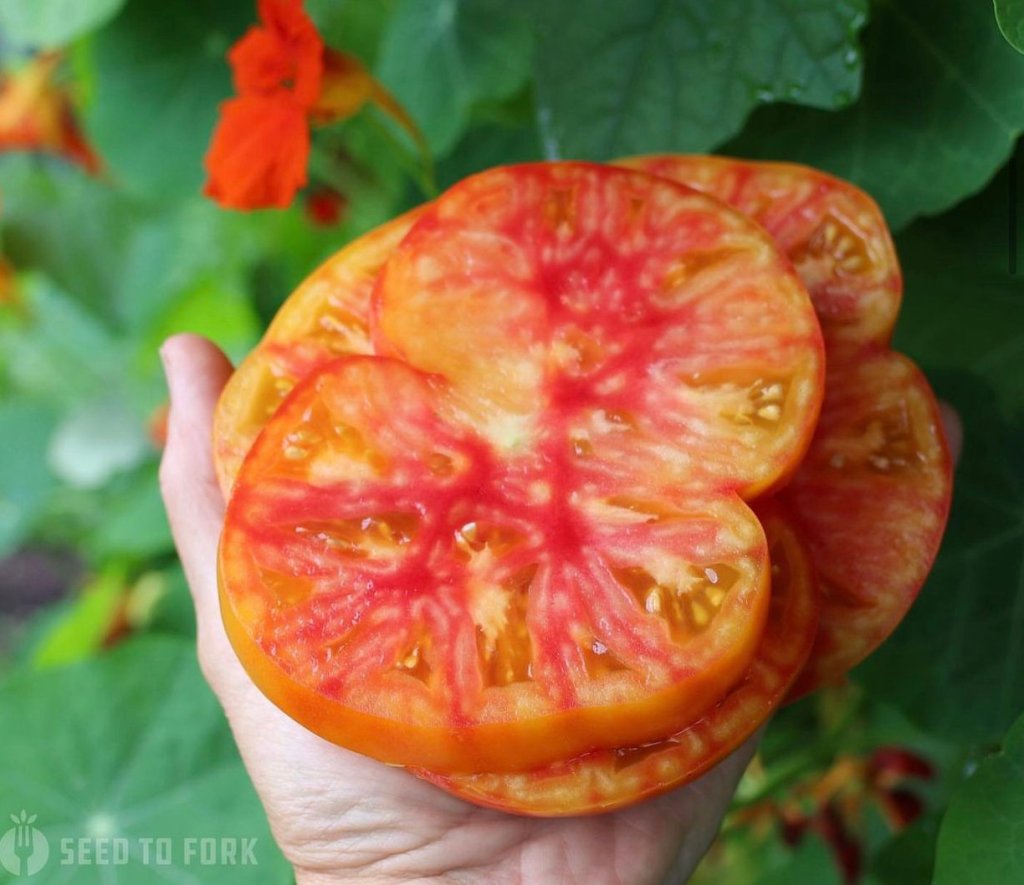
The interior of an Afternoon Delight, a yellow-skinned fruit with deep purple shoulders. It amazed me for the first 2 years and then this year didn’t quite live up to its previous years’ productivity. It’s still on my favorites list though, because I believe this year was an exception.
I fell in love with Whittemore Heirloom this summer. It’s a brandywine-type beefsteak and it was very productive and so meaty. It’s a keeper, a massive pink tomato! I also really love Paul Robeson. That tomato is another keeper, and was extraordinarily productive this summer too. It’s a deep burgundy color, with a smoky flavor. So I want to keep growing either Afternoon Delight or bring back Orange Strawberry for some yellow color in our larger tomatoes.
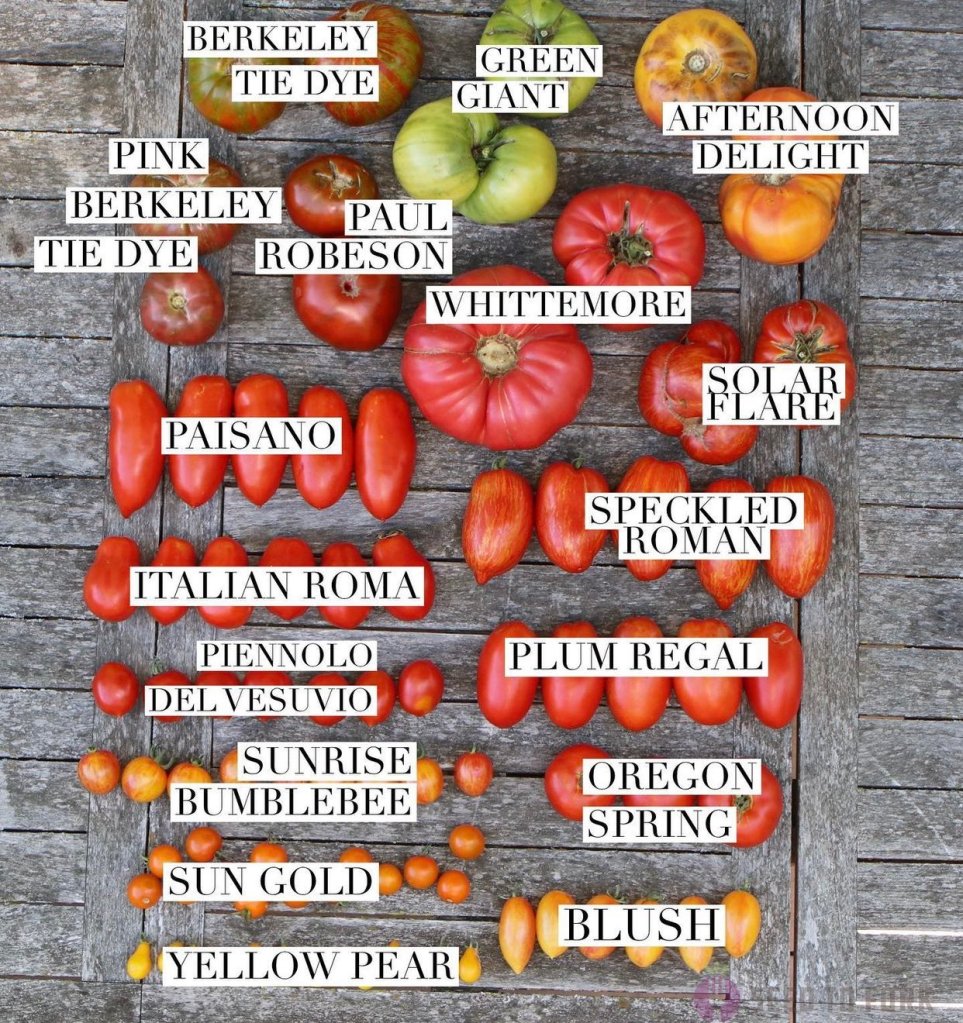
This summer’s (2022) tomatoes included the massive and delicious Whittemore Heirloom a massive pink brandywine type tomato. It also had less emphasis on ensuring I had extreme color in my bowl of tomatoes, something I continue to struggle with, both as I plan and search for new tomatoes and as we assess them for flavor. There’s just something satisfying about juicy, red tomatoes.
There are so many great beefsteaks. We could choose a few new ones each year to try and never taste them all. But at some point I think it’s best to settle into what works. I am starting to settle with our tomatoes, satisfied with my exploration and happy with the relationships I’ve developed with some of our favorites. I surely will still rotate through many of the tomatoes I’ve listed as neutral, perhaps I’ll pine for a tie dye tomato one winter and will swap it out for another standard.
I plan to grow only 4 beefsteaks next year: Paul Robeson, Whittemore, Orange Strawberry (technically an oxheart), and one more … Solar Flare or Afternoon Delight.
Beefsteaks We’ve Grown
- Green Giant
- Black from Tula
- Cherokee Purple
- Box Car Willie
- Brandywine
- Whittemore
- Black Beauty
- Afternoon Delight
- Solar Flare
- Pink Berkeley Tie Dye
- Berkeley Tie Dye
- Paul Robeson
- Big Rainbow
Winners: Paul Robeson, Whittemore, Solar Flare, Afternoon Delight, Brandywine, and Orange Strawberry (we grew this many years ago and I miss it)
Losers: Green Giant (we aren’t green tomato people), Black Beauty (very prone to anthracnose), Big Rainbow (too late of a season for our climate)
Neutral: Berkeley Tie Dye, Pink Berkeley Tie Dye, Cherokee Purple, Box Car Willie, Black from Tula, Piroka, Oregon Spring
Paste + Saucing Tomatoes
This is really our focus, and I only see this increasing in the coming years. For many years, the majority of our gardening life, we grew indeterminate paste tomatoes. These are the likes of San Marzano and Amish Paste. They are delicious but they were quite prone to blossom end rot early in the season.
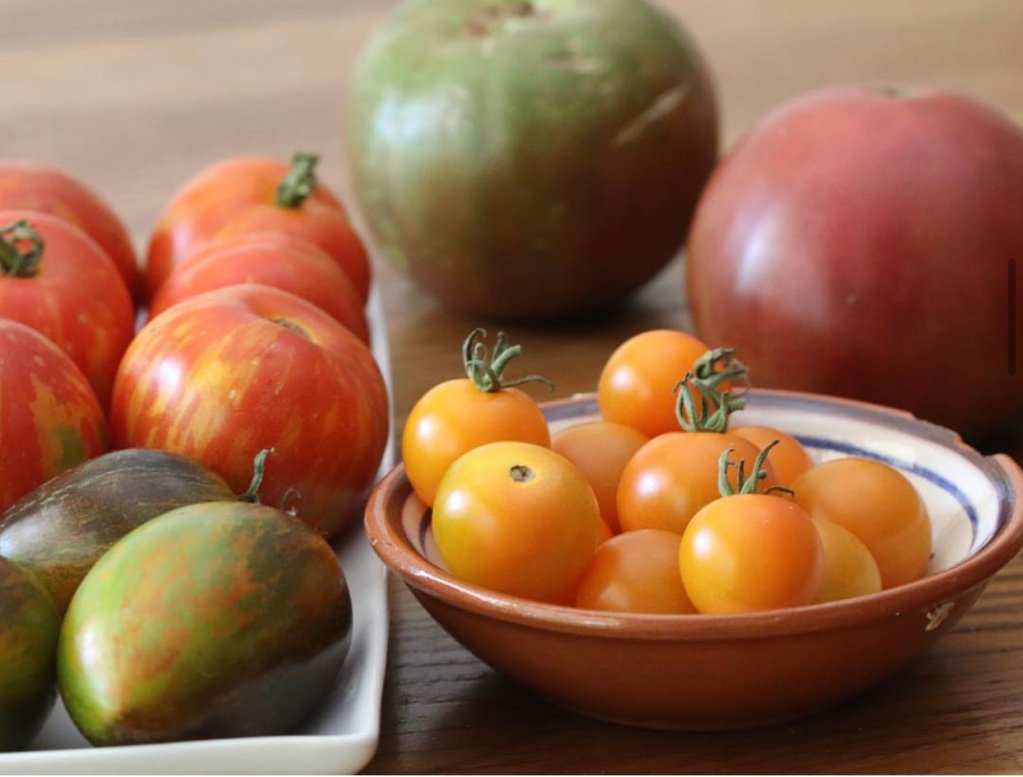
The extent of our 2018 tomato garden: Brad’s Atomic Grape, Tigerella, Sun Gold, and Cherokee Purple. I’m guessing we also had a San Marzano that summer too. More recently I did a tomato trial with SeedLinked and grew Opalka, Ukranian Purple, and Speckled Roman. I also picked up a rare heirloom, Inciardi Red Paste from a local farm. We loved the Speckled Roman so much we grew it again this year. I had 2 plants, and I may even increase that to 4 next year. It’s so meaty and beautiful and a workhorse all summer long — I’m still pulling hefty sized tomatoes off the vines this week, even after the temperatures plunged into the 40s. The Inciardi was also massive and meaty but unfortunately my seedlings didn’t make it so I’ll try again next year. I also love the deeply fluted Costuloto Genovese, and hope my seedlings make it next year (they struggled in late winter and I threw them out for fear of disease).
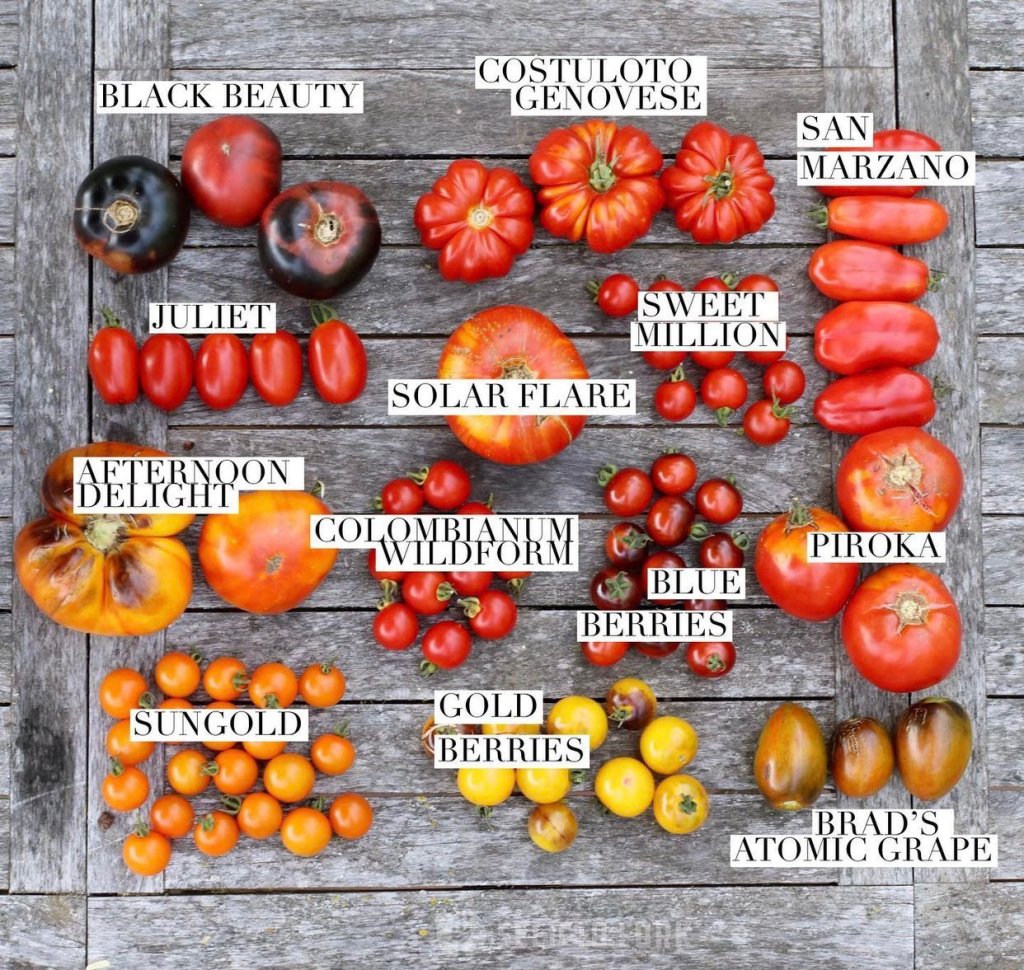
My 2019 tomato lineup. I tried to plan for different colors and shapes. It was a beautiful year, but many of these I no longer grow!
I’ve only started the switch to determinate tomatoes. I think I started in 2020, so this was our third year growing them. Before that time, I really explored cherries and beefsteaks, but we quickly realized that saucing is, well, our jam. The standard open pollinated variety we grow is Italian Roma. Many hybrids offer larger fruit, and I choose to grow some of each because I get more pounds processed quicker with the hybrids and it is in part about efficiency. Because I oven roast, I’m enhancing the flavor of all of the them before canning.

My 2020 Tomato Lineup. Italian Romas are quite a bit smaller than the hybrid paste tomatoes I grow. I have not tasted them side by side because I roast and can about 99% of what we harvest, but I suspect the Italian Romas are more flavorful. And so while they are are not as meaty, they do produce plentifully and thus I’ll keep growing them, for now.
I loved Plum Perfect in 2021 but couldn’t find seed for 2022 so switched blindly to Plum Regal. It was similar in size and shape and produced much better than the Paisanos, another hybrid I grew again only because I had the seed. I won’t grow it in the future. If I can find the seed, I’ll return to Plum Perfect in the future. (Note: I did find the seed in 2023/24 and bought enough for many years!)
I’d be willing to try other hybrid paste tomatoes as they arise, which I suspect they will.
I’ll plant a total of 22 determinate paste tomatoes next summer, that’s 8 more than this year. I want to be able to complete our canning goals with the harvest still rolling in. As you may recall, this year we had 14 plants and I was about 20 quarts short (or 80 pounds tomatoes). If each plant produces on average 20 pounds, then 8 more plants will yield me plenty for our saucing needs, ketchup, and bloody mary mix — plus fresh saucing and eating.
I’ll round out the paste and saucing garden with 4 Speckled Romans and a Costuloto Genovese.
Paste and Plum Tomatoes We’ve Grown
- Juliet (indeterminate hybrid)
- Amish Paste (indeterminate open pollinated)
- San Marzano (indeterminate open pollinated)
- Opalka (indeterminate open pollinated)
- Ukrainian Purple (indeterminate open pollinated)
- Speckled Roman (indeterminate open pollinated)
- Piennolo del Vesuvio (indeterminate open pollinated)
- Inciardi Red Paste (indeterminate open pollinated)
- Costuloto Genovese (indeterminate open pollinated)
- Italian Roma (determinate open-pollinated)
- Plum Perfect (can’t find seed) (determinate hybrid)
- Paisano (determinate hybrid)
- Plum Regal (determinate hybrid)
Winners: Speckled Roman, Italian Roma,Plum Perfect, Inciardi Red Paste, Plum Regal, and for beauty, Costuloto Genovese or Costuloto Fiorentino
Losers: Paisano (disease prone), Ukrainian Purple (splits unless you harvest it green), San Marzano (prone to blossom end rot)
Neutral: Amish Paste, Opalka, Juliet, Piennolo del Vesuvio
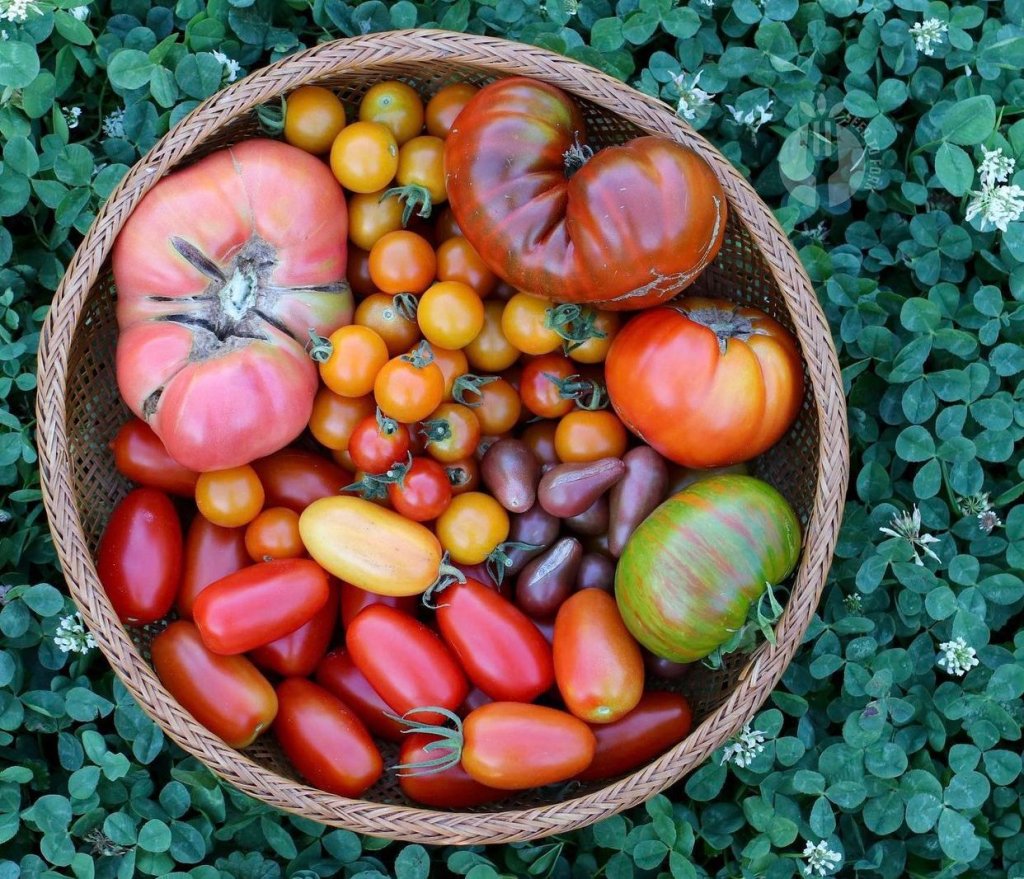
I hope this helps you shape your tomato grow list for next year. More information to come next month as I discuss how I assessed the garden overall, including my tomato spacing, trellising, and plans for 2023’s garden. Because it’s gonna be epic, and we are all going to grow our best
-
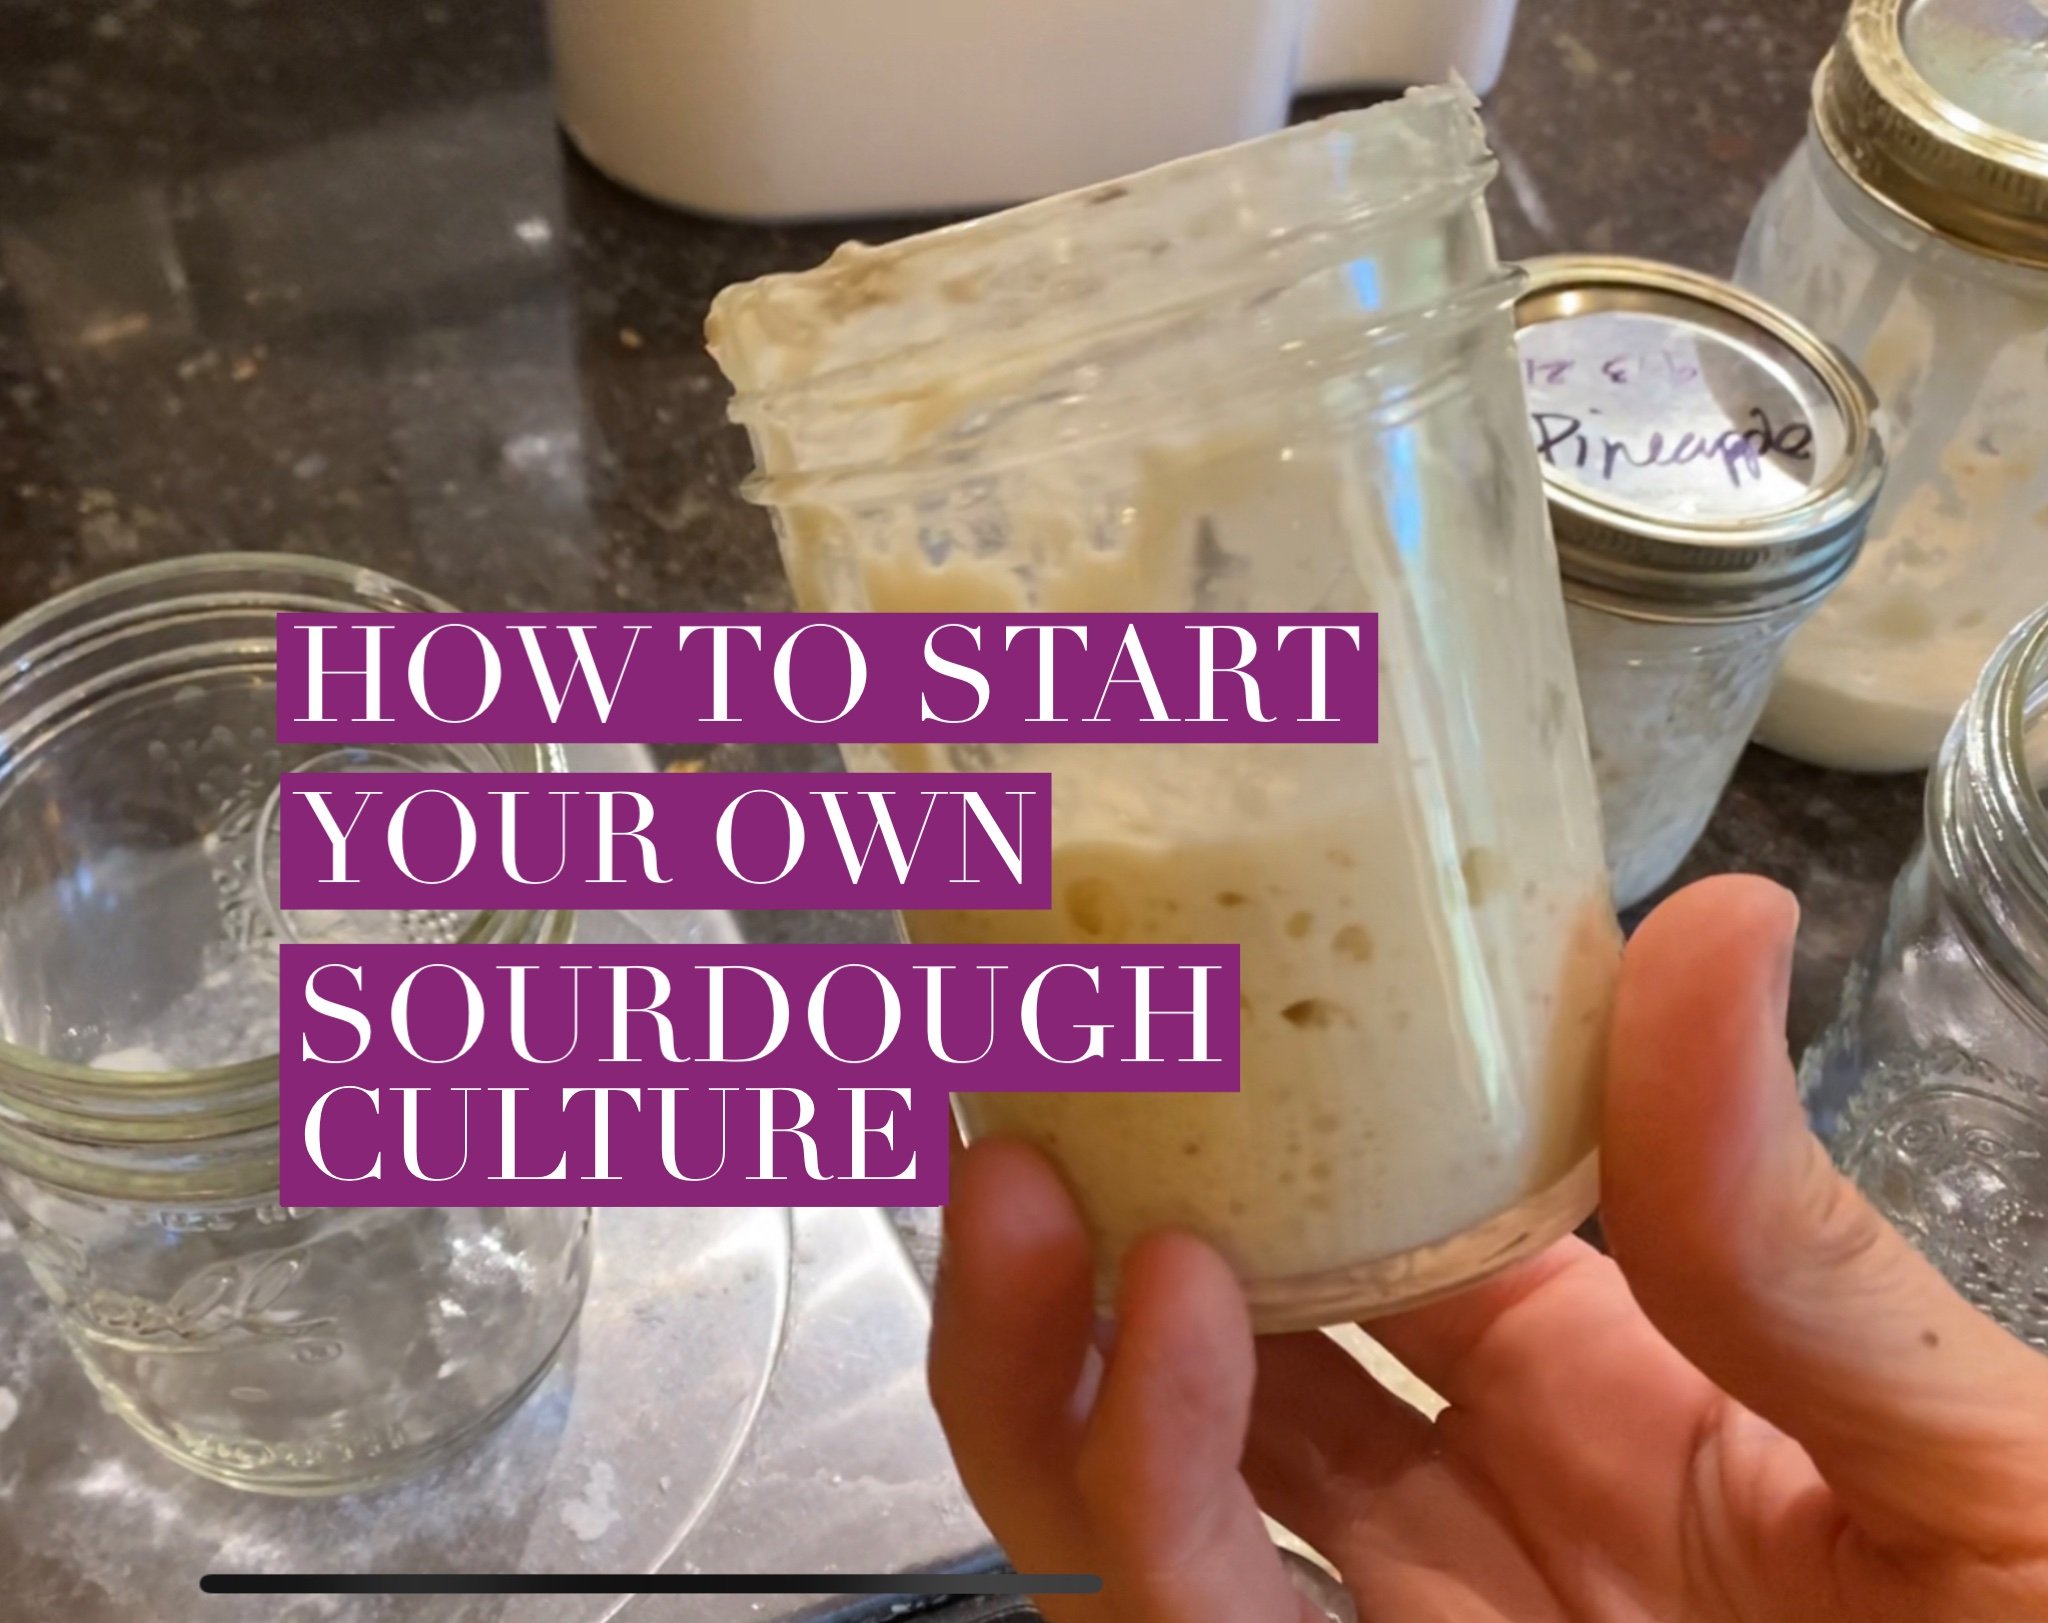
How to Start Your Own Sourdough
We’ve been growing sourdough cultures in our home for over 2 decades. It’s such an integral part of everyday life and our way of being I can’t imagine buying bread or bagels in a store, though we do still purchase buns, croissants, and such from time to time.
I have so many wonderful sourdough recipes to share with you this fall and winter and I can’t wait to dive in.
But first, for many of you, you need to create a starter. Sure, you could order one, but it’s a very simple method and I just spent the last week testing 3 different starters for you to give you the confidence you need to just go for it!
Truth be told, we invested in sourdough starters twice in the past 20 years, and we were given one from France called Popine. Alas, these starters proved not as robust as the ones we’ve started ourselves. Sadly, Popine perished, I think, during my postpartum depression after my second was born. It was a rough winter, to be sure.
In the past decade, we’ve started a few sourdoughs from scratch. One our son started, and he named it CeeCee, short for sourdough sourdough. If memory serves, he added a bit of brown sugar to water to jumpstart it. It worked, and it fed us well for years. When we moved here six years ago, John started another one using the method I’m sharing below which starts out with a high acid liquid to bypass the early bacteria phase (dominated by Leuconostoc species). This method was pioneered by Debra Wink.
Here’s an excerpt from Debra Wink’s article on The Pineapple Juice Solution, Part 1:
“…it was apparent that the shift in populations and activity are tied to changes in acidity. pH is a fundamental factor in microbial growth. Some like it neutral while others need more acidity or alkalinity, but each species has its own pH range. The reason that the starters had become quiet on day three was because the pH had fallen and the gas-producing bacteria were no longer growing.”
It was Debra’s experiments back in the late ‘00s that shifted many home bakers’ approach to starting their own sourdough. Spoiler: you don’t need to buy someone’s starter, you just need a few days, some OJ or pineapple juice (I used it strained from diced pineapples which are a frequent pizza topping here) and your bread flour. I want to empower each of you to then go on and share this with your friends and family. It’s accessible, it’s straightforward, and it’s delicious and rewarding!
How to Start Your Own Sourdough Culture
Below are both step-by-step photo instructions plus a 10-minute video diary of my first seven days creating these new cultures. I am currently attempting my first loaf of bread with each of my three starters so more updates to are forthcoming yet this week.
For now, I hope you’ll give a sourdough starter from scratch a try this month.
Ingredients
- Bread Flour
- Water
- Pineapple Juice
For Proofing
- Glass Jar
- Heat Mat
Instructions
 If you have apple cider vinegar or pineapple juice, you can substitute those as well.
 We keep ours on top of a seedling mat (with a thermostatic controller set to 85F) in a lower cabinet of our kitchen.
 It will start to look active faster with the added heat; if you don’t have the extra heat, this will take more time to get started, but it will still work! Adjust your times accordingly (maybe add an extra 12-24 hours to stirring before this second feeding).
- Day 2-3: Time to transition to your “seed culture”. We are now switching to just water and flour!
 Pull 3/8 ounce (1-2 teaspoons) of the sourdough culture into a 1/2 pint or pint glass jar. Add 3/4 ounces filtered water and 1 ounce bread flour to this. This feeding is the base for EVERY single recipe I’ll ever share with you. This is our “wake up” feeding. Every time you feed your sourdough for something, you’ll want to set aside 3/8 ounces between your second and final feedings and place it back in the fridge until the next time you need it.
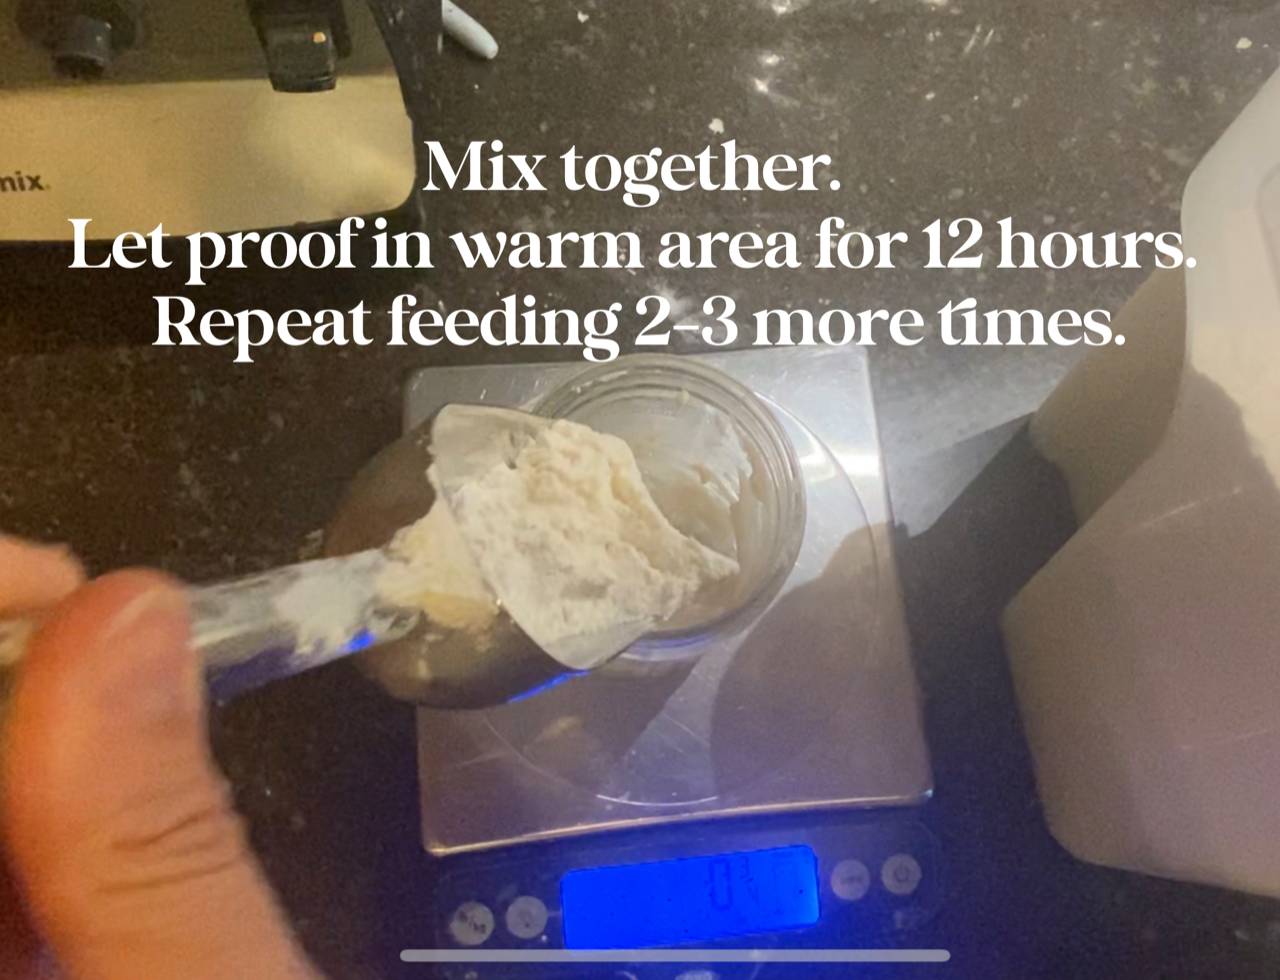 To get this brand new sourdough active and healthy, keep this feeding going for 2-3 days, pulling out a fresh 3/8 ounces and feeding it 3/4 ounces water and 1 ounce bread flour in the morning and evening. I kept these feedings on the countertop to slow the growth down a little (cooler temperatures).
Notes
NOTE: We use King Arthur’s restaurant bread flour called Sir Lancelot Hi-Gluten bread flour. We have found the best price is to order it in bulk from the Webstaurant Store.
We have gone upwards of 6 weeks between feeding our sourdough and it’s remained a healthy culture for many years.
-

Irreplicable Moments
I was really struck last weekend on our hike in a national wildlife refuge about how the same steps in the same space are never quite the same.
I was looking forward to finding the same angle and view of the white oak trees with the fruitful hazelnut edge / understory that I photographed for my book. It was in fact the space I had already envisioned foraging for nuts, confident the same savanna edge would greet me as we walked through the prairie and open woods.
Alas, as we made our way along this five-mile loop, I wasn’t able to locate the same vista I had loved two years ago.
And that really gave me pause. Two years ago was during the height of covid. It was a time when we traveled only to our grocery store 2-3 times a month. A time when we were all huddled up together in the garden and home and hoping for better days.
It was also during the height of my book writing and photographing, a time when my eyes, ears, and heart were so focused on processing and understanding and crystalizing those thoughts onto paper and capturing it visually too. I have held onto this image of that space because I probably poured over dozens of similar images as I edited my photos in January 2021. I did this while my father was gravity-fed his liquid meals by my older sister, for he could no longer chew or swallow but he was starting one of the many fights of his life, though this one would quickly defeat him.
I have not fully recovered from losing him, and I honestly don’t think I ever will. I still don’t see the world through a similarly hopeful lens I once did. Everything looks different now. There is a before losing a parent, and an after. And it looks and feels very different. Things 13 months later remain, at times more so, dimmed. It was almost a mirage that I was able to capture that photo in September 2020, because I searched so hard for it last weekend and it completely evaded me.
What’s also true is we went later in the day. It was a lot warmer out. And it was sunny. Previously it was a little damp, definitely chilly, and there was a September fog that hadn’t fully lifted for the day quite yet. And so, the energy last weekend was a swift and forward movement while two years ago it was more liminal and magical. And I feel that this different energy — a more industrious and less creative presence — encouraged my myopic views of my surroundings.
We never see the same thing twice, but this was a moment where I lived and breathed it, and now I can’t stop reflecting to deeply understand what it was about my mind-body connection to this natural space that created the beautiful photo that now feels like a fairy tale moment from years ago.
So all this rambling is to remind each of us to leave each moment like it’s the only one we have, because we will never experience that moment again in the same way, ever. And, because we just don’t know which mundane moments will last a lifetime and make the deepest marks on our souls.