Your cart is currently empty!
Welcome to Meg’s Blog
-

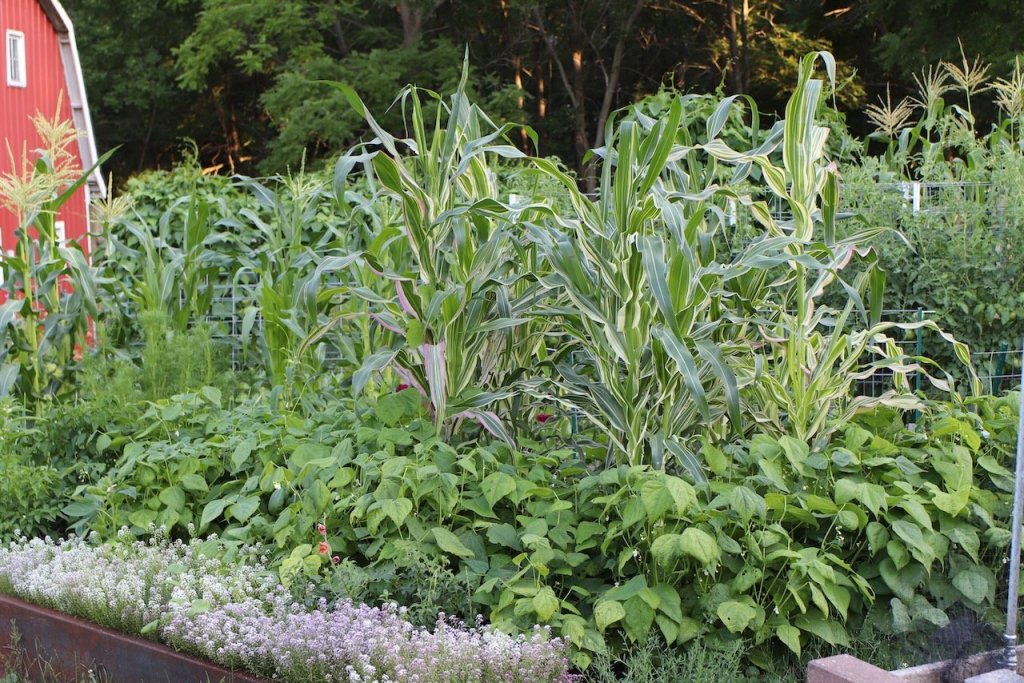
September Garden Tour
Enjoy some garden updates and thoughts on the garden in this month’s garden tour.
-
Preserving Tomatoes
Tomatoes are one of the most productive plants in the garden and one of the key ingredients to so many delicious foods across numerous cuisines. But in the garden they can easily tip us over from excitement to overwhelm this time of year, and having multiple ways to use them fresh and store them is essential for our overall well being. It can be daunting to have so many tomatoes to use, give away, or process. So here are some of my top ways that we preserve our harvest for year-round use in the kitchen.
Dehydrating Tomatoes
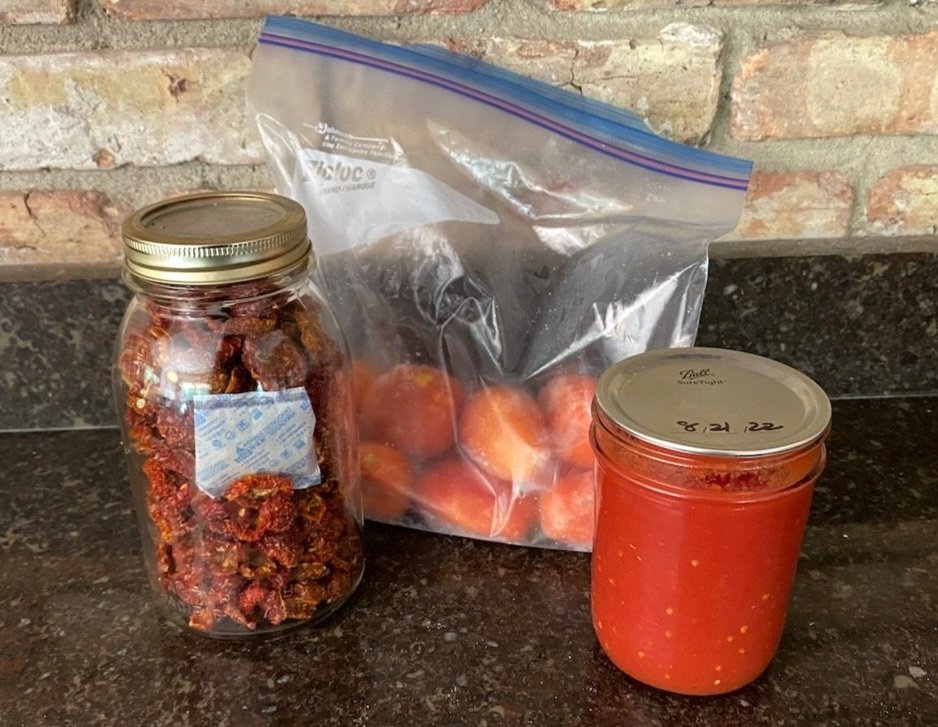
We preserve tomatoes several ways, depending on how many and what kinds we have. First, we dehydrate halved cherry tomatoes and use them ground as a sub for tomato paste. I love them so much and it’s a fantastic way to put those overflowing harvests to work in our winter kitchen. My method is here in an old recipe post.
Freeze Whole
The second way is to simply put whole, fresh tomatoes into a gallon Ziploc freezer bag and toss them into the freezer. This was our primary way of putting tomatoes by for winter or later enjoyment when we gardened on an urban lot because back then we didn’t grow a lot of ‘maters. Super easy and the skins slip right off after they’ve defrosted in a colander. The downside is the time you need to plan for the thawing; they aren’t as instant as a jar of roasted tomato sauce, however, some recipes do call for whole tomatoes so I always keep a few gallon bags of whole tomatoes in our freezer for those times I just need a little (and not an entire quart jar).
Oven Roasting
In recent years, I started oven roasting my tomatoes as a way to get the skins off and reduce moisture ahead of either freezing or canning. It brings out a rich flavor and is really delicious. My oven roasted tomato recipe is here.
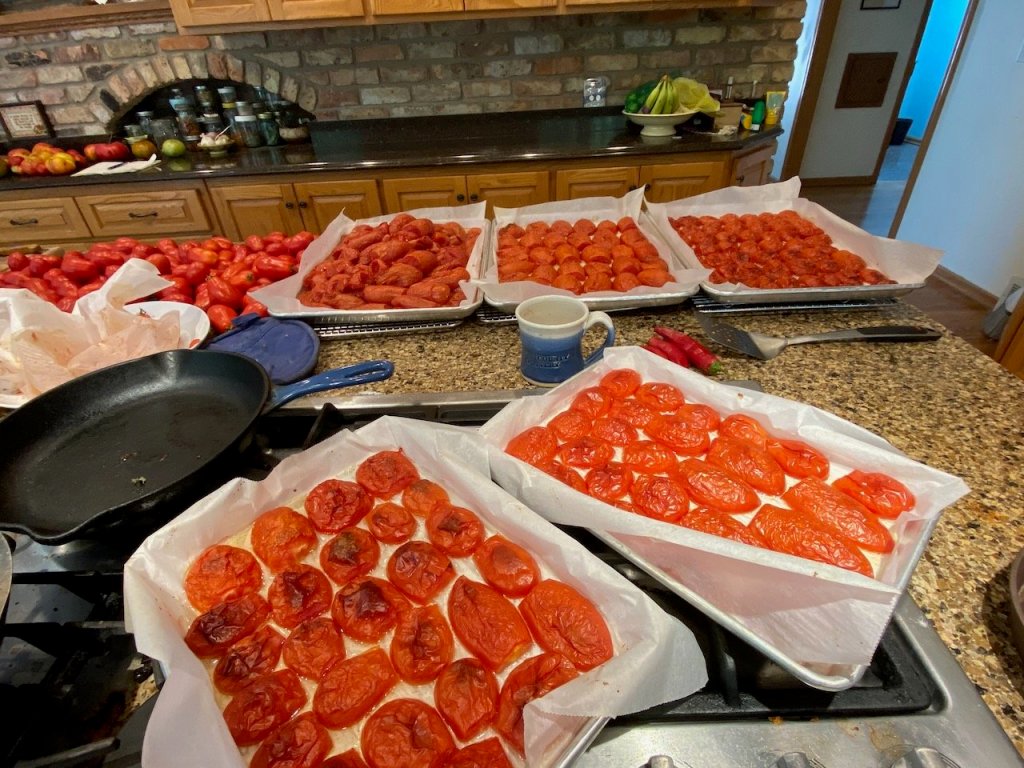
We use all 3 oven trays at a time for oven roasting. You can set the temp low and slow or warmer and get it done quicker. These were oven-roasted at 375 convection for a little over half an hour. Oven roasting quickly became my precursor to canning too. It’s a tradeoff, to be sure: boil down your tomatoes into a sauce or oven roast first. For us, this is now the way we process and it has a rhythm and beauty to it that I’ve come to really lean into as a huge part of my late summer days.
If you want to just oven roast, and skip the canning, you can simply remove the skins and pack in a quart ziploc freezer bag and lay flat in your freezer. This way you can stack them neatly for storage in either a chest freezer or your main kitchen freezer. I am known to not always remember to flatten them first and then you’re left with a rigid, malformed rock solid mass of frozen veggies that is not a friend to limited freezer space. Be sure to label the bag with a sharpie with the date so you remember to use it up before next summer.
If you choose to only take on one new way with tomatoes this year, I highly recommend giving roasting and freezing them a try.
Canning: the ultimate preservation tool
If you’ve never canned, it requires some equipment and a great level of care for what you’re doing. And I completely understand that it can feel scary and overwhelming and perhaps expensive too, to invest in the resources. The large canning pot we bought back as newlyweds over 20 years ago and it works as well as its first boil. So these are possibly one-time investments.
The upside to canning versus freezing is that they are ready to cook with immediately. I find this great for our busy lives, and I love that they are shelf-stable too. I just think that’s pretty awesome.
Official recipes are laboratory tested for acidity; you shouldn’t deviate from recipes because that can alter the pH and thus the safety of the food. I always follow the times and acidity additions from the National Center for Home Preservation. Here is a link to the USDA’s most up to date documentation: Complete Guide to Home Canning.
Here is a link to our current set of tools for canning at the scale with which we preserve tomatoes. The biggest investment was the extra large stainless steel stockpot we bought last year for my ketchup adventures, which can has a capacity of about 26-30 pounds of tomatoes.
Why Start with Tomatoes?
Tomatoes are one of the easiest things to can in my opinion. They just need a consistent addition of acid to ensure safety. There are two ways lower the pH for tomatoes: lemon juice or citric acid. We use the latter because we have it on-hand from other kitchen experiments. I like that it only takes a small amount of it and that it’s a dry addition.
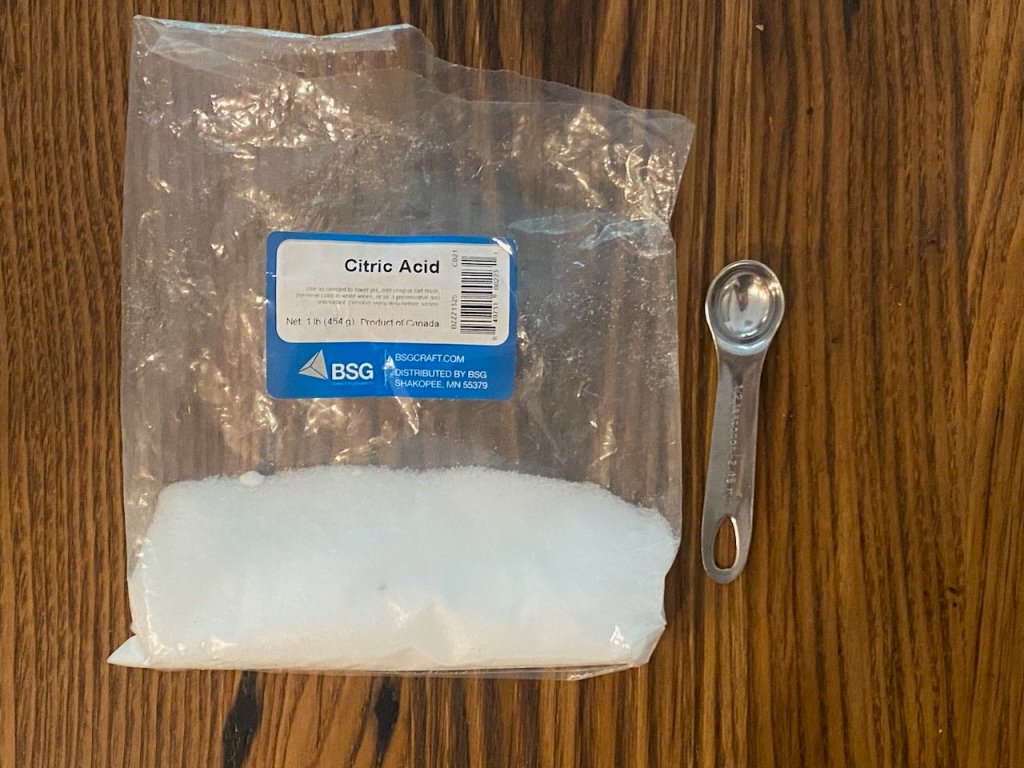
1/2 tsp per quart or 1/4 tsp per pint is what is needed to safely ensure proper acidity for canned tomatoes. The other thing I never do is salt my canned tomatoes. While it’s an option for recipes, I’d rather wait and salt my food as I’m cooking it. But most recipes offer salt as an option to add while you’re canning. It’s your call.
It’s also important to keep everything warm – namely, your jars and the sauce – so that when they go back into the canner they remain as close to a boil as possible. Reading up on current practices, I have changed the way I can this summer and now only take out 1 or 2 jars at a time, leaving the rest submerged in my hot water bath and fill individual jars and then place back into the canner. Previously, I would take them all out and fill them one by one and move them all back in at the same time, thus more variability in temperature of the sauce and jars.
Hot Water Bath or Pressure Can
Now there are two ways to safely can tomatoes: hot water bath and a pressure canner. I don’t have any experience with a pressure canner; it is a very different method (it uses pressure and the jars are not submerged in water). I hope to invest in a pressure canner next spring and will share as I learn and use it. The upside is it cuts down on processing time, and it is the only safe way to can vegetables (corn, tomatoes, green beans) as well as chicken broth or stock, so for my long-term self-sufficiency goals it is a tool that would be useful in our summer kitchen.
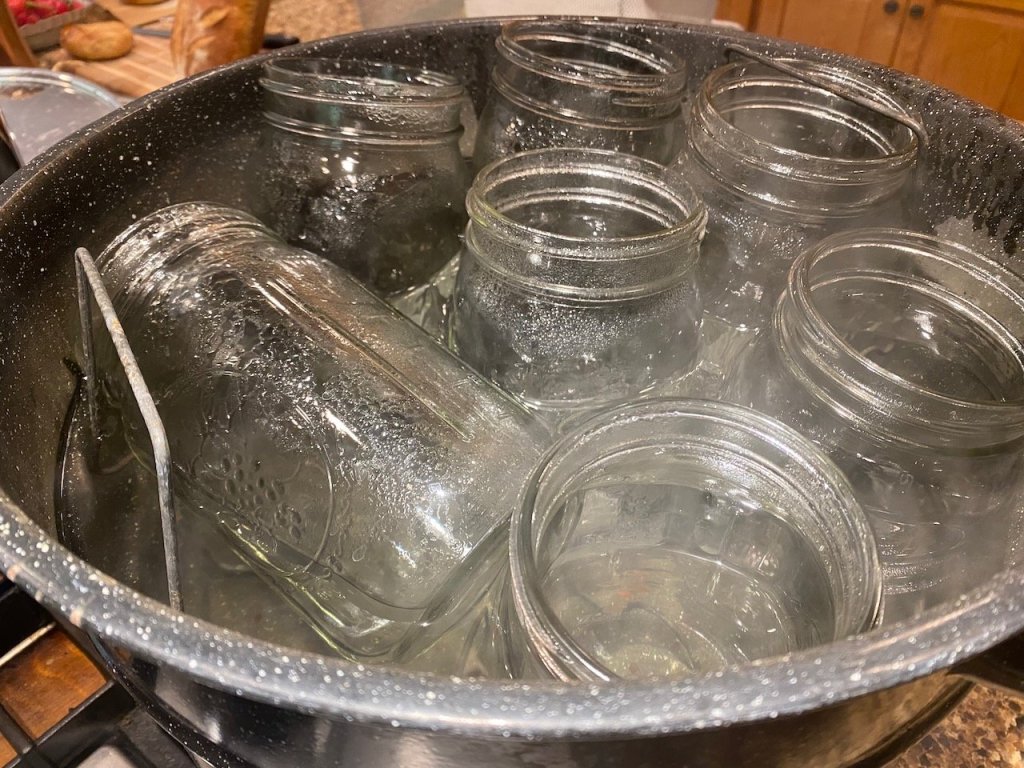
Keep your jars warm while you prepare the warm tomatoes. This is a new step I’ve incorporated into my canning this summer, in an effort to stay current with best practices for safe home canning. Best Practices
- Use blemish-free and ideally vine-ripened tomatoes
- Never can with tomatoes that were subjected to frost as they have a naturally lower acidity; use them fresh or freeze them
- For boiling your tomatoes, use a stainless steel pot and utensils because they are non-reactive
- Never re-use a canning lid unless they are the reusable kind (I don’t have any experience with them, though I’m interested in trying them); Ball and Kerr canning lids are a single-use though the rings can be reused as long as they remain in good condition.
- Clean your jars, lids, and rings with soapy water and place your clean jars in the water bath as it comes to a boil.
- Boiling times for raw tomatoes is slightly longer than for tomato sauce, which is cooked down. Be sure to follow the boil times according to what product you’re making.
- Follow the boiling guidelines on the National Home Preservation Website here. These are updated by research-based data in cooperation with the USDA.
-
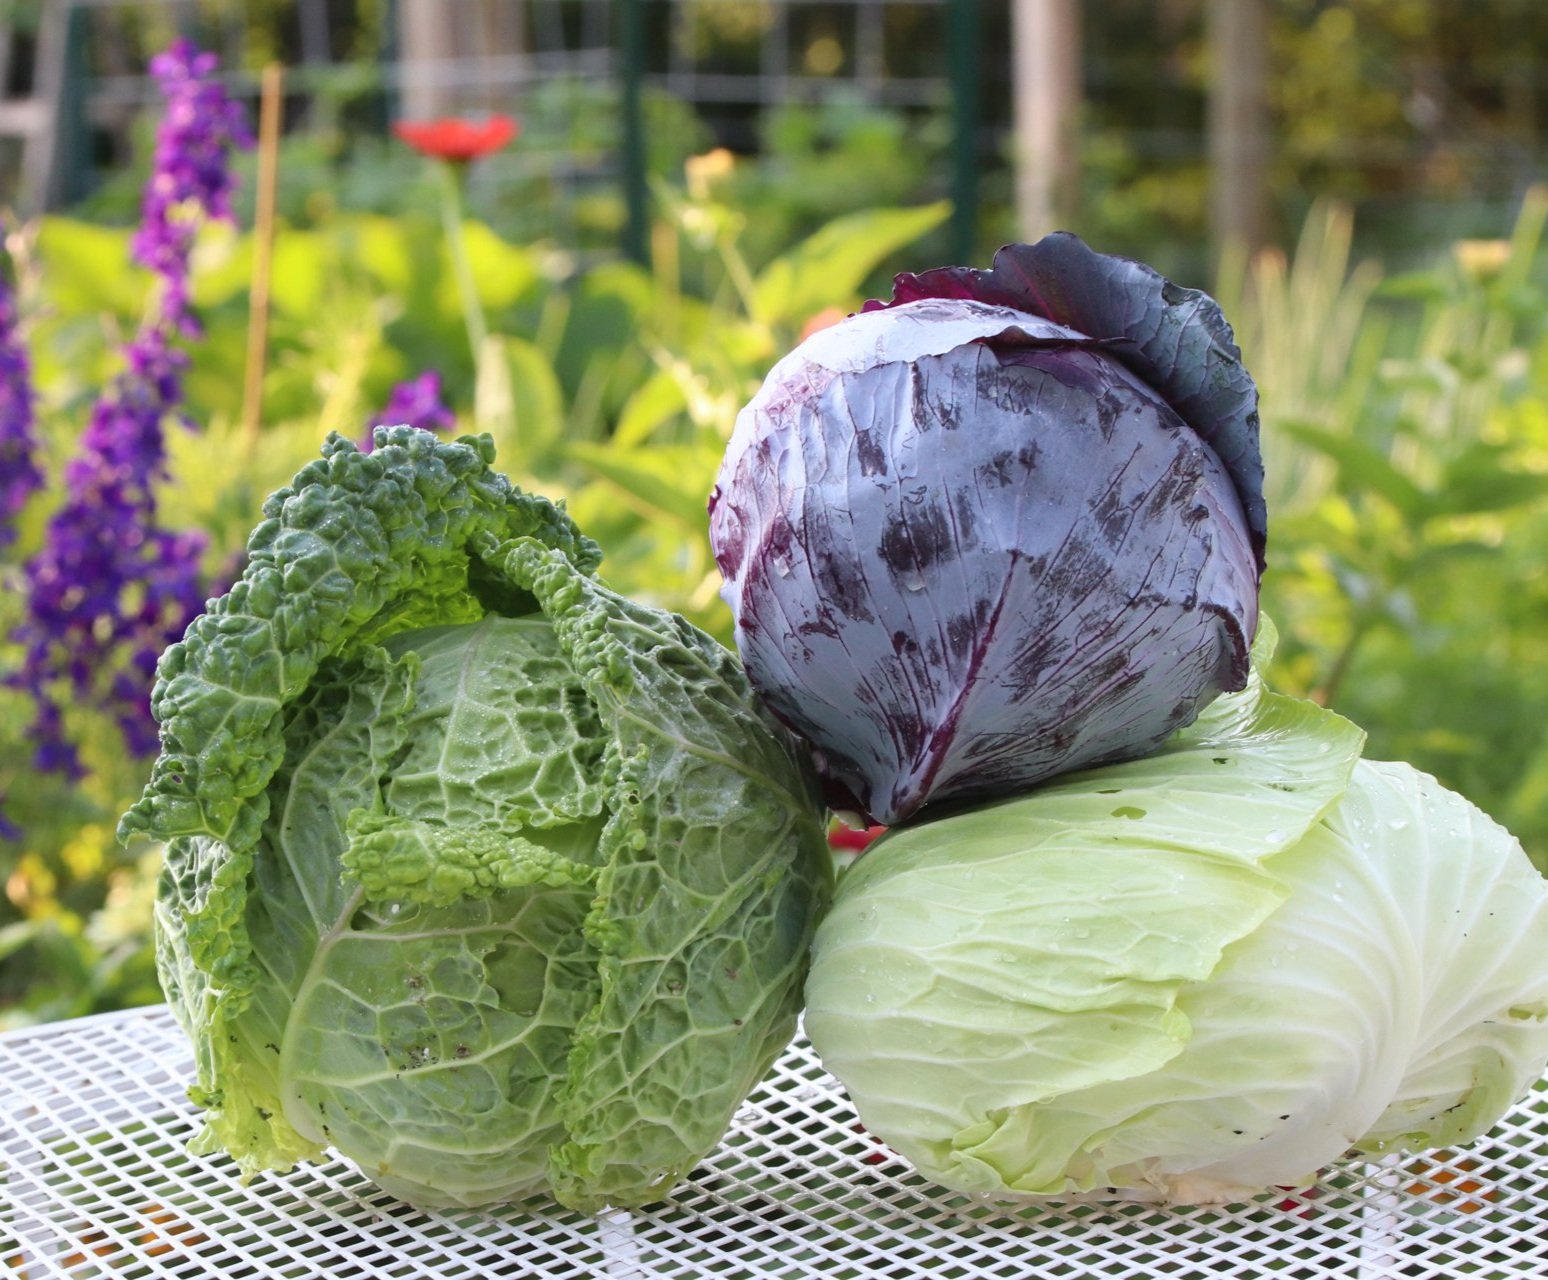
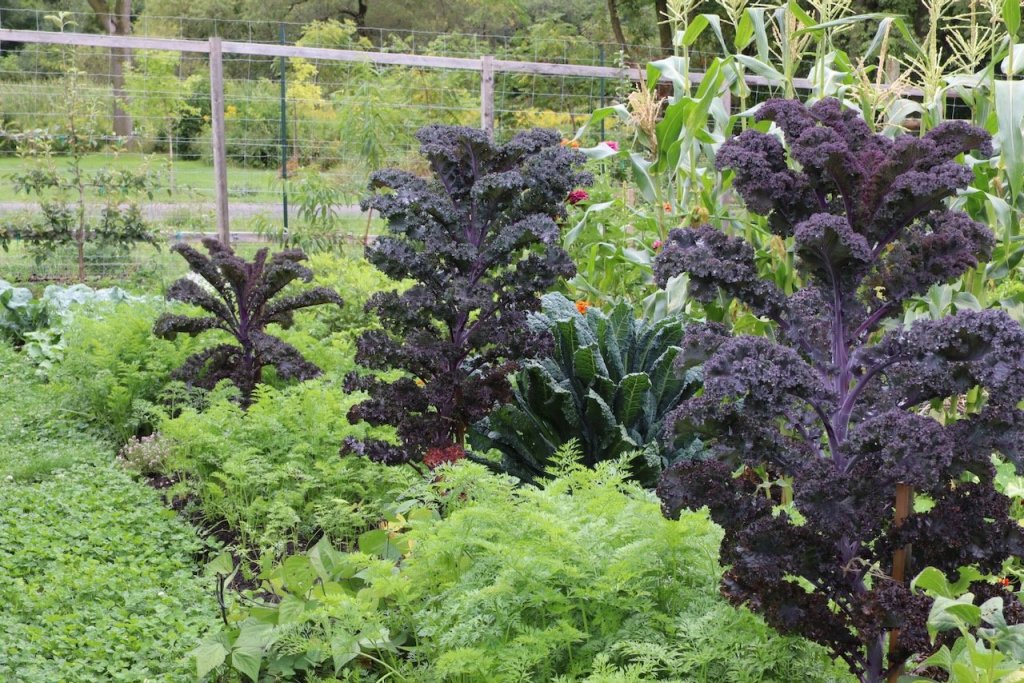
My Favorite Varieties: Brassicas
A subscriber asked for a list of my favorite varieties to grow, and I wanted to start with the Brassicas, probably the most diverse and most-grown vegetable in our food garden.
The term brassica is most often used synonymously with a specific species, B. oleracea, which is broccoli, cauliflower, kohrlabi, brussels sprouts, kale, and cabbage. However, there is another Brassica species, B. rapa, which most of us also love to grow which includes
AND, we cannot leave out some other delicious “brassicas”, the radish. This is a cousin of the other two groups with a genus and species name of Raphanus sativus.
Brassica oleracea Brassica rapa Brassica sativus Cabbage Chinese cabbage Round radish (globe) Brussels sprouts Bok choy Daikon Broccoli Mustard greens Watermelon radish Kale Mizuna Rat tail radish Cauliflowers Rapini (broccoli raab) Collard Greens Turnips Tatsoi Many of the brassicas we grow are hybrids. I find them to be consistent and uniform and also perform really well in a variety of conditions (heat and cold).
That being said, there are some open-pollinated brassicas we grow too, and those are marked with an asterisk (*).
Cabbage
Green: Tiara, Primax*, and Capture
Savoy: Famosa and Chieftain Savoy*
Red: Integro, Amarant*
Brussels sprouts*
We are branching out into open-pollinated territory trying 3 new OP varieties this season from Adaptive Seeds, our go to brassica open pollinated seed sources, so can’t call these favorites but we are growing them in 2025:
Darkmar 21, Early Half Tall, and Red Bull
Broccoli
Hybrid: Blue Wind, Belstar, Covina, and trailing Green Magic right now
Open Pollinated: DiCiccio*, Waltham, Spigariello
Notes: Blue Wind is for early and late season plantings. Belstar and Covina grow any time of our growing season. DiCicco and Blue Wind beading is much looser than Belstar and Covina.
Kale
Scarlet, Redbor(F1), & Nero Toscano
Notes: Scarlet is my fav as ornamental and for eating, with Nero Toscano a close second.
Cauliflower/Romanesco
Veronica (Romanesco), Cheddar (yellow), Earlisnow, Bishop, and Skywalker
Kohlrabi
Kolibri, Beas, & Terek, all hybrids that produce small leaves and quick, uniform bulbs.
Chinese Cabbage
Bilko, Nozaki Early* (New in 2025)
Bok Choy
Joi Choi, Pak Choi, and Li Ren Choi (baby bok choy)
Mustard Greens/Mizuna
Dragon Tongue* and Miz America
Rapini
Sorrento Raab
Turnip
Hakurei (salad turnip)
Purple Top Globe*
Tatsoi — don’t currently grow any
Round Radish
Sora* (fav for many years), Bacchus, Viola, Easter Egg II, French Breakfast*
Daikon
KN-Bravo and Sweet Baby
Watermelon Radish
Red meat*
Storage (winter) Radish
Blauer White* (new this year), Red King, Black Spanish* (intense earthy tones, but a culinary experience, to be sure)
-

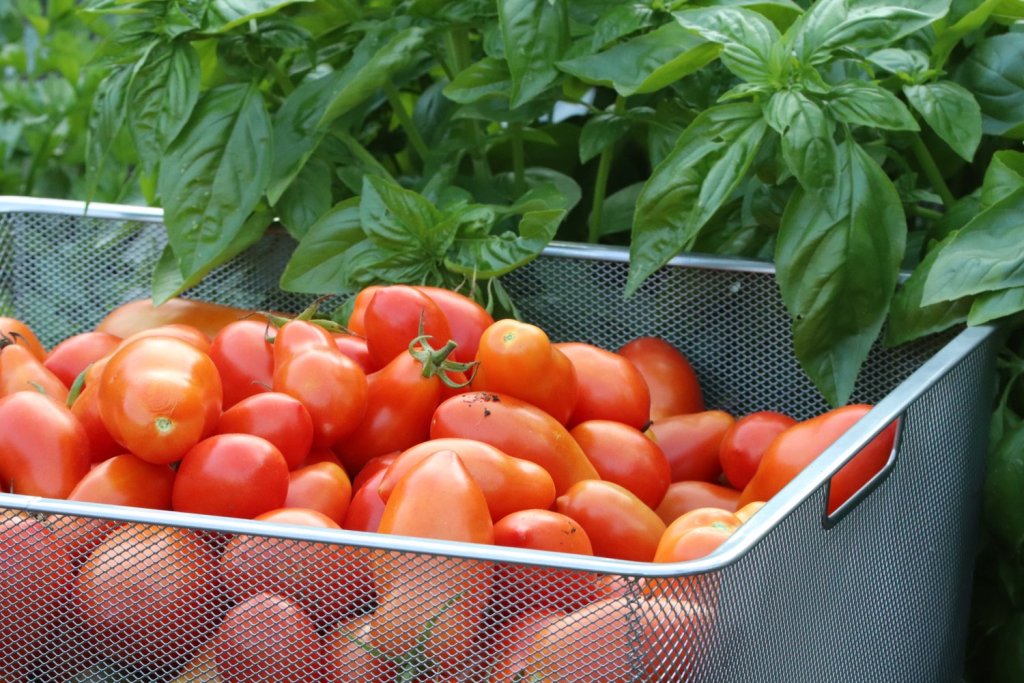
Sweet Corn + Tomato Risotto
A quintessential summer side dish or main entree, we only cook and enjoy this risotto in the height of the summer feast. It usually happens in late July as soon as the corn’s in season here and we’ve had a few nights of just straight corn on the cob and are ready for more.
This risotto is really fun to serve for a group. It’s easily doubles, or you can use it as a side along with a main protein source and sourdough.
Yield: 4 servingsSweet Corn + Tomato Risotto
 Prep Time 30 minutesCook Time 30 minutesTotal Time 1 hour
Ingredients
- 2 cups fresh corn on the cob
- 2 cups onion, diced
- 2 cups cherry tomatoes, halved
- 1/4 cup olive oil, or more
- 2 cups arborio rice
- 3 T apple cider vinegar or white wine vinegar
- 1/3 cup water
- 6 cups vegetable or chicken stock
- 1 cup parmesan cheese
- 1/4 cup basil leaves, chiffonade
- salt to taste
Instructions
- In a large saucepan on medium heat (I use our deep saute cast iron pan which has a 4 1/2 quart capacity), add olive oil and onions and saute until softened, about 5 minutes.
- Add the arborio rice and more oil if needed and cook another 3-4 minutes until the rice turns translucent. Turn burner to low.
- Next add the combined 3 T cider vinegar and 1/3 cup water and cook, stirring, until the mixture evaporates. This will lift off anything off bottom of pan and infuses flavor into the rice. (Note: I don’t cook with alcohol, but you can also use 1/2 cup white wine instead).
- Add the fresh corn kernels and 1 1/2 cups of the broth. Stir frequently until it’s fully absorbed and repeat this process 4 more times, cooking on medium low heat, until you use up all the liquid. This process takes 15 minutes or so.
- When fully cooked, it will have a creamy appearance. Though it’s a pasta, it’s texture is closer to rice.
- Add the parmesan cheese and mix into the risotto. Alternatively, you could wait to add the cheese until it’s served and let your guests decide how much, if any, to use.
- Finally, in a smaller saute pan, heat up a little more olive oil and add in the halved cherry tomatoes and cook on medium heat until just softened — not more than a few minutes.
- To serve, place the risotto in a shallow bowl and top with the tomatoes and basil. Serve with shaved parmesan and ground pepper.
-

Selecting and Applying Beneficial Nematodes
Nematodes are good or bad? Both, actually. It depends on the species. Root knot nematodes are a horrific soil pest for many in warmer zones where they can persist for years. The focus of this post is on the positive, beneficial nematodes: hungry, non-segmented roundworms that are voracious soil predators of many of our least welcome garden visitors’ offspring.
There are three main species of beneficial nematodes, and each preys on different larval species and even at different soil depths:
- Steinernema feltiae
- Steinernema carpocapsae
- Heterorhabditis bacteriaphora
Steinernema feltiae (Sf) is what we often purchase for keeping our cutworm and root maggot populations in check. This species also preys on cucumber beetles, corn earworms, armyworms, fungus gnats, and fruit flies among many other pests.
Steinernema carpocapsae (Sc) hunts similar species to Sf, including cutworms and armyworms, but also lots of borers, weevils, fly larvae, fireworms, and more.
Heterohabditis bacteriaphora (Hb) attack beetles and weevils (also a type of beetle!) such as asparagus beetles, Japanese beetles, carrot weevil, Colorado potato beetle, flea beetles, ticks, and several species of flies among other pests.
If I am going to order nematodes, I tend to order at least 2 species. My rationale is that if I’m going to spend the money on one species (and often at that price I’ll have to pay for shipping), I can order multiple species and save on shipping and maximize the time investment to prepare the soil and keep it moist for the first 1-2 weeks. So I figure I may as well try to work on as many perennial pests as possible for my time.
A full list of what pests each nematode will parasitize can be found here.
To be Proactive or Reactive?
While with other organic methods like applying beneficial bacteria (Cease/Bacillus subtilis) or Surround (kaolin clay) as preventative measures, applying beneficial nematodes are more of a reactive measure. Because of cost, we only apply them when we notice a significant uptick in pest pressure, most notably root maggots that bore disgusting holes into our radish crop, rendering them largely compost material.
When to Apply
In general, applying nematodes in spring or fall is the best time due to insect life cycles. However, here I am applying in late summer because of an issue I saw in June (root maggot damage on my later radish successions) that I’m just now addressing. I’m rolling the dice on the efficacy, because this is how I garden.
Once you settle on the best time of year for your garden, always apply them either early in the morning on a cloudy or cool day (hot soils > 95F are no good for nematodes) or in the evening. Bonus points if it coincides with a good rain event. If rain hasn’t fallen recently in your area, be sure to give your beds a good soak before adding the nematodes with the Hose End Sprayer attachment.
We have always ordered our beneficial nematodes from Arbico Organics. I am leery of purchasing them as shelf-stable boxes in garden centers because they always come refrigerated (and live) from Arbico.
It would be remiss if I didn’t address the cost. Beneficial nematodes are expensive and a significant investment in your garden. While suppliers will say it’s best to apply them not once but twice over a few weeks (from separate orders, no less, because once you open the package you must apply it that day), we have only ever done one application of nematodes when we were working to address pest pressure. And it solved our issues. We made the decision to only apply them once based on economics, to be sure. I’m not sure if this is a marketing push or if there’s credence to this recommendation for highly infested areas; I’m guessing it’s a little bit of both, to be honest.
The packaging should come refrigerated and must be placed in your fridge as soon as they arrive. You can keep them in the fridge for up to 2 weeks, but it’s best to use them as soon as possible. I used ours one week after they arrived this summer.
How to Apply
You will need a Hose End Sprayer like this one in my Pest Management Amazon list. The instructions will want you to fill the hose end sprayer the full 32 ounces to measure how much it covers at 2, 3, or 4 ounces per gallon as set by the dial on your hose end sprayer. From there, you will know which setting will thoroughly cover the square footage you need to treat.
You will then divide the space and the package up evenly in 3 parts, and finally you get to start getting to work.

We ordered 10 million each, which will cover 3200 square feet, this was more than I needed for my project, but I would rather have extra than be short. The total cost of both packages was $60 plus tax (no shipping). NemaSeek (Hb) is more mobile in the soil and will seek out pests, while NemAttack (Sb) will only feed in the range where they “end up” upon application. After you have your ounces per gallon adjusted, you’re ready to mix the microscopic worms into the canister and get spraying. I set our sprayer to 3 ounces for the first two applications, but when I had plenty left, I increased it to 4 ounces per gallon for the third and final application.
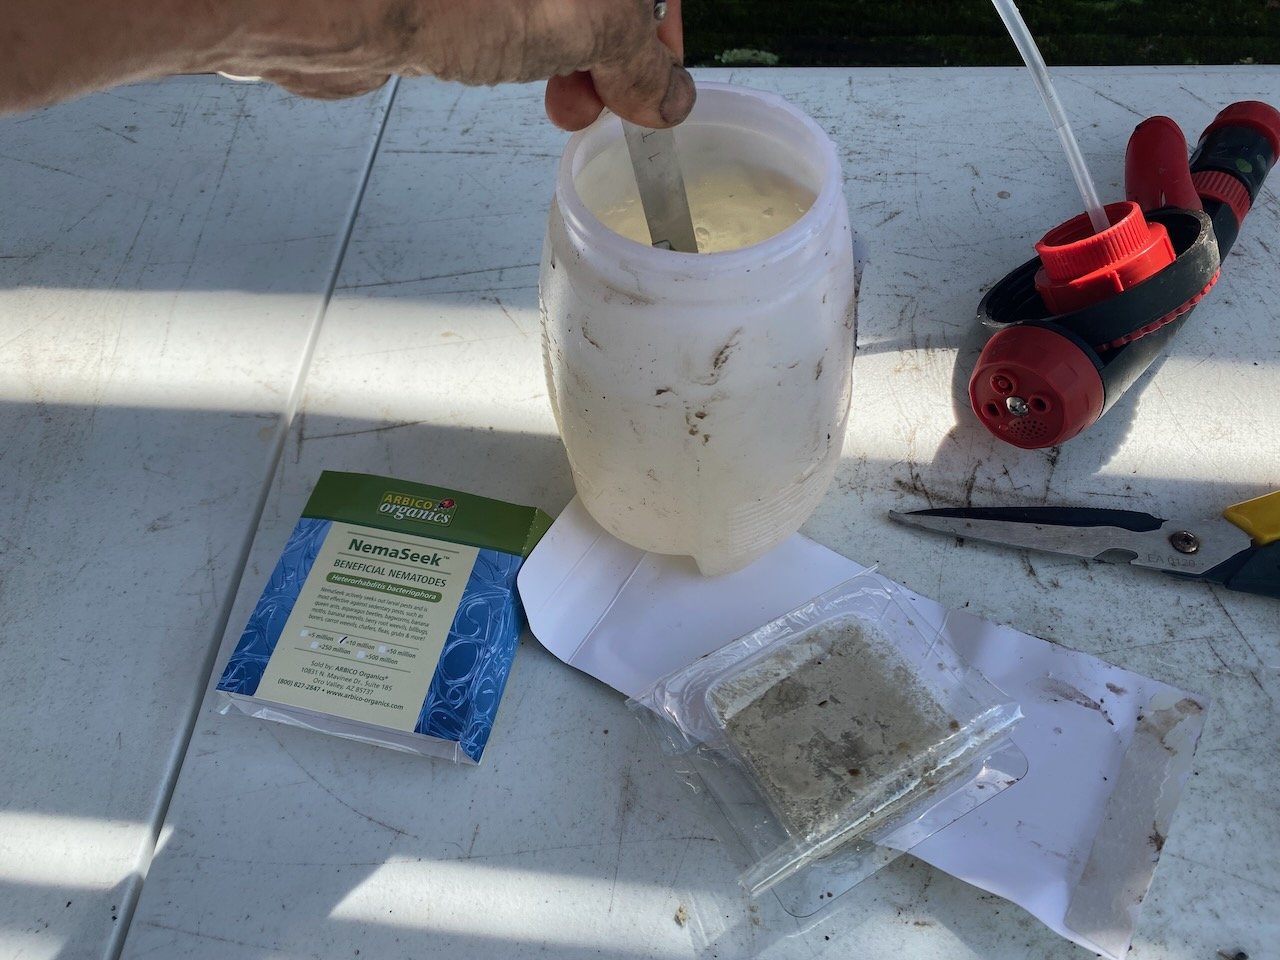
You won’t be able to spot any squirming nematodes because they are microscopic; they are in some kind of a carrier paste. It’s not a perfect science and I just eyeball my proportions using a teaspoon. Shake the container well before attaching the hose, and I also give it a shake every few minutes when applying to keep it well-mixed so I get an even spread, maximizing their effectiveness.

The best application is directly in contact with soil, and that’s why I chose to do this right now before my fall root crops were seeded. I needed as much of the soil exposed as possible to get the nematodes to have direct soil contact so they can tunnel into the soil and find their prey.In beds where we have dense vegetation, I sprayed between the plants where soil was visible and reachable. I avoided spraying in beds where the foliage was really dense and it was unlikely for the water to reach the soil surface, like our bush beans, determinate paste tomatoes (seen one bed behind where I’m applying in the photo above), peppers, and much of our tomato plantings. I was able to crouch down and spray the understory of our asparagus, and I really hope this makes a dent in both our asparagus beetle and our Japanese beetle population in that bed. Once applied, be sure the soil is damp, and every few days if it doesn’t rain, you want to go through and water the beds well to keep the nematodes
How Quickly Will You See Results?
They are not instant, but nearly instant. Faster than a garden radish kind of instant. It will take about 2 weeks for nematodes to fully parasitize their larval hosts. As noted above, spring is a great time to apply them. Alternatively, you can choose to apply beneficial nematodes in the fall before winter to kill off any lingering pest populations ahead of winter. This is especially useful in colder climates like ours. Or, you can follow my lead and apply them when you remember and have time.
I hope you consider utilizing these microscopic predators for your organic pest management in your garden.
-
Layered Seasons
I love celebrating new years in the middle of a calendar year, those anniversaries that mark new beginnings amid a frenzy of life. Such is our wedding anniversary that comes smack in the middle of tomato season. And onion curing time. And during the frenzy of fall plantings and sowings. And right before any plums that didn’t split will be consumed with moans and groans.
It’s these anniversaries that feel like walking through an open door into a clean slate for me. I suddenly have a new anchor, the memory of our wedding in Oregon, with so many loved ones present who are now gone and so many loved ones who had yet to be born that are now adults or younger. And in placing myself at that moment in time every year, it somehow renews my passion for this garden, for this space, at a time when I feel like I can’t go on.
I recognize what I do is aspirational for many. Maybe that’s what many people enjoy about it. Frankly, it’s aspirational to me too. I’m laughing as I write this, because it’s as honest and raw as I can be with you. Every time I succeed at gardening, preserving, planning and planting, in many ways it feels like success for the first time, even when I’m doing a familiar task like canning cucumbers or tomatoes. Because every year is a first-time in some ways.
And add to that the layers of our real-time experience and decades of dreams that finally have turned into our reality and we often ask ourselves, “What were we thinking?” wanting a garden this large. Because, we achieved it. This dream we co-conspired at a friend’s wedding in the spring of 1998, when we were first dating. We made our way to this incredible garden with espalier fruit trees ringing the perimeter and immediately said this is what we wanted someday. It even had, if I’m not misremembering, a central pergola and seating area. That kitchen garden at McMenamin’s Edgefield in Troutdale is our inspiration for our garden dreams.
And I do think our garden is the right size for a family of four who wants to eat a whole heck of a lot of their own food year-round. How much actual growing space do we have? I don’t know, because we haven’t measured our raised beds yet. But it’s a math problem I’m posing to the boys to calculate for me before they go back to school. Its size is best measured in the amount of potatoes and dry beans we need to get us through those long winter months. That’s how we measure the success of our garden planning.
So what is my point? I think to take things slowly, to find ways to renew your love amid the exhaustion and very real garden fatigue, and to really enjoy the precious time you have in each season. That is exactly what this anniversary this week has done for me, reset my enthusiasm and joy amid my most exhausted time of summer. I try to avoid the garden some days because there are so many tasks and just ME, mostly, who has to do them all. If I just keep the gate closed, maybe it will be easier?? Nah, it just makes it worse. So starting this new year of marriage means I can see the garden as a new adventure too. It’s a mindset shift, or maybe some mental gaslighting, but it works!
It’s all too easy to want instant gratification, but I can tell you that achieving our garden in slow motion really helped us reflect and consider what we wanted, and we certainly made different decisions had we tried to do it all at once 20 years ago. I think the garden is a richer tapestry because of it, and that’s all thanks to the layers of seasons and experience that brought us here.
-
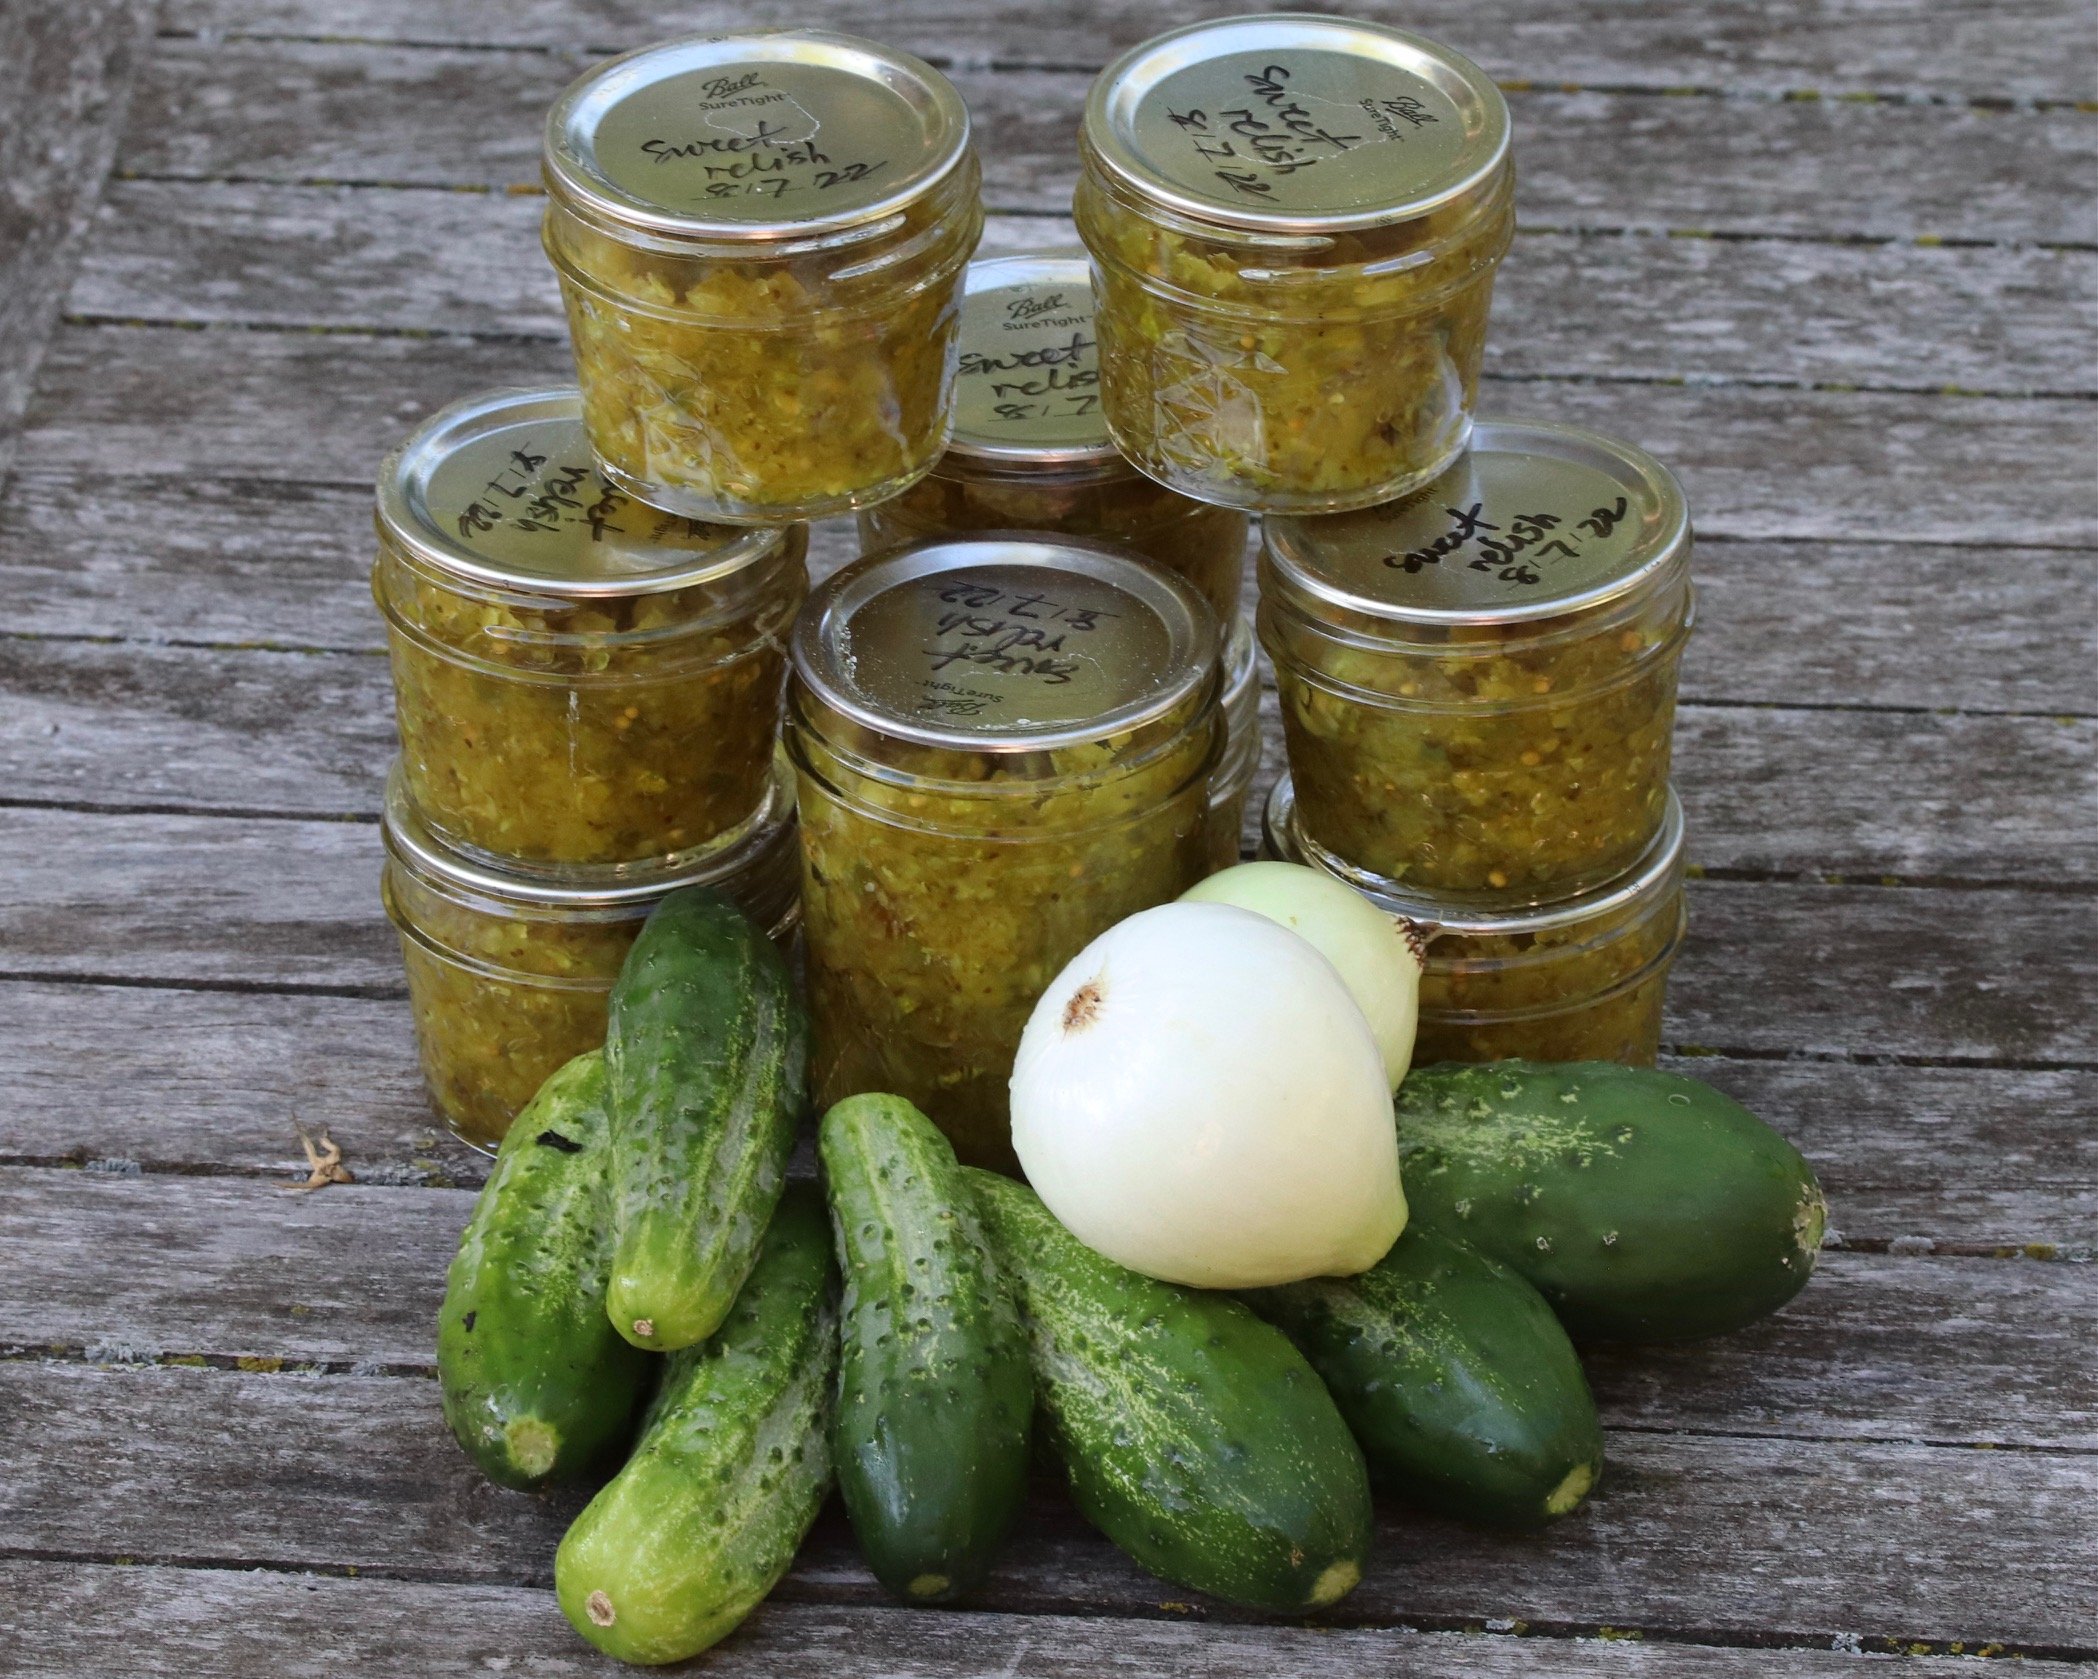
Sweet Relish
Yield: 6 pintsSweet Relish

We love making and gifting sweet relish. And I know many of you were looking forward to this recipe, so this month I’m going to publish two recipes so I can show you How To Make Sweet Relish this week, and then give you a second recipe later this month.
I think these kinds of novelty items are the best homemade gifts for teachers, family, and friends. It’s something we usually have in our fridge or pantry, but not something we consume even monthly. So that’s why we’ve started to make it in smaller, gift-size 4-ounce (half cup) jars.
I hope you enjoy learning how to make relish and find as much joy in this process as we do making and gifting this really delicious sweet relish.
This recipe makes 12, 4 ounce jars or 6, half pint jars.
Ingredients
- 4 lbs pickling cucumber, chopped fine
- 12-15 ounces yellow onion, chopped fine
- 3 Tbs salt
- 1 ¾ cup granulated sugar
- 2 cups apple cider vinegar
- 1 ½ tsp mustard seed
- 1 ½ tsp celery seed
- ½ tsp turmeric
Instructions
- Either chop cucumber and onion fine by hand, or pulse with a food processor until diced to about 1/8-1/4” cubes. You want your final weight to be 4 lbs cucumber (after removing any excess seedy areas and dicing) and 12-15 ounces chopped onions.
- Spread the 3 Tbs salt into the bowl with minced cucumber and onion. Mix thoroughly. Add just enough water to cover the mixture.
- Let stand for 2 hours.
***Wash your jars with soap and water or run through a dishwasher cycle. It’s important to keep your jars warm because we will fill them with boiling liquid, so find the best time to do this. While not necessary to sterilize jars or lids for water bath (processing) times of 10 minutes or more, I still generally place my clean jars into my hot water bath while I’m preparing the relish, even just to let the steam keep them warm.
One hour later …
- Measure out all sugar, vinegar, and spices and set aside.
- Fill and bring your water bath canner to a boil.
- After 2 hours, let a colander with cheese cloth in your kitchen sink and carefully ladle your mixture into the colander. Rinse and repeat. Then gather the cheesecloth together and press the excess moisture out of the mixture. You want it to be as dry as possible.
- Boil the sugar, vinegar, and spices together and add the cucumber and onion mixture. Boil together for 10 minutes.
- Set the jars aside and carefully pack the hot relish into your clean jars, leaving ¼” headspace in each jar.
- Wipe the rim off every jar with a damp cloth and carefully secure the clean lids and rings in place. Don’t over-tighten the ring.
- Place in hot water bath, ensuring every jar has 1” of water above the jar. Boil for 15 minutes. For those at higher altitudes, adjust accordingly. Learn more here.
- After 15 minutes, carefully remove and place on a towel. Do not touch jars for 12 hours, or overnight.
It’s best to let this recipe blend together for a few months before serving. Makes a great holiday gift utilizing our summer excess.
Hope you enjoy making this pantry staple in your kitchen this summer.
-
August Garden Tour
It only took me all week to get this done. I appreciate your patience, everyone! Hope you enjoy. I’ll keep it unlisted (private) until Monday morning when I make it public and share via my monthly email newsletter.
Remembering
I may have overscheduled myself for the latter half of July to numb myself a little.
But the effect is quickly wearing off, and I think it’s for the better.
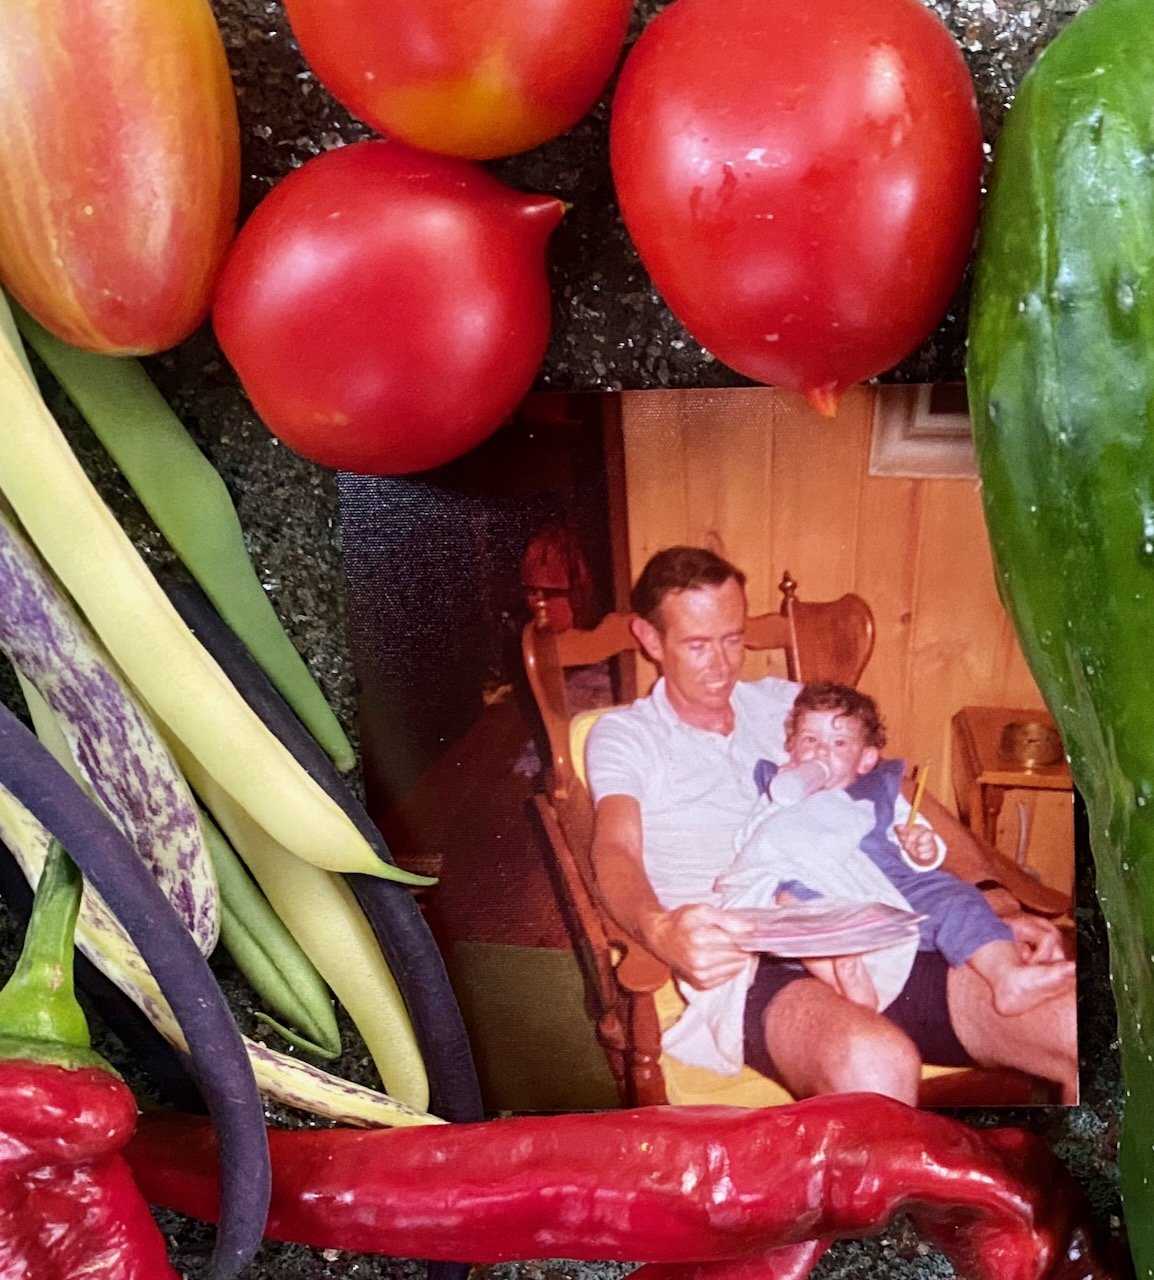
Today is the one-year anniversary of losing my father. One year ago Sunday, I flew home with a bouquet of zinnias and a book on dying in my oversized carry on.
Dad was on hospice by then and I couldn’t bear to be apart from him, knowing he had maybe a month to six weeks to live. My husband was so encouraging on me following my heart and returning to be with him. The timing was confounded by the fact that I hadn’t seen my father-in-law since his beloved wife passed away in January 2020 a day after my birthday and before the world shut down; he had planned a trip to see us in July and was staying for a little over a week. I cut my time with him short by 3 days to go be an extra person at home to help care for dad on hospice.

At the very end, my oldest was holding my Mom’s hand (she reached for his hand at some point during his final hour), she was holding Dad’s hand too, and I was on his other side with the rest of my family him holding his other hand, all linked together. It was so peaceful.
I had been with my dad two other times already that summer. Once, in mid-June, before he went on hospice. During that visit, he was sent to the ER during a palliative appointment due to very low blood pressure. It turned out on top of the cancer that had grown back with a vengeance, an infection from a fall and hearing loss (we think from the antibiotics), he had developed a heart condition, too. He knew then, in June, that the life he’d hoped to recapture had sunset. It was so difficult to see him truly defeated in the hospital bed, shrugging in a “what does it matter” when I proclaimed enthusiastically on the white board (because, remember, he couldn’t hear), that he was being discharge and could go home.
Once he was settled at home, I flew home for a week and a half, and then flew back with my entire family for the Fourth of July. At that time, he felt terrible still, and apologized to me that he wasn’t up for spending time with the grandsons. Still without hearing and very uncomfortable, he had not yet fully decided to go on hospice or not.
This week, one year ago, was a frenzied blur. I’ve done a lot of emotional processing over the months since he passed, but there’s something about the anniversary of being in it with him that is welling up some unprocessed grief. He and I pulled an epic all-nighter when he could no longer stand up on his own and before the hospice bed arrived, because, stubborn old man loved stretching out in the cool basement and that’s where he got stuck until we were able to get a hospital bed setup and call for a medical transport.
Once I was between talks this week, I felt a deep and familiar sadness, one that is unlike any other grief I know, cracking my heart open anew. I am very good at keeping myself busy — you see it everyday in the garden. The disease of busyness keeps us distanced from our hearts. I am keenly aware of this, and plan to work this weekend on not being busy but really trying to be present. I know canning season is a wonderful time in that regard … hours of puttering around the kitchen, and forever marked by the tasks I focused on after we said our goodbyes to him.
Grief does change with time, but it doesn’t ever go away. It takes on new forms. It presents itself in different ways. It often catches you off-guard, tipped off by a sight, smell, feeling, or other sensory experience. You are able to smile and laugh more, tell stories joyfully, but then grief bubbles up and swallows you out of nowhere.
I feel so blessed to have spent so much time with my Dad, but especially his final 5 days on earth. If you were my support circle, you know I was a wreck. I wasn’t sleeping well, I was trying to keep track of his breathing, the dosing of comfort meds, and all the things family members do while their loved one is on hospice in the comfort of their own home. It was worth every tear, every lost hour of sleep.
We will be celebrating him tonight with a remote family dinner. I’ll be wearing my red chuck taylors to Orchestra Hall tonight, where we will hear some Beethoven. Getting to the one year marker is a significant step in moving forward while bringing those we love along with us in spirit, cheering us on in their own ethereal way as we keep on living as best we can.
All this to say, call your people. Hug your people. Talk to your people, say the things you want to say. No matter how hard that might be, I promise you will never regret doing it.

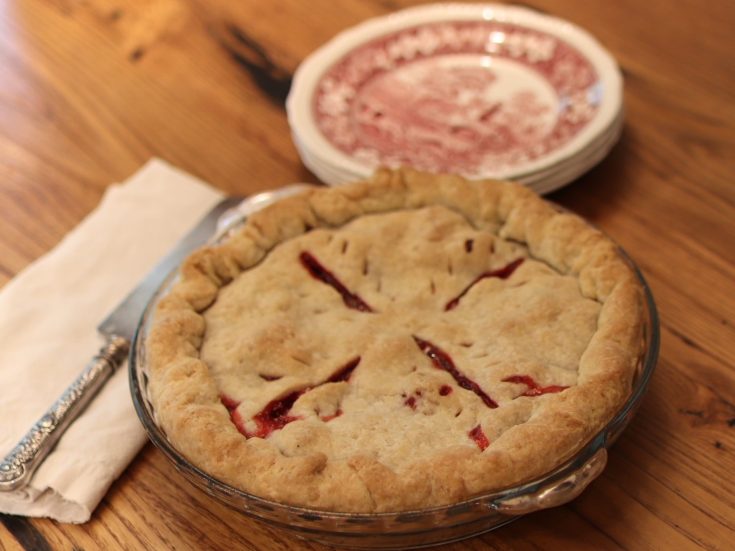
All-Butter Pie Crust
My husband tells me I make the best pies. And I think it’s largely the crust, but yes, the gelatinizing of the fruit inside is equally important.
I was handed down a pie crust recipe from my Mom, who got it from her Mom. And now I’m sharing it with you. There is a secret ingredient that I no longer use often because it’s something we don’t keep in our fridge, so I’ll give you two ways to make it.
Yield: 2 pie crustsAll Butter Pie Crust
A flaky, all butter pie crust with a hint of acid.
Prep Time 20 minutesCook Time 45 minutesTotal Time 1 hour 5 minutesIngredients
- 2 cups plus 2 T all-purpose flour
- 2 sticks salted butter, lightly frozen
- 1/2 cup ice cold water (minus about 1 tsp)
- 1 tsp apple cider vinegar**
Instructions
- Measure all flour into the food processor assembled with the blade attachment. Cut the lightly frozen (I toss it into the freezer for 20-30 minutes before I’m gonna make a crust) into about 1 tablespoon chunks. Pulse the butter into the flour. I don’t run it all the time as you want variation in butter chunks for the flakiest crust. Once both sticks are added, I pulse it a little more before adding the measured out ice water plus acid (I’m currently using the cider vinegar).
- Pulse the liquid into the food processor and when completely added, for 3 second pulses until you just start to see it come together into a rough ball. Don’t overmix it! It will be a little dry (I like it more dry than wet).
- Criss-cross two pieces of plastic wrap on your countertop and place the crumby-doughy mixture onto the wrap. Pull two sides in, and press the dough together and repeat with the other piece of wrap. Massage the dough, rolling the edges on the countertop, to form a flattened round about 2” thick. Put this into the fridge to chill for a minimum of 20 minutes but up to a day ahead.
- Once chilled, cut in half (I like to have slightly more than half for the bottom piece) to a thickness of 1/8”, making as round as you can. If there are gaps, use a little water and patch the holes with extra pieces from the jagged edge.
- For some pies, you need to blind bake the bottom like a lemon meringue, but for most double crusted pies and my galette, you roll it out, fill it, and bake it according to the recipe.
I rely on our trusty kitchen appliances to make this crust perfect — our food processor.
Notes
**Alternatively, you can use 1/4 cup orange juice and 1/4 cup cold water
Ingredients
- 2 cups plus 2 T all-purpose flour
- 2 sticks salted butter, lightly frozen
- 1/2 cup ice cold water (minus about 1 tsp)
- 1 tsp apple cider vinegar**
**alternatively, you can use 1/4 cup orange juice and 1/4 cup cold water
I rely on our trusty kitchen appliances to make this crust perfect — our food processor.
Measure all flour into the food processor assembled with the blade attachment. Cut the lightly frozen (I toss it into the freezer for 20-30 minutes before I’m gonna make a crust) into about 1 tablespoon chunks. Pulse the butter into the flour. I don’t run it all the time as you want variation in butter chunks for the flakiest crust. Once both sticks are added, I pulse it a little more before adding the measured out ice water plus acid (I’m currently using the cider vinegar).
Pulse the liquid into the food processor and when completely added, for 3 second pulses until you just start to see it come together into a rough ball. Don’t overmix it! It will be a little dry (I like it more dry than wet).
Criss cross two pieces of plastic wrap on your countertop and place the crumby-doughy mixture onto the wrap. Pull two sides in, and press the dough together and repeat with the other piece of wrap. Massage the dough, rolling the edges on the countertop, to form a flattened round about 2” thick. Put this into the fridge to chill for a minimum of 20 minutes but up to a day ahead.
Once chilled, cut in half (I like to have slightly more than half for the bottom piece) to a thickness of 1/8”, making as round as you can. If there are gaps, use a little water and patch the holes with extra pieces from the jagged edge.
For some pies, you need to blind bake the bottom (like the lemon merengue pictured above), but for most double crusted pies and my galette, you roll it out, fill it, and bake it according to the recipe.

Tomato + Onion Galette
This summer galette is a garden delight. One of the most important ingredients is time. It takes time for the crust to be ready to shape, and you just can’t hasten a proper onion caramelization. The onions are the key to this recipe and tie all the flavors together.
I’m also notoriously flexible with recipes like this. Sometimes I may do half and half cheeses and other times all one type. I may try plum tomatoes one week and the next month use beefsteaks.
Yield: 6 servingsTomato + Onion Galette

Using my all-butter pie crust recipe, this summer staple is a sure crowd pleaser, made even more delicious by fresh, homegrown tomatoes and onions.
Ingredients
- Pie Crust
- 2-3 beefsteak tomatoes, or half a dozen plum tomatoes, sliced
- 2-3 garden-fresh onions, sliced in rounds
- 3 T olive oil
- 2+ cups Bellavitano cheese (or any swiss type or a sharp cheddar)
- Kalamata olives, drained
- Salt to taste
Instructions
- Prepare your pie crust. You can make the crust a day ahead and keep in fridge, or make it before you do any other prep so it’s good and chilled.
- Slice the tomatoes, cutting out the seeds and gelatinous area. Layer on a paper towel or absorbent cloth while you cook the onions.
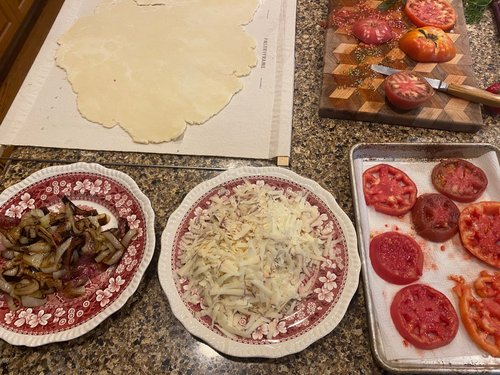
- In a large skillet, heat to medium low, add onions and if need be a little oil. Cook, covered, for about 10 minutes. Resist the urge to flip them (I know, it’s hard). Flip them after about 10 minutes and cook on the other side. Then, add the oil and continue to cook on low for another 20 minutes or so. If I have the time, I cook these onions for 45 minutes. The longer you cook them, the sweeter they get. My oldest asked if I put sugar in this recipe on Sunday; that’s how I know my onions were properly caramelized.
- While the onions are caramelizing, preheat your oven to 400 and shred the cheese.
- When the onions are done, it’s time to assemble. Roll the pie crust out pretty thin — I go for maybe 1/8” thickness. For this recipe, I used a full (double) pie crust and ended up cutting off a small portion of it as I folded it up. (The original Bon Appetit recipe I’ve adapted called for only a single pie crust.)
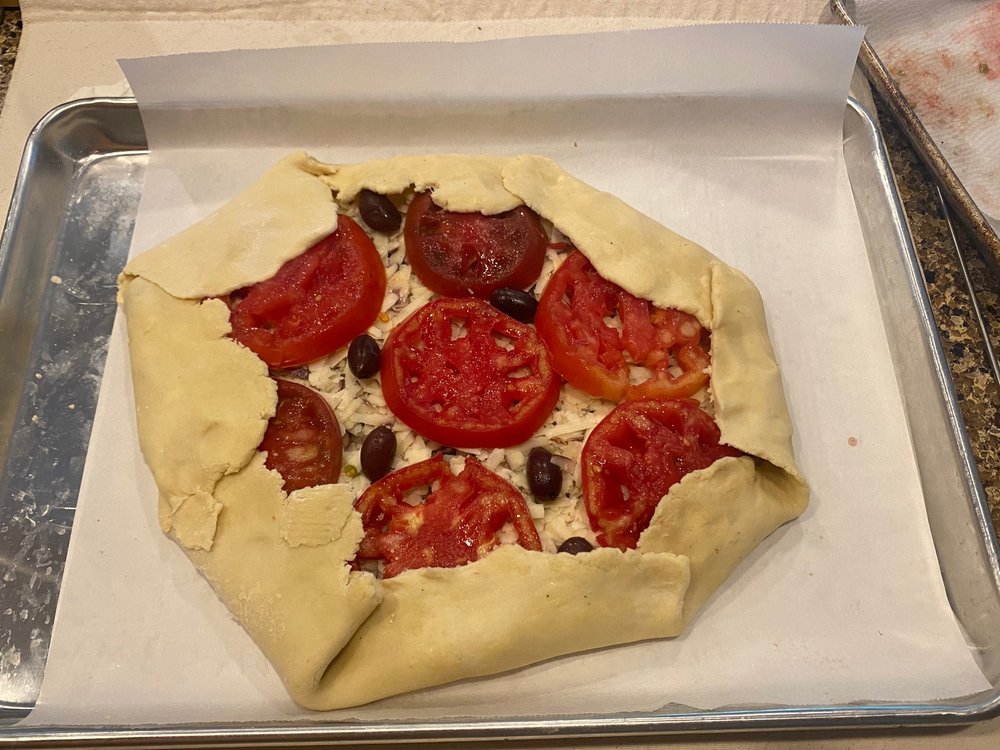
- To Assemble: Onions go on the bottom. Cheese next. If you love it cheesy, feel free to go for more like 3 cups of cheese. Tomatoes get layered on top. This is where you can make it pretty if that’s your passion. I tend to just be happy with dinner being served. Olives get dotted around the tomatoes.
- Bake for 1 hour. If the crust isn’t as brown as you’d like it, you can push the oven up to 450 and bake the final 10 minutes or so at a higher heat.
- Serve warm or cool.

Top 5 Interplantings this Summer
So many beautiful views this time of summer in the garden, and here are my top five plantings I’ve created this year so far, and why I love them.
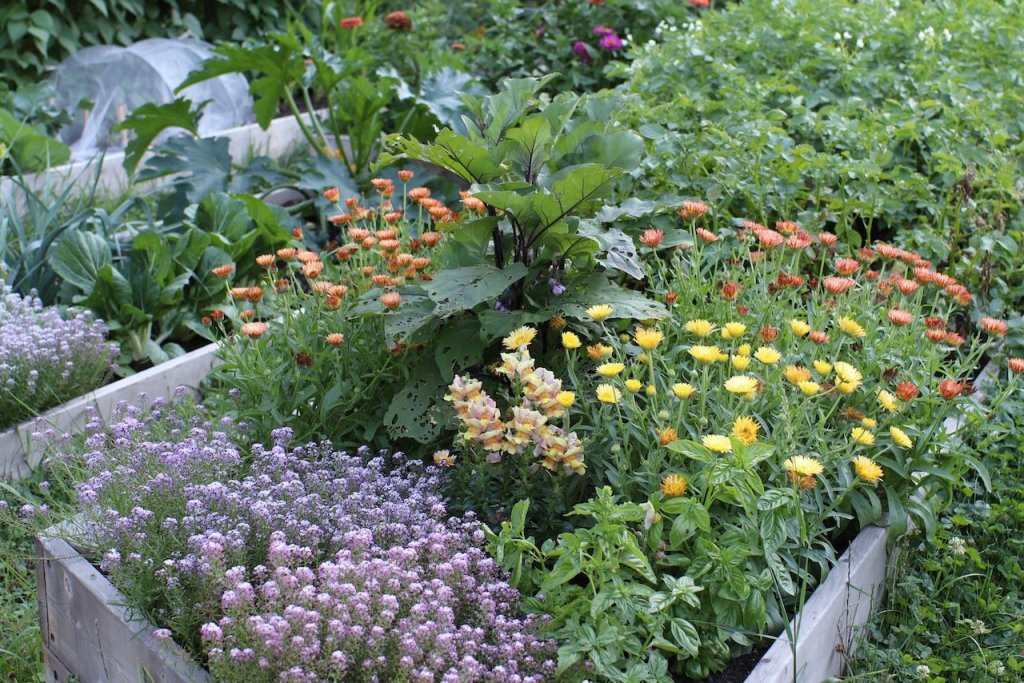
You can’t plan these things. When I plant my snapdragons, they are from a Tetra blend, which means I’m picking from a lottery of colors. This planting, though, of my goodness. It is perfect in every way, and the colors all talk to each other. It’s harmonious and the eggplant foliage, albeit riddled with holes from grasshopper damage, really anchors the flowers that have grown to envelope it. The calendula is all Zeolights, though as you can see there is some major variation in color of those flowers. Again, I used Rosie O Day sweet alyssum in this planting too (and it’s all along the main path as well).

I always stuff my pickling cucumbers with flowers. Calendula and cosmos are two standard interplantings, and dill has become a third favorite. They end up supporting each other, and the prolific cucumbers have never seemed to been negatively impacted by the tight quarters. Highly recommend trellising your cucumbers and dotting the planting with flowers.
I didn’t expect to love this triangle bed quite as much as I am, but here we are. The thing that has surprised and delighted me is just how completely full it has become in the past three weeks. The beans are bumping right up to the corn on one side and the alyssum or onions on the other side. It’s like a stuffed serving of beautiful. The beans are climbing a little, which is somewhat unusual since I’ve been growing these from saved seed since 2019. Dapple Gray beans are a bush type. Only some of the plants seem to be wanting to run, so I’m letting them reach for the skies. I won’t do anything but let this bed ride out the season.

I tried so hard with this bed, and it’s not a total disappointment, but there’s room for improvement. This is my sesame bed, and I wanted it to be a white-pink-purple bed. And I achieved that. It is planted with QISO Purple gomphrena, Rosie O Day sweet alyssum, thai basil, Purple Red and Silvery White strawflower, Redbor kale, and Black and Tan sesame.
I could have had a few more sesame plants, and some of my strawflower aren’t doing as well as i’d liked. I purposely left zinnia out of this bed because of their form and texture. I wanted the pop to be spikes of sesame flowering in August. Since it’s not August yet, there’s still hope, though these plants seem to be flowering one at a time along the stem and not in one large cluster like they did last summer. I’m a bit puzzled but there’s lots of summer left and this bed may slide into its utter glory I had intended it to be.

he final bed I love the most is the patio bed. I’ve always loved this bed and stuffed it with Benary’s giant zinnia. This year I went for zinnia, kale, and Alpha calendula. The calendula are out of this world vibrant and this entire bed has an ethereal feel. It’s my very favorite interplanting in the garden this summer. The only regret is I could have fit a few more plants in this bed … maybe some sweet alyssum in the understory to completely fill it out — and I should have added a few more zinnia too as the calendula are about to take a midsummer siesta before raging back to life in early fall. Noted for next year!
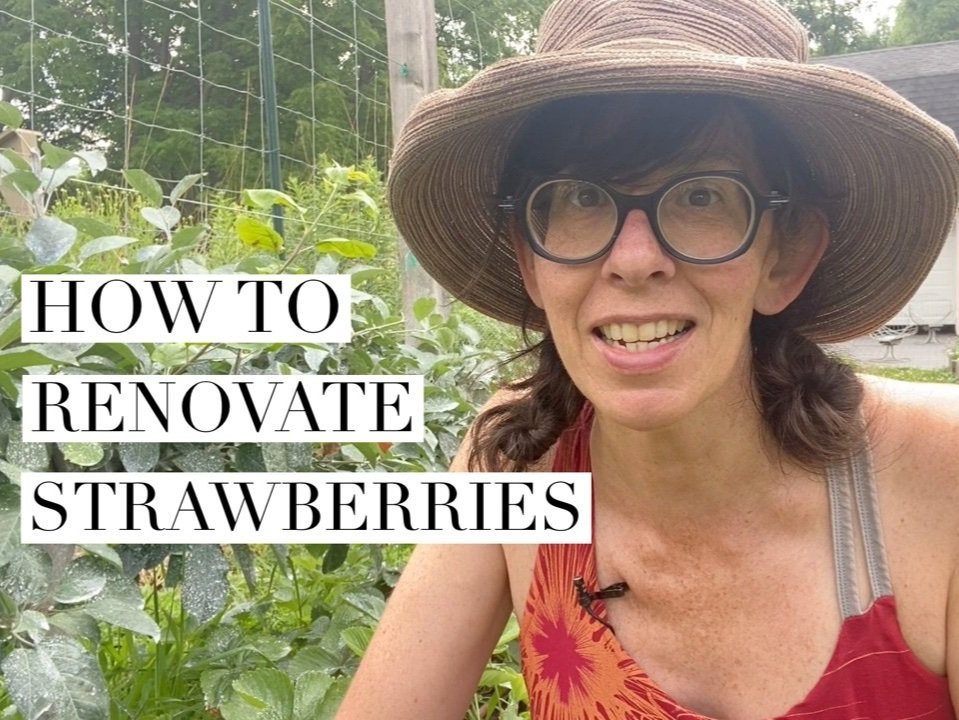
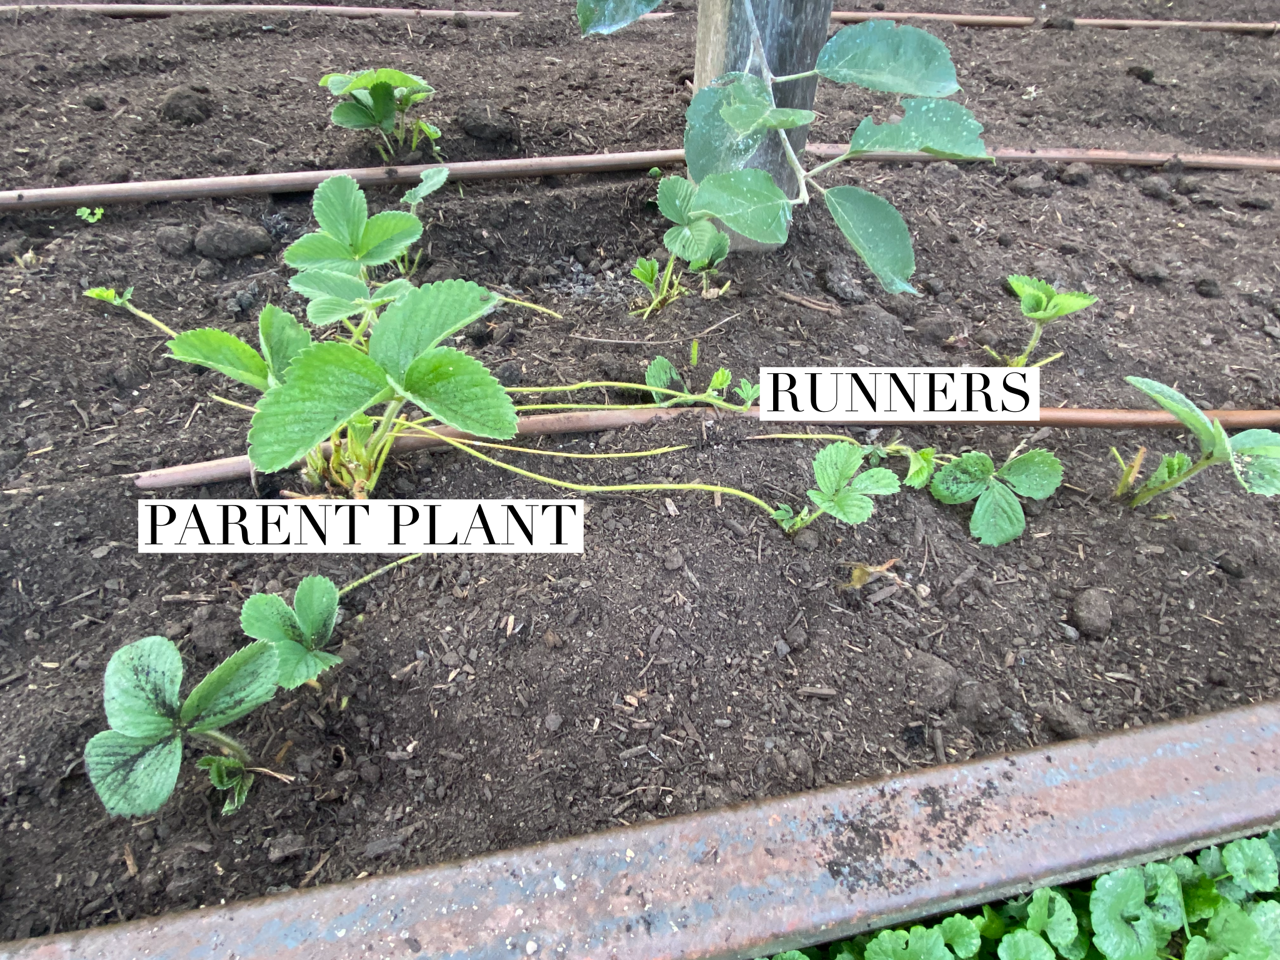
How To Renovate Strawberries
Strawberries are the most vigorous perennial fruits we grow. They give and give. But they do require some attention to give at the annual robustness of a 2 year old planting.
It seems counterintuitive, but as soon as you’ve harvested your last ripe berries in early July from your June bearing plants, you have to cut them down. Yes, that’s right.
When our beds were all in-ground, we were able to use our lawnmower set high (we keep ours set to 4”) and trim off above the crown. The crown is what you don’t want to disturb, the base of the plant at ground level. It should also not be buried deeply. Now that we have the weathered steel edging throughout our orchard, it’s not as easy to maneuver a lawnmower in there so we are now renovating by hand. Definitely a little more time, but weeding is a necessary step alongside pruning back all the old green foliage.
Why do I need to do this?
Renovating strawberries serves several purposes. First and foremost, it removes disease from your bed. Strawberries have a lot of fungal diseases, and by carefully removing the leaves you can take diseases and pests out of the bed and the new growth will be less susceptible to develop the diseases.
Second, the new growth will help develop the roots, new runners, and most importantly, the fruiting buds for next year!
Finally, this is also the time to add compost and/or fertilizer to help spur this flush of growth we are looking for to continue to grow and expand and renew the strawberry patch.
I will note that for us these plantings are only a few years old — I think this is our second year harvesting from our north orchard and third from the east, though the east orchard had immense quack grass pressure last year and so we nearly removed all strawberry plants. We only harvested this year from the transplanted plants. There is a lot of room for runners to establish this summer for a more robust harvest next year.
As such, we haven’t had to take out the oldest plants yet, but if your strawberry bed is more than 3 years old and you’ve never removed the parent plants, that is also an essential step to maintaining vigor. I look for the smaller plants (last year’s runners) and would select those as my keepers, and remove the oldest, largest ones as I’m weeding.
Step by Step Instructions
-
Cut back all strawberry foliage down to the newest leaf the crown. Do not sever any runners (if you can avoid it).
-
Thoroughly weed the bed.
-
Add slow release organic fertilizer to the bed (1/2 gallon per 4×8 bed (32 square feet) or 1-2 gallons per 100 square feet).
-
Top with 1-2” compost.
-
Bring the runners above the compost and rest on top.
-
Irrigate regularly (at least 1” per week) until September.
It gets a little loose with how old our plants are because we do move them around every year it seems, but this parent plant was moved to this location either late summer 2020 or summer of 2021. The runners you see are not yet rooted down, but will be before long and will produce berries for us next spring.
These are all young runners that have rooted down. As you can see, we aren’t holding fast to the 12” x 12” mantra.
Post Renovation
After you renovate, watering the plants is key. This helps set roots for runners and allow for the plants to uptake all the fertilizer and compost you added to the area, critical for strong foliar growth, bud formation, and even for vigorous runner development.
With our drier summer (again), we will be able to just turn on the orchard zone in the garden to supplementally irrigate that bed if the dry weather persists throughout the month of July and August, the key months for growth of these plants.

Organic Foliar Sprays
We have been using organic foliar sprays in our orchard for a few years to help curtail fungal pressure and, at the same time, build a healthy microbiome on the leaves. Last year, too little too late, we decided that maybe this would work on our tomatoes, cucumbers, and melons, all crops that seem to be predisposed to fungal pressure here in mid to late summer.
While anecdotal, so far it does seem to be making a difference this season now that we have started early and continued applying regularly. So much so that I am finally comfortable sharing our current recipe with you all.
In essence, this foliar spray works to build a healthy microbiome on the surface of the leaves, something that has proven to help plants’ immune systems reject spore colonization of unwanted fungal disease pressure.
It’s like a probiotic for our plants. Makes total sense to us, and I hope you find this useful in your gardens too.
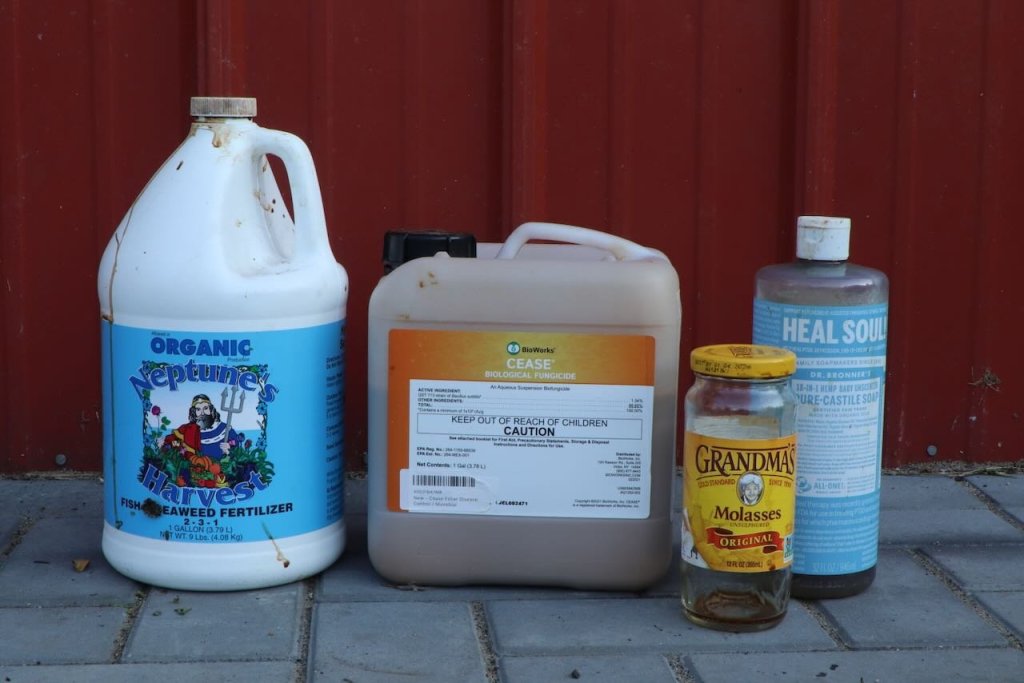
Ingredients (per gallon of water)
- 2 ounces Cease (Bacillus subtilis)
- 1 ounce Molasses
- 1/2 – 1 ounce Fish and Seaweed emulsion
- 2 drops castille soap
Because of the scale of our garden, we mix this up in a 3 or 4 gallon batch. All ingredients go into the bottom of the backpack sprayer and then you fill with water. Vigorously shake to mix it all together.
Once on your back, continue to jiggle and mix all ingredients together before application.

exc-62c4551e003d2a07584d9a45 My husband uses a backpack sprayer and applies this to our orchard, all cucurbits and tomatoes, and then outside of the garden he applies this to all of our native edibles scattered around the property.
We start applying this as soon as we transplant the plants in spring, and reapply once a week or after a rain event. Yes, it adds work to the garden, but the lushness of our plants this summer demonstrate that anchoring our weekly tasks around these prophylactic measures is all worthwhile.
For a smaller garden, starting with a one-gallon recipe should work well.

Early July Garden Tour
Enjoy early access to my monthly garden tour this week before I share via my monthly newsletter on Saturday morning.

Finding Rhythm in the Chaos of Summer
It’s here. The frenzied, manic summer garden life. Screw sleep. It’s for winter. Put down your knitting needles. Those too are for colder days. Forget TV. It’s for dreary and snowy days that are sure to return.
Living and breathing alongside a garden is a test of elasticity. It doesn’t even request your presence, it demands it. The days are long and the tasks are endless. The food is maturing and the fridge is full. It’s a true balancing act deciding each day what to prioritize. It’s sort of awesome. And can also be more than a bit overwhelming.

It is only going to get more intense, more beautiful, and more hectic day in and day out. And it’s exactly what I love about living with a garden.
On the one hand, I love this lifestyle. I am maybe a little ADD (self-diagnosed, but have you watched my Stories?!), and so playing ping pong with gardening tasks leans into my intuitive strength. (Shiny object, go fetch, Meg!). It’s like going to work and having no plan until the plan presents itself.
My weekly tasks from last week didn’t all get done (the ones I list on the MGG homepage). But I got A LOT done last week; I let the garden remind me what needed to get done. I am feeling as productive and energized as my garden.
This is living alongside a garden.
I’m soaking up the sun and long days, and despite feeling a bit under the weather (possibly you-know-what has infected me), as soon as I step into the garden, I do. It’s like an uncontrollable urge to be in the space and to listen to its call and heed its direction. It wills me into action every time. It’s so motivating.
So how do my days form right now? I definitely take inventory everyday. Writing a list is aspirational for me most days, but when I do it works wonders. (I should write that down so I do it more often.) But sometimes you wake up and see an issue that you didn’t anticipate and you have to drop your list and act. There are 5 main areas of focus for me for the next month or two.
Pests are top of mind right now, and will be through sometime in August. The next six weeks is a daily crawl for larva: Colorado potato beetles, three-lined potato beetles (they feed on tomatillos and cape gooseberries), squash vine borer (no better feeling than killing those beautiful moths!), Cabbage white (aka, cabbage moth or imported cabbageworms, though it’s a butterfly!), and soon the Japanese beetles. I’m on the lookout for cucumber beetles but they are suspiciously absent in our garden so far this summer.
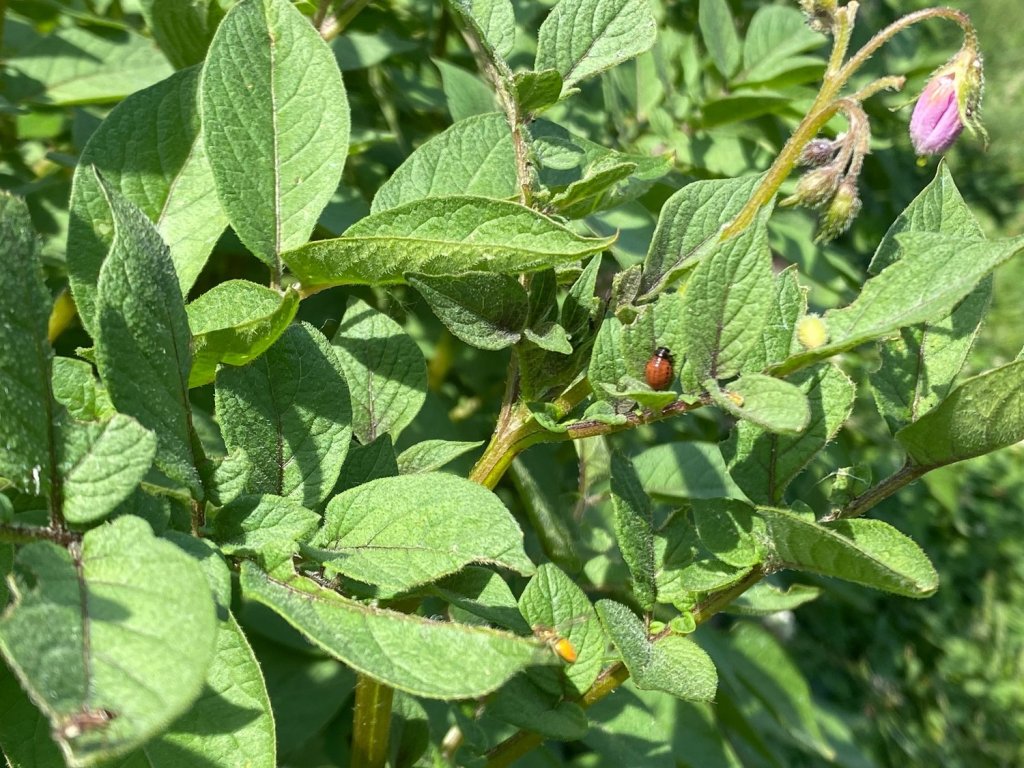
Oh those pesky Colorado potato beetle larvae. The good thing? They are sluggish and super easy to catch (and don’t coat themselves in fecal matter like the three-lined potato beetle). After the pest patrol, I water any seeds I may have miraculously sowed recently. Right now that’s the cover crop in the raspberry bed and soon I’ll add more flowers to some open spots as well as another round of sweet corn (third and final sowing!), and my direct-seeded brassica bed.
Sowing seeds in summer is the singular most challenging thing to do — and it’s the singular best thing to do as a gardener, securing extended harvests well beyond tomato season. I am loving hearing from so many of you who are taking steps toward a fall garden this year. It will be a delicious fall for so many of us, and it makes me just delighted to hear from you!
I am not hand-watering anything other than newly planted seeds; the rest of the garden is on drip irrigation that runs every other morning for 20 minutes in each bed. I’ll share more about our irrigation system later this week.
Managing the garden for trellising issues, pruning, and deadheading flowers is a less critical but also necessary task to maintain a visually stunning garden throughout summer. I prune my indeterminate tomatoes every 1-2 weeks, weather dependent. I am currently working on training all my cucurbits up the various trellises to get them going vertical.

This watermelon needed a little extra encouragement to go vertical, so I used some twine to show it the way. I’ve never grown watermelon on a wooden trellis, and this is an experiment (they are usually supported on cattle panels). Because it’s a burgeoning grocery store, the third major task of the day is harvesting, especially delicate food. So that’s definitely strawberries and to a lesser degree, our peas and lettuce. We are at the tail end of spring head lettuce season and quickly moving into heat tolerant summer lettuce territory — they will be ready to harvest in another week or two.
Amid and between and during these tasks, I am working to keep my phone away from my hands and really immerse myself in the sheer joy and wonder of the garden, the seeds we sow, the environment all around us. The hoverflies are doing their typical June thing, reproducing by the thousands in our garden — they are an aphid-eating machine in larval form, and they are so tiny you’d miss them if you didn’t know I’m making friends with this adorable robin who’s sort of taken up residence in the garden. It has a ruffled feather and a few nights ago we watched and waited while it chipped away at the ripest, most beautiful strawberry in the blueberry bed. The birds are definitely thirsty right now, so providing water outside the garden is a great way to deter this kind of snacking — but we grow enough to share, so I don’t worry. Unless this robin brings their friends, families, and friends of family … then we will have a problem.
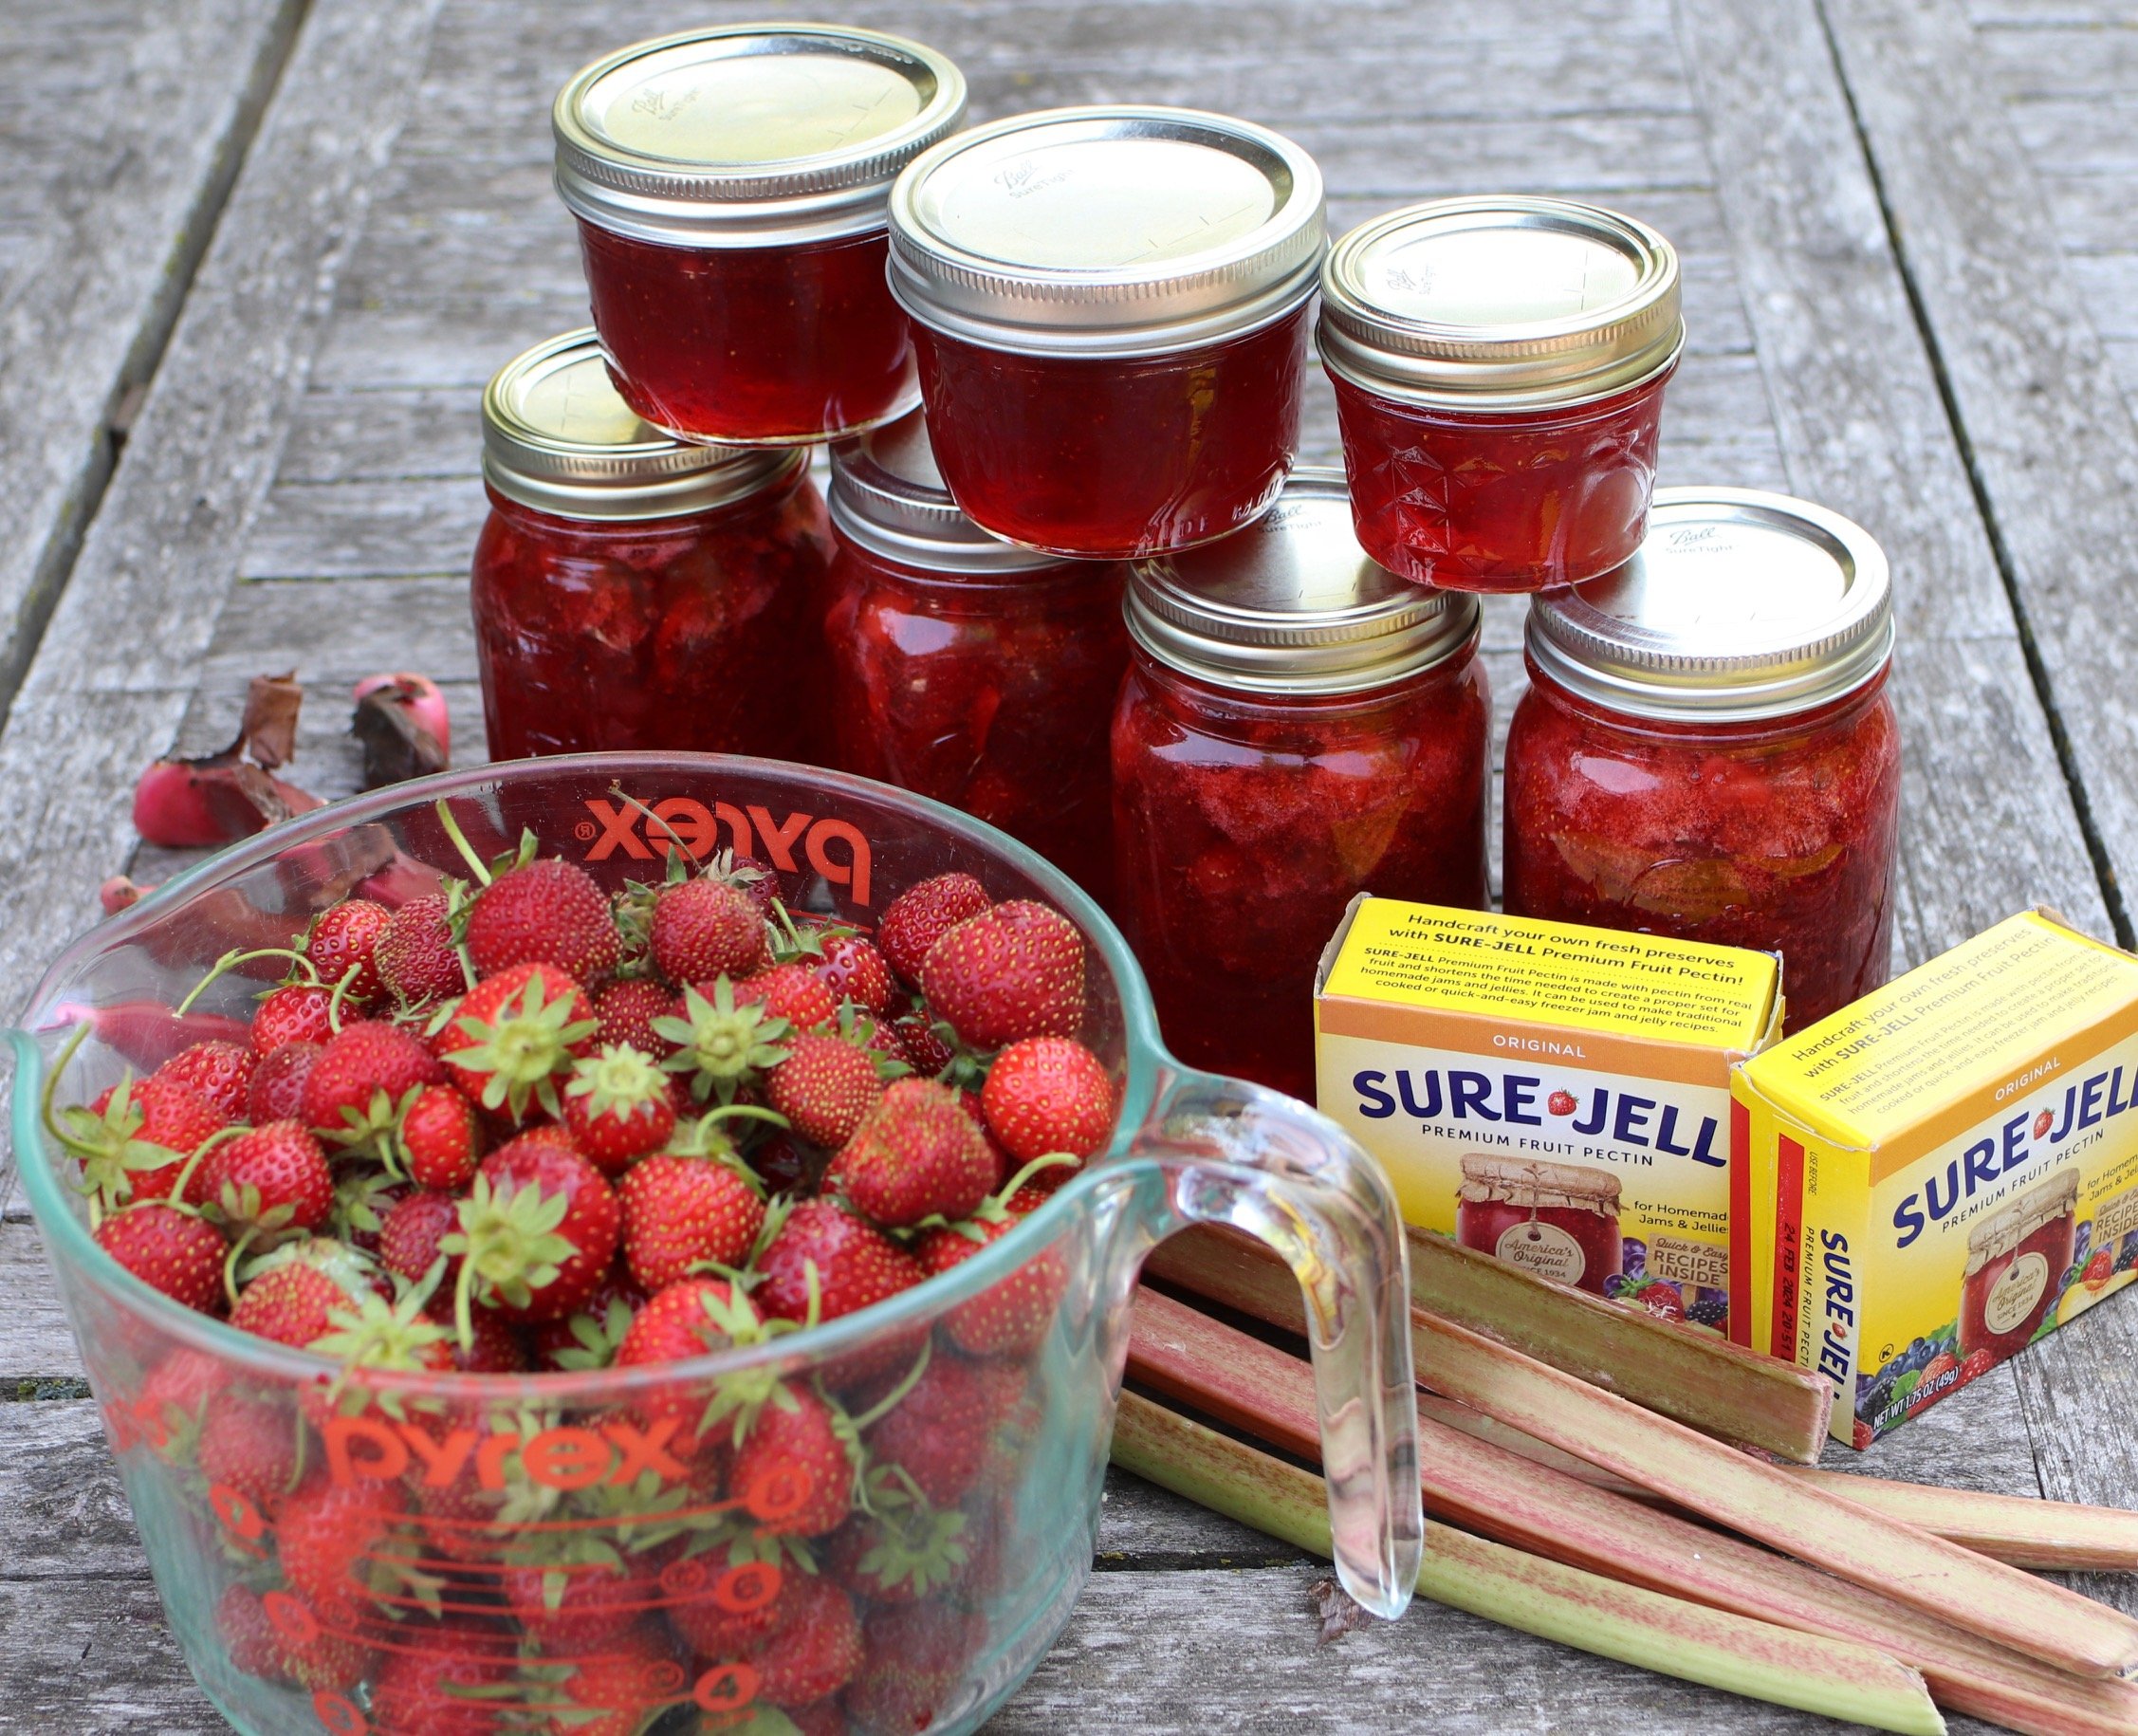
Strawberry-Rhubarb Jam
So many recipes for strawberry rhubarb has either a majority rhubarb or a 50/50 blend. Not this one. We are big fans of balanced flavor. Homegrown, sun-ripened strawberries are the best thing to come out of the garden. In fact, strawberries are just amazing in their abundance both in fruiting and in clonal propagation. To me, they are a non-negotiable for a garden of any size.
My advice: make this double recipe your minimum batch size. Our canning vat can hold 7 jars, and this double recipe yielded 5.25 half pints. I know, it’s a weird amount. The recipe purports to make 6 pints but we always yield less due to the frothing and removal of the froth.
Yield: 6 pintsStrawberry Rhubarb Jam
A strawberry-forward jam with the balance of the tartness of that odd perennial vegetable.
So many recipes for strawberry rhubarb has either a majority rhubarb or a 50/50 blend. Not this one. We are big fans of balanced flavor. Homegrown, sun-ripened strawberries are the best thing to come out of the garden. In fact, strawberries are just amazing in their prolificness both in fruiting and in clonal propagation. I think they are a non-negotiable for a garden of any size.
My advice: make this double recipe your minimum batch size. Our canning vat can hold 7 jars, and this double recipe yielded 5.25 half pints. I know, it’s a weird amount. The recipe purports to make 6 pints but we always yield less due to the frothing and removal of the froth.
Ingredients
- 6 cups strawberries, hulled and sliced (you’ll need more than 6 cups to yield 6 cups sliced!)
- 3 cups rhubarb, sliced thin
- 2 Tablespoons fresh-squeezed lemon juice (no substitute for fresh!)
- 10 cups sugar
- 2 packages (3.5 ounces) Sure Jell fruit pectin
- 1/2 tsp butter or coconut oil (optional), to reduce foaming
- 6 pint jars, or 12 half pint jars (plus a few 1/4 pint jars for extra if you have on hand)
Instructions
- Get your canning bath going before you start processing your fruit. This way, the jars will be waiting for you.
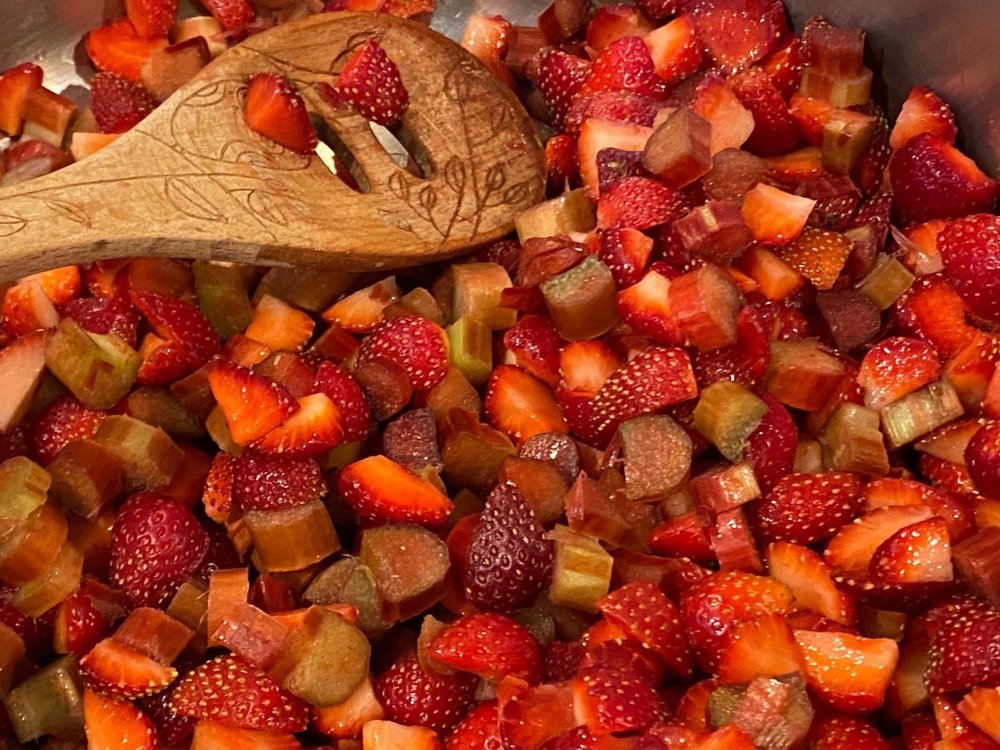 Prepare strawberries and rhubarb into a large stockpot. Add lemon juice, pectin, and the (optional) butter. Cook over medium heat until the fruit starts to release some juices, about 3-5 minutes.
 - Add the sugar, 1 cup at a time, stirring to fully dissolve after each addition.
- While you’re adding the sugar, process your jars, lids, funnel, and ladle in boiling water for 5-10 minutes. I use the canning pot for the jars and a smaller 3 quart stockpot for the lids, rings, ladle, and funnel. I let them sit in the hot water bath, steaming, waiting for me.
- Once fully incorporated, bring to a full boil and cook for 1 minute on medium high heat.
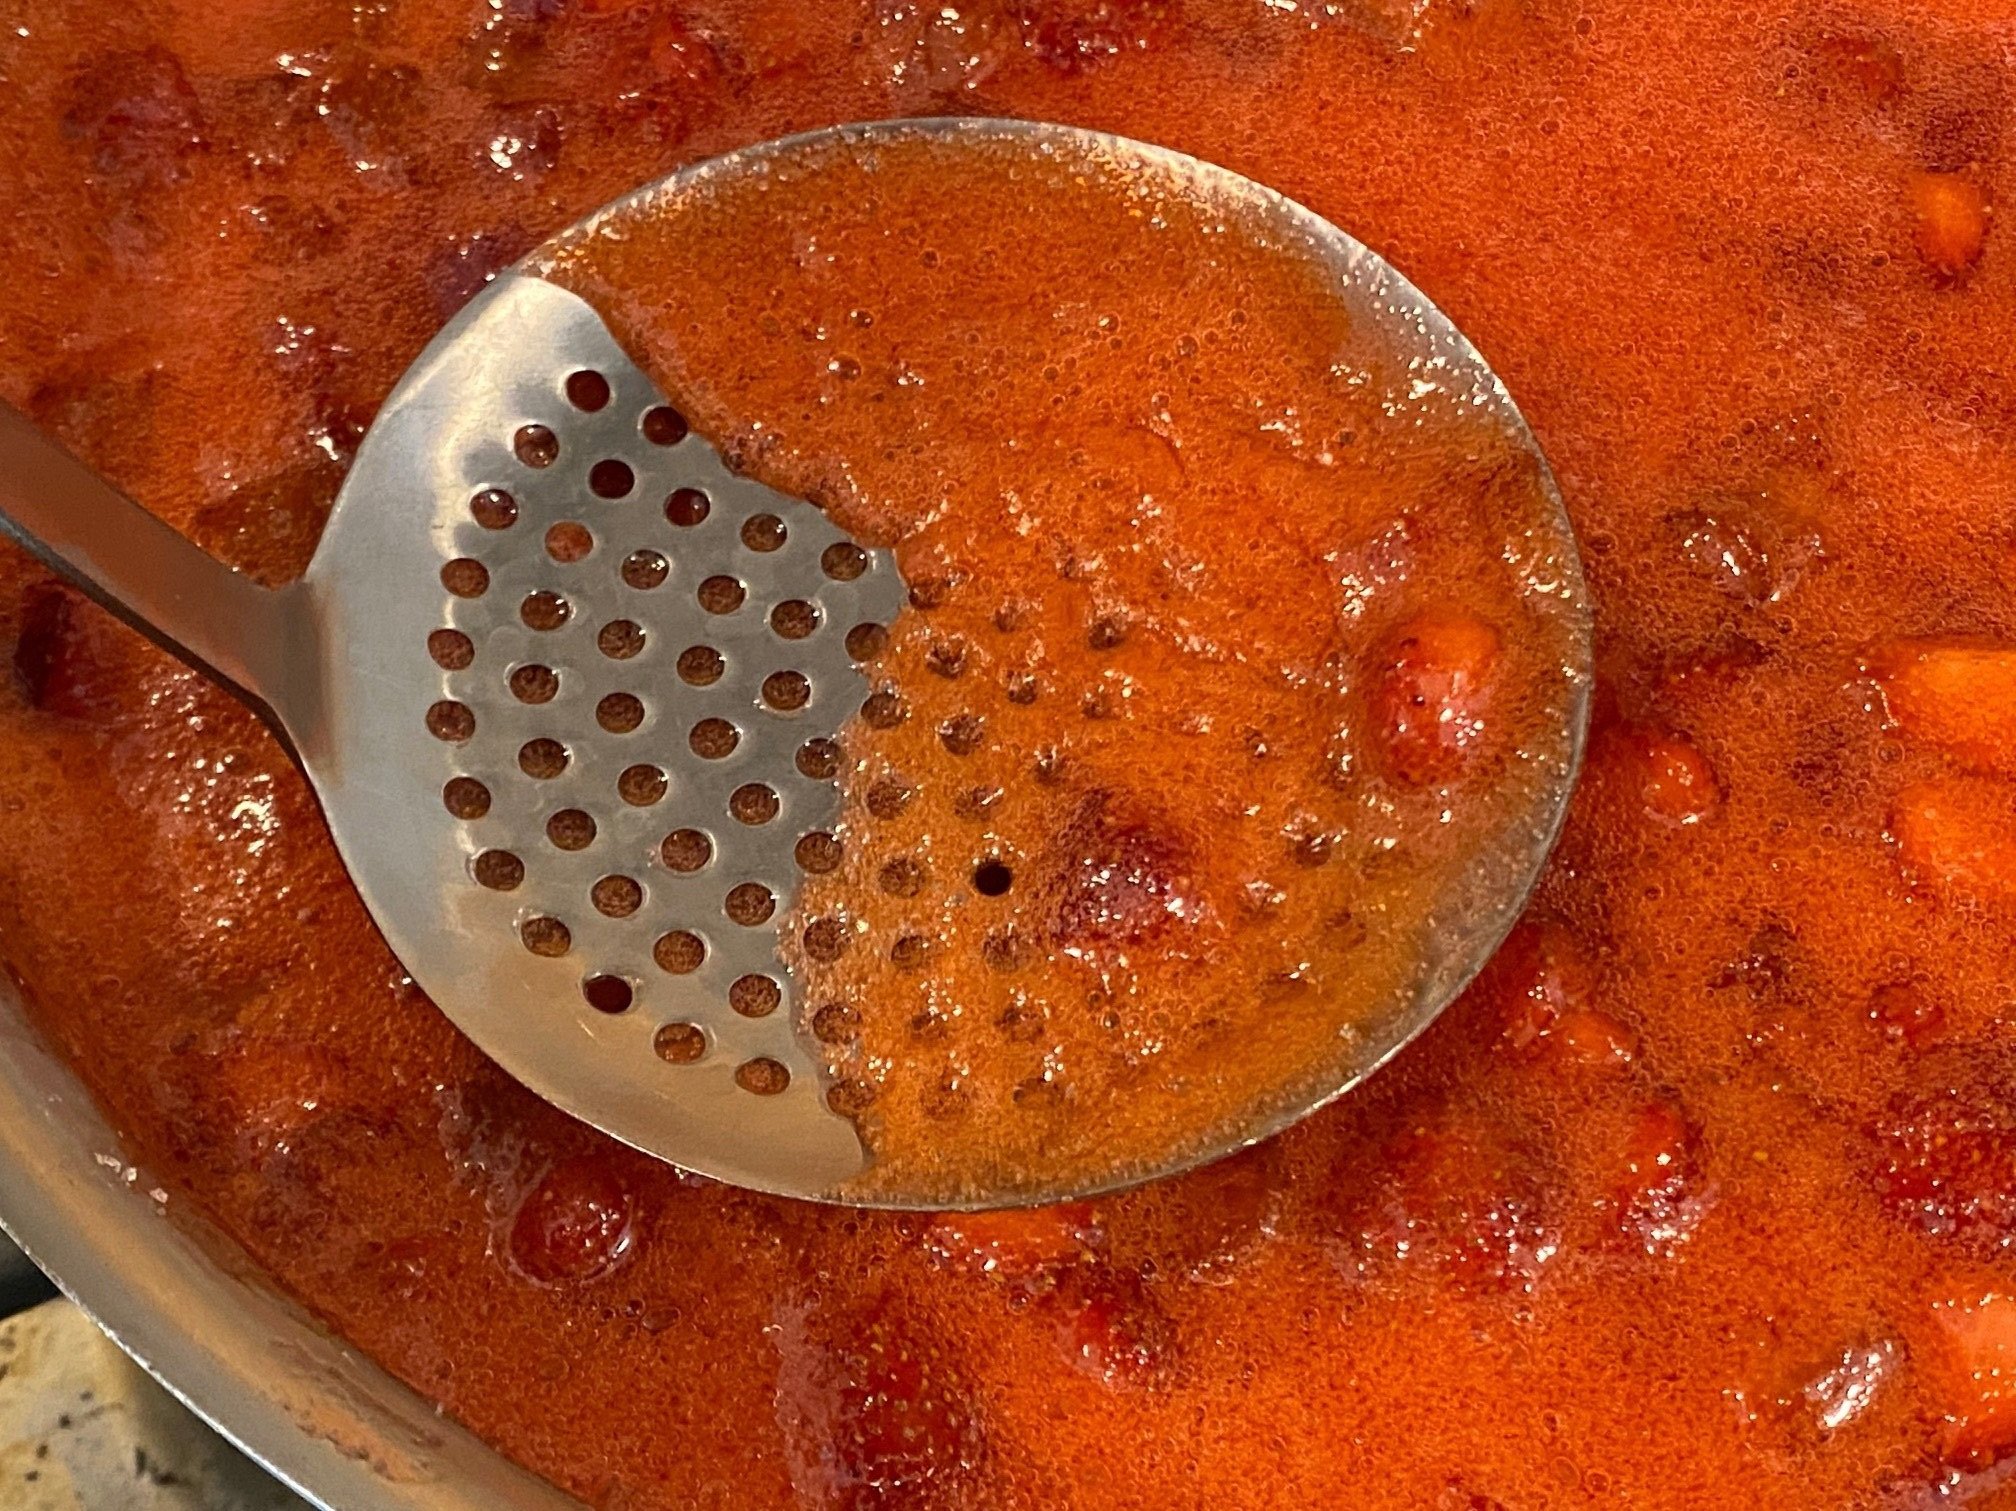 Skim off the foam. Carefully ladle into jars, filling to 1/4” of top.
 - Dampen a paper towel and run it along the rims of each jar before carefully placing the lid on top.
- Screw the the ring on, but not too tightly.
- Boil in a hot water bath with a canning rack on the bottom for 5 minutes. Remove from hot water bath and place on a towel on the countertop. Let cool and set for 24 hours before moving.
Notes
Note: There’s a good chance you’ll have an odd amount leftover, that’s why I always prepare more jars and some smaller ones for odd leftover quantities. Worst case, you don’t process a partially-filled jar and put it right into your fridge for consumption in the next few months.
Be sure to use the same pectin as sugar amounts vary from brand to brand.

Why I Support my Bush Snap Beans
We used to only grow pole beans. Then we met Japanese beetles and they loved our pole beans. So we decided to try growing bush beans. They loved them less. We grew both types for several years, but there are tradeoffs to each.
With pole beans, it’s easier to harvest but acts as a trap crop for Japanese beetles. With bush beans, they largely ignore them but it’s back-bending work to gather the large flushes of snap beans.
The lower pest pressure won us over, and I now try to string my bush beans up annually to help them stay off the ground, which mitigates slug and other soil living pest pressure too. It also, cleverly, makes them much easier to see and harvest — a time saver.
We use small scrap cedar boards that are sometimes used to stake peppers and such. We place screws at 8” and 16” high and run twine, using the screw to fasten the string to so it won’t sag or slip down.
I am careful to lift the plants from underneath to support all of the vegetation as I’m doing this. Because bush beans top out around 24”, I find just 2 loops of twine at 8 and 16 inches is plenty of support to make bush beans a much more enjoyable crop to harvest.
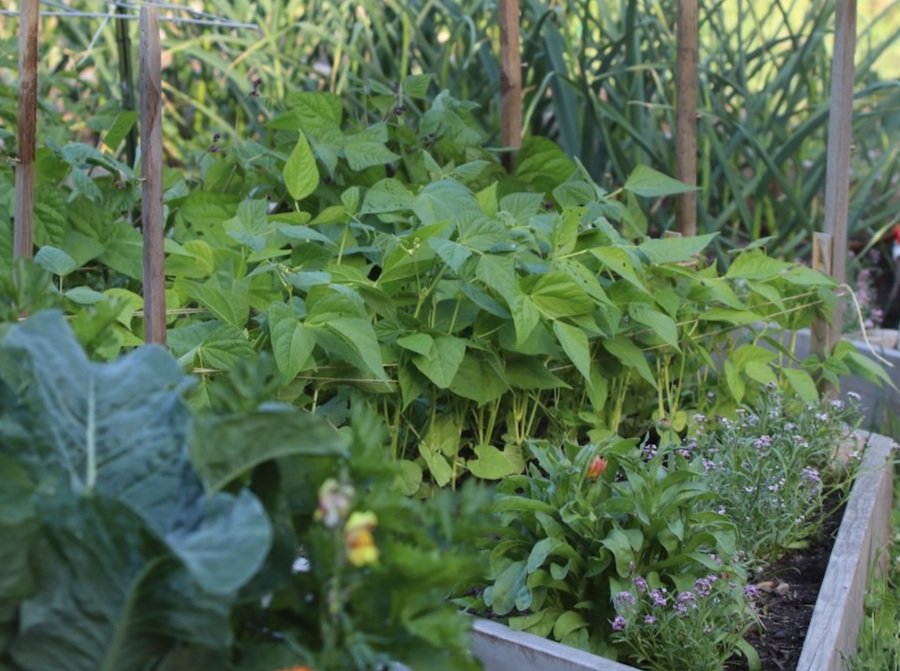
Give your bush beans a lift. It makes everything about them better in my opinion. A bonus is that it opens up the space between the rows (if you’ve given them 18” between rows) for the interplanted leafy greens or radish to have plenty of room to mature, too.
Hope this helps some of you manage space and ease of harvesting this summer!

How to Find Room for a Fall Garden
There is so much potential for a spring garden to become your fall garden. When we do this, we don’t need to find the space because it’s already allocated. It’s a natural progression from one season to the next.
Space is likely at a premium in your garden. I admit our space is, well, spacious. It took us over 20 years of gardening to finally achieve this garden and to be relatively equipped to plan and execute a garden of this scale. I truly believe the slow evolution of gardening is its greatest gift to the gardener, and I’d argue it is also its most essential aspect in this day and age with so much information out there to consume about … everything. The garden teaches us in its own time, measures in weeks, seasons, harvests, and years.
Even with our sprawling raised beds, I make a concerted effort to plan the garden for extended fall harvests. I want to break it down for you so you can find a path, even at this moment without having a plan, to some possible fall garden vegetables to add to your garden sometime this summer. A fall garden starts now. It starts in 3 weeks. It starts in 6 weeks. And yes, it also starts in 3 months. Jump in anytime that works for you. I promise you will be delighted at the drive for these plants to produce for you.
I hope you can see one or more paths in your garden right now to deeply extending what you are able to harvest come deep autumn. Or, maybe you’re taking this all in for a future season because managing a summer garden is achievement enough. Our gardens are ours to create and tend, meeting our hearts, time, and resources right where they are at. And that’s the best part.
The Fall Garden as the Only Succession
This is what I do for my most slow to mature, full season cabbages and my Brussels sprouts. I’m talking 87-120 day varieties. We enjoyed green cabbage until January this year, thanks to our root cellar. We could have had a few more heads in there to get us into February. We will see if I am able to time it better this year.
Timing is definitely a tricky thing, and you’ll want to play with your seasons for a few years so you can gain a better understanding of how different veggies perform. For me, I start those cabbages around June 10; they mature usually by late October, around a time when we head into our shortest days and thus the plants stop growing. So if the weather is good, we can leave them outside in their garden refrigerator for a few more weeks.

Look at those densely planted full season Brussels sprouts. No room for interplanting there. This is a mid-July garden view circa 2019.
However, an extra warm summer can and has caused my cabbages to mature too quickly. Also, I remember my first serious fall garden for the root cellar back in 2017 and I proudly told my good friend who at the time was an organic farmer how I transplanted my cabbages in mid-August and she flatly said “oh they will never mature in time.” I was determined to prove her wrong, but she was right. I got a few small cabbages, thanks to a prolonged fall, but nothing like I am able to produce now with sowing them 5 weeks earlier!
If you have open space right now and you haven’t dedicated it to a summer crop, consider some Brussels sprouts or late season cabbages (as mentioned, they take 3+ months to mature). Even just a small space — 2 feet wide, is enough for a cabbage or two. In the meantime, you can interplant some cilantro or arugula or even some low-growing flowers like sweet alyssum, so the space can have a dual purpose in the short term, too.
I am currently using my Brussels sprouts plantings for my heat tolerant summer lettuce. They pair perfectly for a quick dual purpose succession planting. I had no plan for where those lettuce were going, so this ended up being the only and best space for them.
Planting a Spring Garden
This is paramount to my epic fall harvests. I feel as passionate about spring gardening as I do about summer and fall. I want to help you consider how starting a garden extra early can be the perfect timing for a fall garden too. Here in our climate, that space opens up right around early to mid-July …. the ideal time for fall peas, fall carrots, and those fall cabbage seedlings I mentioned in the section above. So, I tie up square footage for fall by enjoying my first succession in May – July! This is probably the very best way in my opinion of creating space for the fall garden, because it is productive for more of the season. If you are short on space, this is the recommended path to a fall garden.
One of my favorite spring garden resets is my fall carrot garden after my earliest cabbages, broccoli, and bok choy.
I gave a talk earlier this winter locally and I tried to impress upon the audience that after your shelling peas are done you can drop kohlrabi, bok choy, napa cabbage, carrots, or watermelon radish seeds in after them. Then I asked the audience, what do you plant when your peas come out?
Dead silence.
Then one brave woman said with a sheepish giggle, “Spinach?”. I practically collapsed thinking of all these gardens that aren’t replanted after the peas come out!
Renewing the Summer Garden
I didn’t always enjoy the fall garden like I do now. For years our garden ended at first frost — and I was ready for it! But the more I strive to feed us for longer straight out of the garden, the more value I place on being very proactive with my garden in summer to renew spaces.
There are plenty of things you may have planted in the past month that will complete their life cycle in time for a fall planting. There won’t be enough time for Brussels sprouts or massive heads of cabbage, but there is pretty wide array of vegetables, particularly leafy greens and herbs that you can plant as late as mid-September in Minnesota (which is just a few weeks before our average first fall frost) and harvest in late fall (and spring, as some will overwinter).
Here are some examples of current summer garden plantings that will yield to a fall garden.
Pickling Cucumbers. I plant a LOT of pickling cucumbers so we can can for a few weeks and be done with that space. Bam! I just freed up an entire 4×8 raised bed for a fall garden. Maybe I’ll drop in watermelon radish or daikon radish seeds at that time in August, or perhaps I’ll put some kohlrabi seedlings I sowed around the 3rd week in July. Possibly I’d use it as a direct seeding bed for napa cabbage and bok choy, too. There are so many ways to replant the garden in about 8 weeks before your frost.

Out with the pickling cucumbers in mid-August and in with the daikon watermelon radish, and napa cabbages.
Determinate Tomatoes. I could do the same with my determinate tomatoes. I aim for those to be mature in late August to early September. That space could be planted right away in some late fall / early spring vegetables, including bunching onions, spinach, cilantro, and radishes.
Potatoes are another spacehog in my garden, and I admit I leave them in the ground until late in fall. If you are growing your potatoes largely for fresh eating, get those tubers lifted and replant that space with some greens for extended fall harvests — mustard greens, Asian greens, arugula, head lettuce, etc. Our potatoes are usually ready by the end of August but I leave them resting underground until October sometime when our passively cooled root cellar has moderated (it takes forever to drop temperature in autumn as it’s on a south-facing wall).

Potatoes are most often 70-90 day varieties, and that means they can be harvested and the space replanted — even if the space is a grow bag!
Summer squash is another favorite for ripping out prematurely. I have become more and more aggressive with this approach, especially in the last few years as I have seen squash vine borers in our gardens since 2019. They don’t usually devastate our plants, and in fact my kabocha survived their gnawing and went on to produce heftily. But, if I can do my part to disrupt their lifecycle and minimize the number of larvae that end up pupating overwinter in our soil, all the better. And by doing this, I open space for more veggies. I plant two distinct successions of summer squash annually. One is now, transplanted as seedlings. The other will go into the garden in late July again as seedlings, for late August and September production.
Onions and Garlic naturally mature about 8 weeks before our first fall frost here. This makes their space a premium for all kinds of vegetables. In my book, I created a visual diagram about what you can plant in summer depending on how many weeks before your frost. My intention with this was to make the information as zone-friendly as possible.
Strategically Interplanting
If space is really at premium and you want to add those extra successions, you can work on interplanting seedlings like kale, head lettuce, or bok choy under some of your vining crops come mid- to late summer, depending on your growing zone. They won’t thrive under the part shade of the overstory canopy, but once you carefully remove those plantings, those plants will be able to really take off.
Beets, carrots, and green onions are another potential strategic interplanting at the edges of vining crops. Maybe your tomatoes are diseased and tired in August. Perhaps your vertically grown winter squash is dying back. You could try putting a row of carrots and beets in front of the plants on the south side of the bed. Your tomato plants would need to be pruned for enough light to penetrate the soil at the edge, but if this is the case, this would be another great way to start the next succession while the main plants are still producing. When it comes time to remove the overstory/dominant plants, I recommend cutting the plants at the base and let the roots remain intact — they will decompose and it minimizes soil disturbance, which could cause some distress for any root veggie seedlings you may have growing nearby.
Planting a Fall Garden .. in Fall
This was an oddly wonderful discovery a few years ago — that I could plant seeds as late as the Autumnal Equinox and harvest food a few months later. Decreasing sunlight is our biggest threat for our fall garden, so timing all the vegetables I mentioned already is a delicate balance between planting early enough to reach 75% maturity before mid or late October and not too early to mature in say September. I have experienced too early and too late and each year some things excel and mature too early, but as we continue to push our later plantings and exploring even more fall garden companions like napa cabbage (crazy cold hardy and excellent keepers in storage, highly recommend!), we are creating a more elastic plan that will look and taste different every season.
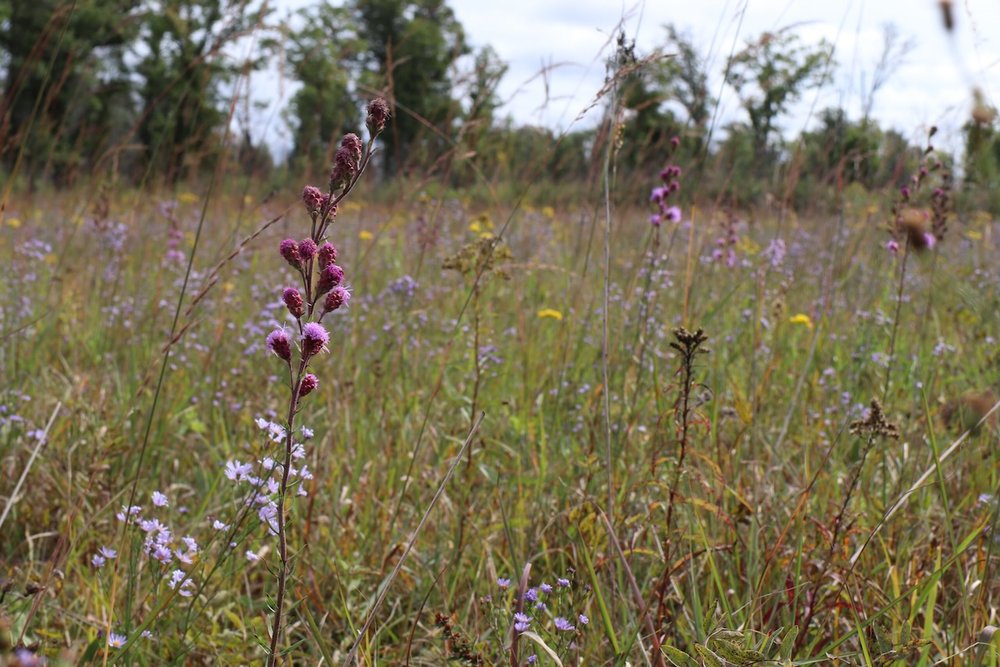
In the end, I hope you will take this concept to think like a natural ecosystem to heart. I am always in awe of our native prairies here, and how they flower from May until October, just like our gardens should be producing for us — and not just modestly, look at all this nectar in a fall garden! Truly inspirational.
In actual fall (late September), I direct seed spinach, cilantro, arugula, radishes, green onions, and garlic. If you like the texture of leaf lettuce, this would be a great time to sow those seeds too. Mustard greens, broccoli raab, and baby bok choy are worth adding to this list as they only take 40 days to mature and I think would work as well. I will take notes right now to sow those all on the equinox this year — will you join me?

I have not figured out the timing of broccoli raab in my climate, but I do think it needs to be sowed much later than I have. Even an August sowing ended up looking like this during an October “heat wave”. The Late Fall Plantings
Garlic always gets planted in late October for me, which used to be 4 weeks after first frost but these days it’s more like 2 weeks after first frost. It’s all about getting them in the ground before it freezes for me — and that’s it. More on garlic as the season progresses.
These are all merely examples of my own favorite vegetables to interplant in summer for fall. Your seed choices might look quite different because of what you love to grow, and your timing. I hope this read sparked ideas for seeds you’d like to try in summer or fall this year to extend your harvests and feed yourself for longer.
Early June 2022 Garden Tour

Planting the Space Between
I keep finding space amid plantings to interplant. It’s a good reminder to scan your gardens for spaces to pair with the right plants.
As I walked around the garden with my hardened off tray of Brussels, sprouts, summer cabbage + broccoli, basil, dill, beets, and lettuce, I focused first on the long-season vegetables. The Brussels sprouts will root down and be in place until November in the garden, assuming the ground doesn’t start to freeze up before then (time will tell). Interplanted between the Brussels sprouts, which are generously spaced between 24-30” on center, I dropped some of the heat tolerant lettuce in between, knowing it will mature quickly and before the sprouts really take hold.
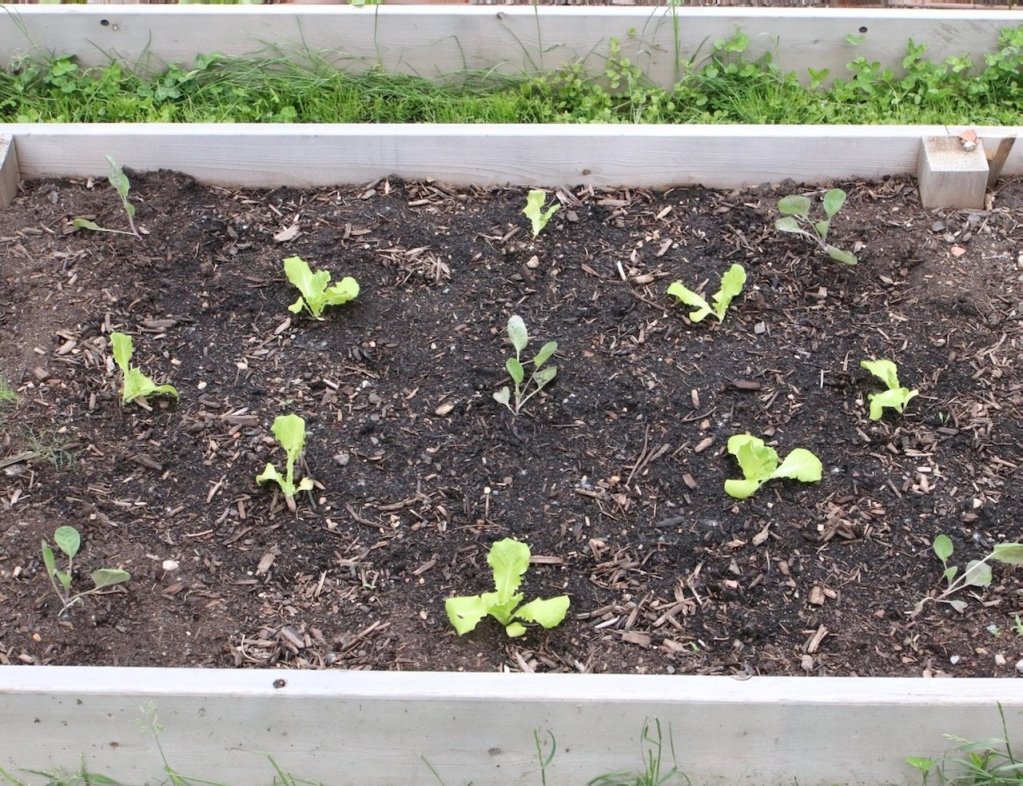
5 Brussels sprouts and 8 heat tolerant lettuce in a roughly 4-x6 foot space.
As I shared in my Instagram stories last week, some of my softneck garlic was looking very sad and wilting. Its never happened to me, and I pulled it all this weekend. I saw this gap as an opportunity to plop something into those empty spaces. Beet seedlings turned out to be the most logical vegetable with it’s modest leaf area and shorter stature than my garlic, which is well on its way to producing scapes. I’ve never interplanted my garlic before, but I’ve also never had gaps this large in my garlic bed, either. So this was a new way for me to interplant, and I’m looking forward to watching how it unfolds over the next 6 weeks or so.
My other favorite interplanting vegetable is radishes. They rarely get their own square footage here, save larger daikon and watermelon types. I wanted to add one more row of quick radishes for late June meals, so decided to saddle up on the outside of my first succession of bush beans, which already has two rows of radishes between the rows that are nearing maturity. Nearby this seeding are zinnia and nasturtium but again, I believe there will be plenty of time before these canopies close for the quick radishes to plump and swell.

My goal is always a “closed canopy” as the interplantings near maturity. This one is making my heart sing. Bush beans sowed 18” apart with radishes sowed in between on same day.
My very favorite new to me interplanting this spring was with my bunching onions. I decided to plant them in, well, bunches! It makes them a quick harvest, grabbing a bundle as needed for suppers. I chose to interplant them with our earliest brassica bed and you guys, it’s been the greatest joy to watch them spike up. Visual interest is so important in our food gardens, and this is truly my new favorite thing!

The interplanted spring onions add an undeniable depth and interest to this spring succession, a planting strategy I will carry forward indefinitely.
The name of the game is mixing maturation rates and stature in a way that the interplantings can thrive in the same space. Are you trying any new interplantings this season?
Determinate Tomato Trellising Experiment
We love our cattle panels. They are economical, sturdy, and highly functional. They store easily behind the barn all winter and we’ve been using them for the past 3 seasons for our tomatoes.
We’ve used cattle panels in a similar manner for both determinate and indeterminate tomatoes. If you grow both you know they don’t have the same growth habit, and I’ve not been entirely pleased with the results for determinate tomatoes. I really wanted to think of a different way to support our determinate saucing and paste tomatoes, and as I was walking the garden this spring it dawned on me.

Turn the panels horizontal instead of vertical. I had already wanted to do something like this for the tomatillos, and in this moment it was decided. We would set our panels parallel to the ground, about 21” above the soil line, and secure with 3’ u-posts and zip ties.
What We Did
I made the best use of what we already had, and it turned out I just happened to have the right lengths for the space I’d already allocated for determinate tomatoes. That was lucky, because it usually doesn’t work out quite that well! I used a 6’ and 8’ long panel and spaced the plants out around 28” apart with 30” spacing between rows. This is pretty similar to plant spacing for my indeterminate tomatoes too, though recently I’ve read you can space determinate plants closer together.
Cattle panels are 50” tall (or in this case, wide). Our beds are 48” wide. I didn’t want to modify the panels as this may be a one season flop, so I wanted the panels to remain intact throughout this experiment for maximum flexibility for future trellising needs. It works perfectly though — I centered them so only 1” hangs off on either side and the lawnmower can get down the paths without bumping into these at all. This was my most pressing concern when I decided to try this out.
This wide angle photo grossly over-emphasizes the overhang of the panel into the paths, but what I want you to notice is the 5 posts and zip ties securing this 6’ long panel.
For the 6’ length, I used 5 stakes — about 1 foot in from the corners and one in the middle. I will eventually add stakes (likely cedar as we have lots of small cedar stakes in the barn) to help the plants reach the trellis, but for now they are settling in and putting on new growth.
For the 8’ panel, a common length for our indeterminate trellises, I used a total of 8 stakes — 3 on each side and two equidistant in the middle. The middle stakes are critical for stability and future tomato gluts weighing the panel down as it really locks the panel in securely.
How We Liked It
We LOVED this new way to trellis determinate tomatoes. We are now using it for our tomatillos, too. I could even see this work well for peppers also, but I haven’t tried it for that yet.
The one thing we didn’t love was how close we spaced our tomatoes last year. It was the only tomato bed to exhibit a fair bit of disease pressure (and it was our Paisano plants in particular). So instead of two parallel rows, this year we did a zig zag pattern which should give the plants more breathing room. It did require allocating more square footage to these plants, but since they are a weekly staple, it seemed a reasonable ask to allocate more space to them.

Deconstruction Commencement
A bittersweet moment indeed, the week when the garden is beckoning to be harvested in earnest, indefinitely. It happened last week, and I waited until a photo shoot for an upcoming feature to break the ice (if you’re local, be sure to pick up this Sunday’s Star Tribune). Fortunately, this year I am committing to harvest at a steady rate so that we have a little bit of fresh produce at the ready indoors every day of the season. This way, I may avoid massive, overwhelming spring harvests — that’s the hope, at least.
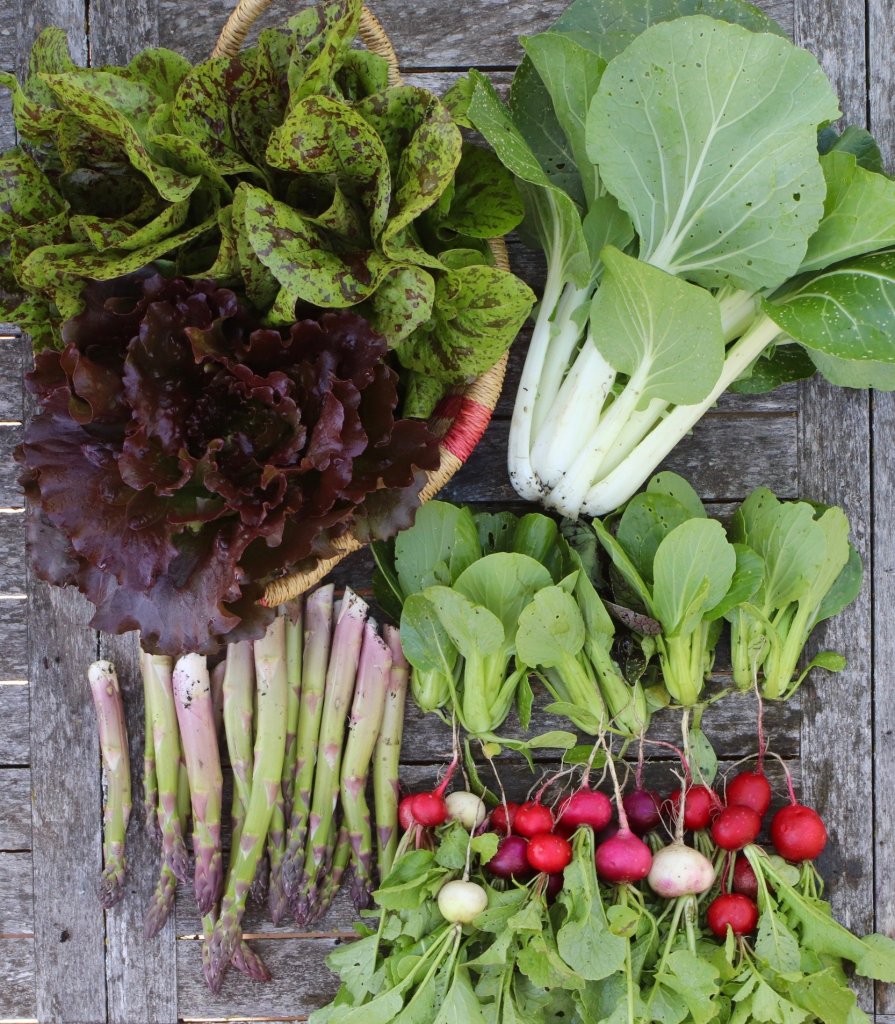
It’s a funny thing how attached we grow to our plantings. But it also makes a lot of sense. As a mother, it’s not unlike the bittersweet passing of milestones in my children’s lives. On the one hand, I delight in their growth while simultaneously mourning a time gone by, never to return. Each time we plant our gardens they are each as unique as every moment of our lives. They are dynamic, fleeting, and filled with immeasurable hope and love and joy. So taking the harvesting knife to these carefully designed blocks of edible art is never easy. But then again, what about life is supposed to be easy, right?
For me I think it’s in part the desire to slow life down, to freeze frame some aspect of my life. To possibly wield control over something, anything, in my immediate life that most often feels and is, frankly, completely out of control. This has intensified exponentially in the past five years. It’s also that these plants become fast friends. Am I the only one to share some of my deepest internal thoughts, hopes, and dreams with my garden companions?
Head lettuce is also mentally challenging to chop down. Last summer I was so attached to our iceberg lettuces that they ended up going to seed instead of in our bellies. True story, and as soon as I saw the flower stalk push through the middle of the head, I knew I had to just enjoy it. This year I’m aiming for more salads.

One way to really embrace the deconstruction is to intensively plant your food. At this point, my bok choy is starting to shade out the neighboring kale, my anchors of these beds in summer and fall. So I endured only minor pangs of despair when the first head was decapitated. The salad turnips are also encroaching on the available light for the scarlet kale so they must go, tool.
I’m embracing harvesting entire heads this season where in past seasons I would harvest individual bok choy leaves until sometime in June. Often, the plants would be nearing flower stage before I harvested the heads, so in an effort to really live in the season and embrace these early flavors, I am actively working on more actively harvesting food each day. We have about 10 heads of bok choy remaining for spring and early summer, plus the baby bok choy. I am thinking I’ll sneak in a few rows of baby bok choy under one of my bean trellises next week for early July stir fries.
The more we harvest, the faster these early beds will open up for their second succession. It’s almost like composting yesterday’s thoughts to open space for tomorrow’s dreams. Embracing the hope and surety of late summer beans and carrots is motivation enough for me to head out into the garden with our sharpened harvesting knife, a basket, and gratitude for the plans that came to life this spring.

Kohlrabi Slaw
I get asked a lot about what to do with kohlrabi. It’s really fun to grow, but for many it’s a culinary enigma. It can be roasted, shredded and fried into fritters, diced up into veggie chips for guacamole or hummus, or, my favorite, julienned and marinated in a light dressing. Making this the morning you will serve it gives it plenty of time for the flavors to meld together.
This spring we are still another week or two away from fresh kohlrabi, but we will definitely be making this a few times in June for dinner. It’s also a delicious and coveted leftover for lunch the next day in our house.
Yield: 3 servingsKohlrabi Slaw
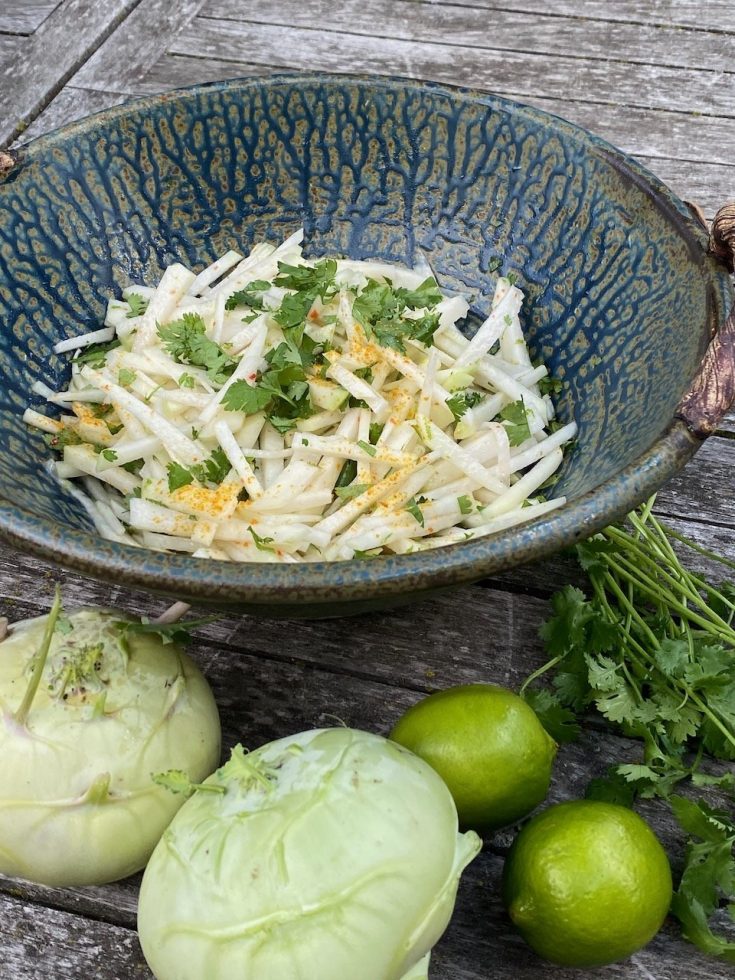
Ingredients
- 3-4 kohlrabi, peeled and shredded (or julienned)
- 1 jalapeno sliced thin – or a splash or sriracha, heat to your liking
- 1 bunch cilantro, to taste
- 3 limes, zested & juiced
- 1/4 cup peanut or vegetable oil
- 3 T rice vinegar
- 1 T honey
- 1/2 tsp sea salt
Instructions
- Start by processing the kohlrabi. Peel with a paring or other small knife, then either shred manually or with a food processor, or take the time to cut it into really small sticks. (I prefer it this way as it stays a bit crunchier).
- Add the cilantro and pepper to your preferred liking.
- Grate the limes onto the veggies, then juice the limes and combine with oil, salt, rice vinegar, and honey. Whisk until emulsified and pour over the kohlrabi, pepper, and cilantro.
- Let sit for an hour or more before serving.
- Before serving, add a dash of cumin, paprika, or hot pepper flakes.